


How to Install Fiber Cement Siding Like a Pro
You’ve chosen fiber cement siding for its durability and good looks—a great choice. But a perfect finish is all in the details. While the material is forgiving, a successful installation hinges on getting a few key things right. Proper expansion gaps, the correct fasteners, and flawless flashing are non-negotiable for a weatherproof seal that lasts. This guide focuses on those critical steps. We'll walk you through the process, helping you avoid common mistakes to ensure your home not only looks fantastic but is also protected from the elements for years to come.
Key Takeaways
- Prep Your Walls and Protect Yourself First: A successful project starts with a solid, dry wall protected by a moisture barrier and proper flashing. Just as important is protecting yourself—always wear a dust mask and safety glasses when cutting fiber cement panels.
- Respect the Material's Unique Needs: Fiber cement requires specific handling. Use carbide-tipped blades for clean cuts, leave expansion gaps at joints to prevent buckling, and use blind-nailing techniques for a secure, flawless finish.
- Finish Strong for Lasting Results: The final steps are crucial for durability. Seal all gaps around trim with flexible caulk, paint every cut edge to block moisture, and perform a quick annual inspection to keep your siding looking new for years.
What Exactly Is Fiber Cement Siding?
Before you grab your tools and start measuring, let's get clear on what fiber cement siding actually is. You’ve probably seen it on homes in your neighborhood without even realizing it. It’s a super popular choice for exterior cladding because it’s incredibly durable and versatile. Think of it as the chameleon of siding materials—it can look like wood, stucco, or masonry, but it comes with a unique set of benefits that those materials can’t always match.
At its core, fiber cement is a composite material engineered to withstand the elements. It’s resistant to fire, rot, and pesky insects, which is a huge plus for long-term peace of mind. Unlike wood, it won’t warp or swell with moisture, and it holds paint much longer, meaning less maintenance for you down the road. This makes it a solid, reliable choice for protecting your home’s exterior while also giving it some serious curb appeal. Whether you're a homeowner planning a renovation or a contractor sourcing materials for a new build, understanding what it’s made of and why it performs so well is the first step to a successful installation. It’s heavier than vinyl and requires specific handling, but its longevity often makes the effort worthwhile. In the following sections, we'll cover its composition, common styles, and what to expect in terms of cost.
What's It Made Of? (And Why You Should Care)
The name 'fiber cement' gives you a pretty good clue about its ingredients. It’s a simple but powerful mix of cement, sand, water, and cellulose fibers (which are essentially wood pulp). The cement and sand create a tough, durable base, while the cellulose fibers add flexibility and prevent the material from becoming brittle. This combination is what gives fiber cement its strength and resilience against everything from harsh sun to freezing rain. Because it’s mostly cement-based, it’s non-combustible, offering excellent fire protection. Our selection of fiber cement boards is engineered with this exact balance for maximum performance.
Finding Your Style: Popular Siding Options
One of the best things about fiber cement is its versatility. It can be manufactured to mimic almost any other siding material. The most common styles include traditional lap siding that looks like wood planks, shingles for a classic Cape Cod feel, and large, smooth panels for a clean, modern aesthetic. This flexibility makes it a great fit for a wide range of architectural designs, from historic renovations to contemporary new builds. While the installation process has some similarities to wood siding, it requires specific techniques and tools to get it right. That’s why it’s a go-to for both residential and commercial projects where both durability and specific design wall panels are required.
How Much Does Fiber Cement Siding Cost?
When it comes to budget, think of fiber cement siding as a long-term investment. It generally costs more upfront than vinyl siding but is often more affordable than wood or brick. The real value comes from its longevity and low maintenance needs. With proper installation and care, fiber cement siding can last 50 years or more, saving you money on repairs and replacements over time. Keep in mind that installation costs can be higher because the material is heavy and requires specialized cutting tools. For contractors and builders, we offer trade application discounts to help manage project costs without compromising on quality.
Breaking Down the Costs: Per Square Foot
Let's talk numbers. When you're looking at the material itself, fiber cement siding typically runs between $5 and $14 per square foot. This price range accounts for different styles, textures, and whether the siding comes pre-primed or pre-painted. For comparison, it’s a step up in price from vinyl siding, which usually falls in the $3 to $12 per square foot range. The higher initial cost of fiber cement reflects its superior durability, fire resistance, and authentic appearance. Think of it as paying for a product that’s built to last and requires significantly less upkeep over its lifespan, which can be a smart financial move in the long run.
Typical Project Budget for a Home
To get a clearer picture of the total investment, it helps to look at an average project. For a standard 1,500-square-foot home, you can expect the total cost for a professional fiber cement siding installation to be somewhere between $7,500 and $21,000. A good middle-ground estimate for a full installation often lands around $14,850. This figure includes not just the siding panels but also labor, supplies like trim and fasteners, and other necessary materials. Of course, this number can shift based on your home's specific design, your location, and the contractor you choose, but it gives you a solid baseline for budgeting your project.
Additional Costs to Factor In
A smart budget always accounts for the unexpected. Beyond the siding and installation, there are a few other potential costs to keep on your radar. First is the removal and disposal of your old siding, which can add about $0.70 to $2.00 per square foot to your total. Once the old siding is off, you might uncover structural damage that needs repair before the new siding can go on. Finally, don't forget about building permits, as most municipalities require them for siding replacement projects. Factoring these potential expenses in from the start helps prevent surprises and keeps your project running smoothly from demolition to the final coat of paint.
Is Fiber Cement Siding the Right Choice for Your Home?
Okay, you’ve learned what fiber cement is, but the big question remains: is it the right fit for your project? Making a decision about your home's exterior is a big deal. It affects everything from curb appeal to your long-term maintenance schedule and budget. To help you figure it out, let's walk through a balanced look at the pros and cons. We'll cover its impressive durability and how it adds value, but we'll also be real about the upfront costs and installation demands. By the end of this section, you’ll have a clear picture of where fiber cement shines and what you need to plan for.
The Benefits: Performance, Value, and Peace of Mind
When you choose a siding material, you're looking for more than just a pretty face. You want something that will protect your home, hold its value, and not give you headaches down the road. This is where fiber cement really stands out. Its unique composition delivers a powerful combination of strength and stability that other materials struggle to match. From its ability to stand up to harsh weather and pests to its positive impact on your home's resale value, the benefits offer genuine peace of mind for homeowners and a reliable product for contractors.
Pest, Rot, and Fire Resistance
One of the biggest advantages of fiber cement is its sheer toughness. Because it's made from a mix of cement, sand, and cellulose fibers, it’s not on the menu for termites or other wood-boring insects. It also doesn't absorb moisture like wood, so you can say goodbye to worries about rot, warping, or swelling. This makes it an ideal choice for humid or coastal climates. Plus, its cement-based composition means it's non-combustible, providing an extra layer of fire protection for your home. As This Old House explains, it's a tough, low-upkeep choice that offers incredible resilience against common household threats.
Increased Home Value and Strong Warranties
Investing in your home's exterior should pay off, and fiber cement delivers. Its durability and premium appearance contribute to a higher resale value, making it an attractive feature for potential buyers. Think of it as an upgrade that not only protects your home but also strengthens its market appeal. Most manufacturers stand behind their products with extensive warranties, often lasting 30 to 50 years, which speaks volumes about the material's longevity. This long-term reliability means you're not just buying siding; you're making a smart financial investment in your property's future.
Health and Air Quality Benefits
A healthy home is a happy home, and your choice of building materials plays a role in that. Fiber cement is an inert material, meaning it doesn't release volatile organic compounds (VOCs) or other harmful chemicals into the air. Its resistance to moisture also means it doesn't support mold or mildew growth, which is a major plus for indoor air quality and for anyone with allergies or respiratory concerns. This makes it a safe and stable choice, ensuring that your home's exterior is not only protecting you from the elements but also contributing to a healthier living environment for your family.
Potential Drawbacks to Consider
No material is perfect for every single situation, and it’s important to go into a project with your eyes wide open. While fiber cement has a lot going for it, there are a few key factors to consider before you commit. These points aren't necessarily deal-breakers, but they do require some planning. Understanding the upfront investment, the weight of the material, and the specifics of the installation process will help you budget accurately and ensure your project goes smoothly from start to finish.
Higher Upfront Investment
Let's talk budget. Fiber cement siding typically has a higher upfront cost than vinyl, with material costs running from about $5 to $14 per square foot. This initial investment can be a hurdle for some projects. However, it's important to look at the bigger picture. While vinyl might be cheaper initially, fiber cement's longevity and minimal maintenance needs can lead to lower lifetime costs. You won't be spending money on frequent repairs or replacements. For contractors managing large projects, our trade program can help make high-quality materials like our fiber cement boards more accessible.
It's a Heavy Material
Fiber cement is dense and, as a result, quite heavy. A single plank is significantly heavier than a comparable piece of vinyl or aluminum siding. This weight has a couple of implications for your project. First, it makes handling and installation more labor-intensive, often requiring two people to lift and position each piece. Second, you need to ensure your wall structure can adequately support the added load. This isn't usually an issue for standard construction, but it's something your contractor should confirm before starting the installation process.
The Installation Can Be Complex
This isn't your average DIY weekend project. Due to its weight and composition, installing fiber cement siding requires precision and specialized tools. Cutting the panels creates silica dust, which requires proper safety gear, and the material can crack if mishandled. For these reasons, professional installation is highly recommended to ensure the siding is properly secured, sealed, and finished. A pro will have the right equipment, like carbide-tipped blades for clean cuts, and the expertise to handle details like expansion gaps, which are crucial for a long-lasting, weatherproof finish.
Fiber Cement vs. Other Siding Materials
With so many siding options on the market, it can be tough to see the forest for the trees. How does fiber cement really stack up against the old standbys like vinyl, wood, and aluminum? Each material has its own set of strengths and weaknesses, and the best choice often comes down to your priorities. Are you focused on budget, aesthetics, maintenance, or long-term durability? Let's break down a side-by-side comparison to help you see where fiber cement fits in and how it compares on the points that matter most.
Compared to Vinyl Siding
Vinyl is one of the most popular siding choices, primarily because it's affordable and low-maintenance. However, the trade-off is often in aesthetics and durability. Vinyl can sometimes look less premium than fiber cement and is prone to cracking in cold weather or warping in extreme heat. Fiber cement, on the other hand, offers a more substantial, high-end look that can mimic wood grain with incredible realism. While it costs more upfront, it provides superior resistance to impact and temperature fluctuations, ensuring it looks great for decades without the risk of damage that can affect thinner materials like vinyl.
Compared to Wood Siding
Nothing beats the classic, natural beauty of wood siding. However, that beauty comes with a demanding maintenance schedule. Wood is vulnerable to rot, insects, and fire, and it requires regular scraping, painting, or staining every few years to keep it protected and looking its best. Fiber cement offers the best of both worlds: it can be manufactured with deep, realistic wood grain textures but without any of the vulnerabilities. You get the timeless look of wood with the low-maintenance, pest-proof, and fire-resistant qualities of a modern composite material, saving you time and money on upkeep.
Compared to Aluminum Siding
Aluminum siding is lightweight, rust-proof, and fairly durable. It's also a good insulator and is resistant to fire. However, its biggest drawback is that it dents and scratches easily, and these imperfections can be difficult to repair, often requiring a full panel replacement. The color can also fade or become chalky over time from sun exposure. Fiber cement is far more resistant to impacts from hail, stray baseballs, or everyday bumps. Its baked-on color finishes are also incredibly durable, offering superior fade resistance and ensuring your home's color stays vibrant for much longer.
Environmental Considerations
The environmental impact of our building choices is more important than ever. Homeowners and builders alike are looking for materials that are not only durable and beautiful but also sustainable. When you're evaluating siding, it's worth looking beyond the price tag and installation to consider the product's lifecycle, from the resources used to make it to its longevity and end-of-life potential. Fiber cement scores well in this area, offering a responsible choice for those looking to build with the planet in mind.
Sustainable Materials and Eco-Friendliness
Fiber cement is composed of some pretty straightforward and sustainable ingredients: water, sand, cement, and wood pulp. The wood fibers used are often sourced from sustainably managed forests, and some manufacturers even incorporate recycled materials into their mix. But perhaps its biggest environmental benefit is its incredible durability. A product that can last 50 years or more means less waste in landfills from replacements and repairs. This long lifespan, combined with its inert composition, makes our fiber cement boards a solid choice for an eco-conscious building project.
Prepping for Success: Tools & Safety Gear
Before you even think about cutting your first panel, let’s talk about getting organized. A successful installation is all about preparation, and that means having every tool and piece of safety equipment ready to go. Taking the time to set up your workspace properly will make the entire process smoother, safer, and a lot less stressful. Think of it as your project’s foundation—get this right, and everything else will fall into place much more easily. Let’s walk through exactly what you’ll need to have on hand.
Your Essential Siding Tool Checklist
Having the right tools for the job is non-negotiable. Scrambling to find something mid-installation is a surefire way to make mistakes. Gather everything beforehand so you can stay focused. You’ll need a circular saw (preferably with a blade designed for fiber cement), a nail gun, galvanized or stainless steel nails, a measuring tape, and a caulk gun with exterior-grade caulk. Don’t forget flashing for windows and doors, a level to keep your lines straight, and of course, your fiber cement boards. Laying everything out will help you work efficiently and keep your project on track from start to finish.
Safety First: The Gear You Can't Ignore
This part is crucial, so please don’t cut corners. Working with fiber cement siding creates fine dust that you don’t want to inhale or get in your eyes. Always wear your safety gear. This includes safety goggles, a good pair of work gloves, and a dust mask or respirator (a NIOSH-approved N95 mask is a great choice). Protecting yourself is the most important step in any DIY or professional project. Taking these simple precautions ensures you can stand back and admire your work safely when you’re done, without any preventable injuries or health concerns.
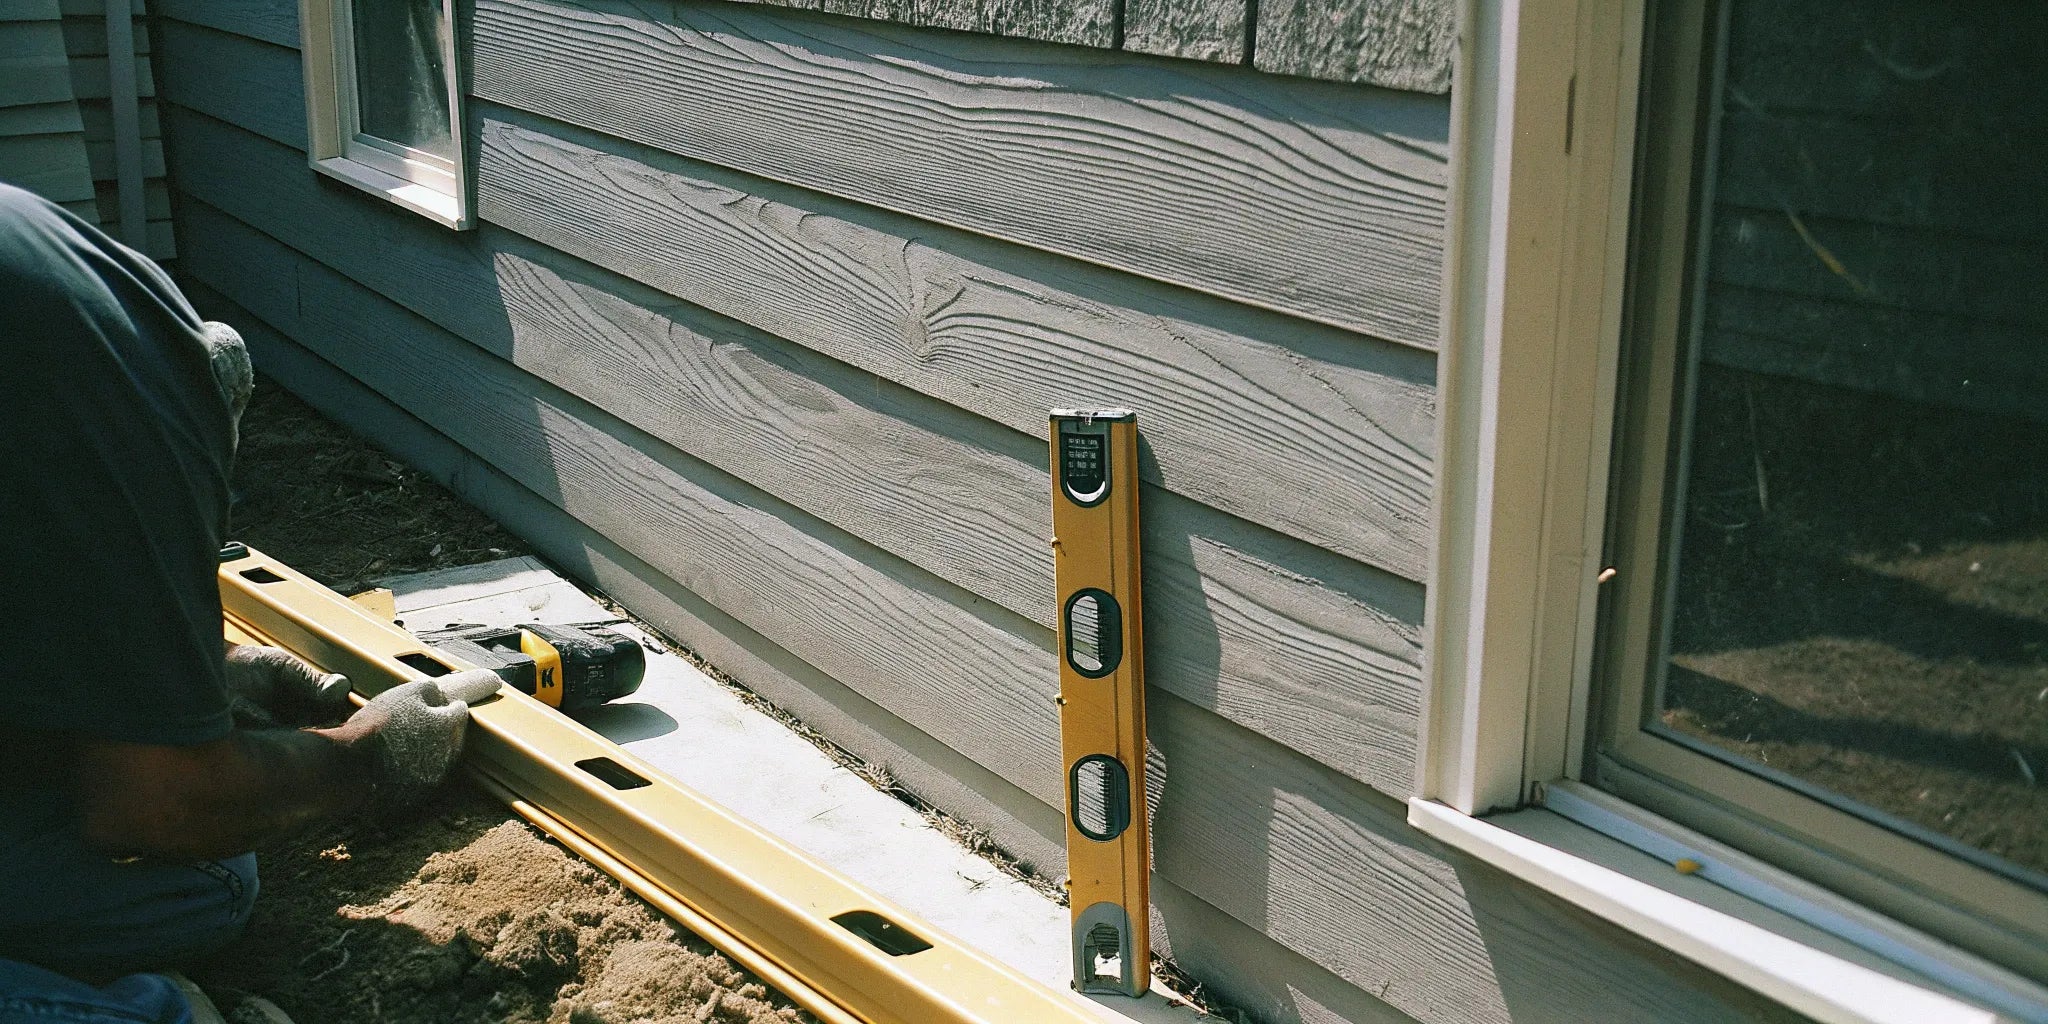
Getting It Right: Measuring and Layout Tools
Accuracy is everything when it comes to siding. A small miscalculation on the first row can become a huge, visible problem by the time you reach the top. Your most important tools here will be a quality measuring tape, a chalk line for snapping straight guidelines, and a long level. Before you start, make sure your wall sheathing is secure and dry. This is also the time to install a moisture barrier and add flashing around all your steel windows and doors. These steps prevent water from getting behind your siding, protecting your home’s structure for years to come.
Don't Forget Ventilation: Here's Why
When you cut fiber cement, it generates a significant amount of silica dust. To keep your workspace safe, good ventilation is key. If you can, do all your cutting outdoors where the dust can disperse naturally. If you have to work inside a garage or workshop, open all the doors and windows to create as much airflow as possible. For an even safer setup, consider using a saw with a dust collection bag or hooking it up to a shop vacuum. This simple step drastically reduces the amount of airborne dust, making the environment safer for you and anyone else nearby.
Creating Your Siding Installation Game Plan
A successful siding project is all in the prep work. Before you even think about cutting your first panel, taking the time to plan your layout and prepare your walls will save you from major headaches later. A little bit of strategy goes a long way in ensuring your installation is smooth, professional, and built to last. Think of this as creating the perfect canvas for your new siding.
Advice for Homeowners Hiring a Pro
While tackling a siding project yourself can be incredibly rewarding, sometimes life gets in the way, or the scale of the job just calls for a professional. If you decide to hire a contractor, that’s a smart move, too. But finding the right person for the job is a project in itself. You want someone who respects your home, understands the material, and will deliver a finished product that looks great and lasts for decades. Taking the time to vet your options thoroughly is the best way to ensure your investment is protected and you end up with a result you love.
Why You Should Get Multiple Quotes
It might be tempting to go with the first contractor who gives you a reasonable estimate, but it’s always a good idea to get at least three quotes. This isn’t just about finding the lowest price; it’s about understanding the market rate and seeing what different professionals bring to the table. As one guide points out, not all siding contractors work with all types of materials, so comparing quotes helps you find someone who truly specializes in fiber cement. A detailed quote should break down the costs for labor, materials, and any additional work like removing old siding. This process gives you a clearer picture of the project scope and helps you find a contractor whose communication style and expertise make you feel confident.
How to Check a Contractor's Credentials
Once you have a few quotes, it’s time to do your homework. The most important step is to verify that your contractor is fully licensed and insured. This is non-negotiable. A license proves they meet state requirements, and insurance protects you from liability if an accident happens on your property. Next, check their reputation. Look for online reviews, ask for references you can actually call, and look at their portfolio of past work. A contractor with a solid history will be proud to share their projects. Be wary of anyone with very few reviews or a portfolio that seems thin, as these can be red flags for inexperience or poor service.
Getting Your Walls Ready for Siding
First, you’ll need a clean slate. Start by carefully removing any old siding, working from the bottom up. Once the old material is gone, take a good look at what’s underneath. This is your chance to inspect the sheathing for any signs of rot, water damage, or other issues. Make any necessary repairs to ensure you have a solid, flat, and secure base for your new fiber cement boards. A strong foundation is non-negotiable for a siding job that will stand the test of time and protect your home properly.
How to Install a Moisture Barrier
Your siding is the first line of defense against the elements, but it needs a backup. Installing a weather-resistant barrier (WRB), or house wrap, is a critical step you can’t afford to skip. This barrier prevents moisture from getting into your wall cavity, which can lead to mold and structural damage. Roll it out over the sheathing and secure it according to the manufacturer’s instructions. Pay special attention to windows and doors, using flashing to create a watertight seal around all openings. This simple step is key to protecting your home’s integrity.
Does Weather Affect Siding Installation?
Weather can be your best friend or your worst enemy on installation day. Try to pick a string of clear, dry days to work on your project. Installing siding in the rain can trap moisture behind the panels, which is exactly what you’re trying to avoid. Also, think about ventilation. If you have to cut panels indoors, make sure the space has excellent airflow or use a dust collection system attached to your saw. Fiber cement dust contains silica, so keeping it out of the air is important for your health.
How to Map Out Your Siding Layout
Before you make your first cut, decide how you want the finished product to look. Will you install the panels horizontally for a classic lap siding appearance, or vertically for a modern board-and-batten style? Your choice will dictate your entire installation process. Use a chalk line to map out your courses on the wall, ensuring everything is level. Plan your layout around features like steel windows and doors to minimize awkward cuts and create a balanced, professional-looking finish. A clear plan prevents wasted material and ensures a beautiful result.
Why Expansion Gaps Are So Important
Fiber cement, like many building materials, expands and contracts with changes in temperature and humidity. To account for this movement, you need to leave small expansion gaps where the siding panels meet trim, such as around windows, doors, and at the corners. The manufacturer’s instructions will specify the exact gap size, but it’s typically about 1/8 of an inch. Don’t worry, these gaps won’t be visible in the end. You’ll fill them with a high-quality, flexible exterior caulk to create a seamless, weatherproof seal that can move with the siding.
How to Install Fiber Cement Siding: Step by Step
With your walls prepped and your layout planned, it’s time to start installing. This is where your project really comes to life, and paying close attention to the details now will pay off for years to come. We’ll walk through everything from getting that first row perfectly level to managing tricky spots like windows and corners. Follow these steps carefully to ensure your siding is secure, weatherproof, and looks fantastic.
Kicking It Off: The Starter Strip and First Row
Getting the first row right is the key to a successful installation. Before you begin, decide if you’re installing your siding horizontally (lap) or vertically (board and batten), as this determines your starting point. For horizontal siding, you’ll begin at the bottom of the wall. Install a starter strip first—this is a special piece that kicks the bottom edge of the first panel out slightly. This angle is crucial because it ensures water can drain away properly and sets the correct angle for all subsequent rows. Make sure this strip is perfectly level, as it will guide the rest of your installation.
Nailing It: The Right Way to Fasten Panels
Proper nailing prevents your panels from cracking or buckling over time. You’ll want to use corrosion-resistant, galvanized nails that can penetrate at least 1-1/4 inches into the wood framing. Drive the nails about one inch down from the top edge of the panel, directly into the wall studs. Be careful not to overdrive them; the nail head should sit flush with the surface of the siding, not sink into it. Most fiber cement boards use a technique called “blind nailing,” which means each new row of siding will cover the nails of the row below it, creating a clean, fastener-free finish.
How to Ensure Perfect Spacing and Alignment
Precision is your best friend when it comes to spacing. Fiber cement siding expands and contracts with temperature changes, so you need to leave small expansion gaps wherever a panel meets trim—like around windows, doors, and at corner boards. Always follow the manufacturer’s specific recommendations for gap size. These gaps aren’t left empty; you’ll fill them with a flexible caulk later to create a watertight seal. At the butt joints where two siding panels meet, place a flashing strip behind the seam. This simple step provides an extra layer of protection, directing any moisture safely down and out.
Tackling Tricky Spots: Corners, Windows, and Doors
Navigating obstacles like windows and doors requires careful cuts and proper flashing. When you reach a window or door, measure and cut your panels to fit snugly, remembering to leave the recommended expansion gap around the entire frame. Above all horizontal openings, like the tops of your steel windows and doors, you must install a piece of flashing that extends over the trim. It’s important to leave about a 1-inch gap between the bottom edge of the siding panel and this flashing. This space prevents water from getting trapped and ensures it can drain away freely, protecting the structure underneath.
Installing Flashing for a Watertight Seal
Flashing is your siding’s first line of defense against water intrusion, so don’t skip it. This thin, waterproof material is essential for creating a durable, weather-resistant barrier. As mentioned, you’ll need to place flashing behind every butt joint where two siding panels meet. You also need to install it above all windows, doors, and any other horizontal breaks in the siding. Think of flashing as a system of channels designed to guide water away from vulnerable areas. Taking the time to install it correctly is one of the most important things you can do to protect your home from moisture damage.
How to Keep Moisture Out During Installation
A successful siding project starts with a dry foundation. Before you hang a single panel, double-check that your wall sheathing is completely dry and structurally sound. This is also the time to install your weather-resistant barrier (or house wrap) over the sheathing. This barrier acts as a secondary defense, stopping any wind-driven rain that might find its way behind the siding. Pay special attention to properly flashing around all your steel doors and windows before the siding goes on. By creating a dry, well-protected surface to work on, you ensure your fiber cement siding can do its job effectively for decades.
How to Cut and Handle Panels Like a Pro
Working with fiber cement panels is straightforward once you get the hang of a few key techniques. Because the material is so durable, it requires a specific approach to cutting and handling to ensure a clean installation and, most importantly, to keep you safe. Getting this part right is what separates a good-looking finish from a great one. With the right tools and a bit of care, you’ll be cutting and placing panels with confidence.
What's the Best Tool for Cutting Fiber Cement?
Your standard wood saw blade isn’t going to work well here. To get clean, precise cuts without shredding the panel edges, you need a tool designed for the job. The best options are a circular saw fitted with a special carbide-tipped blade or a pair of fiber cement shears. These tools are made to slice through the tough composite material cleanly, which not only looks better but also reduces the amount of airborne dust. Using the right blade makes the whole process smoother and gives your fiber cement boards that sharp, professional edge you’re looking for.
How to Manage Silica Dust Safely
Cutting fiber cement creates fine dust containing crystalline silica, which you definitely don’t want to breathe in. Safety is non-negotiable here. Always wear your personal protective equipment (PPE), including safety goggles, gloves, and a well-fitting dust mask or respirator. It’s best to do your cutting outdoors where the dust can dissipate. If you have to cut inside, make sure the space is extremely well-ventilated and consider using a saw with a vacuum attachment to capture dust at the source. A clean workspace is a safe workspace, so take the time to set up properly before you make your first cut.
How to Prevent Chipping and Breakage
Fiber cement panels are strong once installed, but they can be surprisingly brittle during transport and handling. They are also quite heavy, so it’s a good idea to have a helper, especially with larger panels. Always carry the boards on their edge—never flat—as this prevents them from bowing and snapping under their own weight. When you’re storing them on-site, lay them flat on a dry, level surface to prevent warping. A little extra care during this stage goes a long way in preventing chipped corners and cracks, ensuring all your wall panels are in perfect condition for installation.
To Pre-Drill or Not to Pre-Drill?
Fastening fiber cement can be tricky because the material is so dense. While you can nail directly through the panels in most cases, you should pre-drill holes when you’re fastening close to an edge to prevent cracking. This is especially important around windows and at the corners. If you’re using screws, you’ll find that standard drill bits used for countersinking will dull almost immediately. To get a flush finish, look for screws specifically designed for fiber cement, as many are self-sinking. This is a pro tip that can save a lot of frustration, and it’s one of the details that our trade professionals swear by.
Hit a Snag? How to Solve Common Installation Problems
Even the most carefully planned projects can hit a snag. The good news is that most fiber cement installation issues are common and have straightforward solutions. Instead of getting frustrated, it helps to know what to look for and how to pivot. From working around awkward wall features to fixing a panel that’s gone slightly askew, a little know-how can keep your project moving forward smoothly. Let’s walk through some of the most frequent challenges and the simple steps you can take to solve them, ensuring your final result is professional, durable, and something you can be proud of.
How to Cut Around Vents, Pipes, and Outlets
It’s rare to work on a perfectly flat, uninterrupted wall. You’ll almost certainly encounter vents, electrical outlets, or plumbing fixtures. The key is not to force the panel but to accommodate these obstacles. When you’re installing fiber cement boards, make precise cuts to fit around these items. For a clean, weather-tight finish, always leave a small gap (check the manufacturer’s guide for the exact measurement) between the edge of the panel and the trim of a window, door, or vent. This space isn’t a mistake—it’s essential. You’ll fill it with caulk later to create a flexible, waterproof seal that prevents moisture from getting behind your siding.
Installing Siding in Extreme Temperatures
Extreme temperatures can make any job tougher, and siding installation is no exception. Whether you’re dealing with intense heat or biting cold, your safety should always come first. It’s easy to get distracted or rush when you’re uncomfortable, so make a point to wear the right gear. This includes safety goggles to shield your eyes from dust and debris, sturdy gloves to protect your hands, and a dust mask, which is crucial when cutting fiber cement. Working in extreme weather also means paying closer attention to the material itself. Panels can expand and contract slightly with temperature shifts, so respecting the recommended expansion gaps is even more important.
How to Fix Moisture-Related Problems
Fiber cement is incredibly resistant to moisture, but the wall structure behind it isn’t. That’s why preventing water intrusion is one of the most critical parts of the job. If you notice moisture issues later on, it’s often because water is accumulating in certain areas, like where a roofline meets a wall or near decks and driveways. The best fix is prevention: ensure your moisture barrier was installed correctly before you even hang the first panel. If you’re installing siding in a damp climate or an area prone to snow and ice, pay extra attention to flashing and sealing to protect your home’s structure from potential water damage.
What to Do if Your Panels Are Misaligned
There’s nothing more frustrating than stepping back to see a row of siding that’s slightly crooked. If you catch it early, the fix is simple. Proper alignment starts with proper fastening. To keep panels straight and secure, drive your nails through the panel and into the wall studs, placing the nail about one inch down from the top edge. Use high-quality galvanized or stainless steel nails that go at least 1-1/4 inches into the wood frame. This technique provides a solid hold, preventing the panels from shifting or sagging over time. If a panel is already misaligned, you may need to remove it carefully and renail it, using your level to get it perfect.
Easy Fixes for Common Installation Goofs
A couple of small mistakes can happen during any installation. One common error is being too aggressive when fastening. For example, some people try to countersink screws to make the heads sit perfectly flush with the panel’s surface. While the intention is good, driving a fastener too deep can create a weak spot and compromise the panel's integrity. It’s better for the fastener head to be snug against the surface than to be sunk in. Another quick fix is for small chips or cracks that might occur during handling. You can often repair these with a high-quality caulk or epoxy filler designed for fiber cement before you paint.
Finishing Your Siding Project Like a Pro
You’re in the home stretch! The panels are up, and your project is really taking shape. Now it’s time for the final details that will protect your work and give it that crisp, professional look. These finishing steps are just as important as the installation itself, as they seal your siding against the elements and ensure it looks great for years to come. Taking your time here will pay off, turning a good installation into a great one. From sealing gaps to applying the perfect coat of paint, let’s walk through how to complete your fiber cement siding project.
How to Caulk and Seal for a Professional Look
One of the best ways to get a clean, seamless look is by caulking. Your main goal is to fill the vertical gaps between the siding and trim pieces, like corner boards and window frames. This simple step does more than just improve the appearance; it creates a crucial weather-tight seal that keeps moisture and drafts out of your walls. Choose a high-quality, paintable exterior-grade sealant that’s designed to remain flexible. Apply a smooth, consistent bead of caulk and tool it with your finger or a caulk tool for a neat finish. This prevents water from getting behind your siding and causing problems down the road.
What's the Best Paint for Fiber Cement Siding?
If your fiber cement boards didn't come pre-painted, you'll need to apply a primer and paint. This is your home’s first line of defense against sun, rain, and wind, so don’t cut corners here. It’s essential to paint all cut edges with a high-quality latex paint before you install the panels. This seals the exposed core of the board, protecting it from moisture absorption. Once everything is installed and caulked, apply a coat of primer followed by at least two coats of premium exterior acrylic latex paint. This combination provides the best adhesion and long-term durability for a vibrant, lasting color.
The Final Walk-Through: An Inspection Checklist
Before you pack up your tools, take a walk around the entire project and do a final quality check. This is your chance to catch any small issues before they become bigger problems. Grab a notepad and look for anything that seems out of place.
Here’s a quick checklist to guide you:
- Fasteners: Are all nails or screws properly driven? Make sure they are galvanized and penetrate at least 1¼ inches into the wall framing for a secure hold.
- Alignment: Are all your panels level and straight? Check the horizontal lines to ensure they look uniform.
- Gaps: Are the expansion gaps consistent and correctly spaced?
- Flashing: Is all flashing correctly installed and overlapping to direct water away from the structure?
Pro Tips for a Flawless Finish
A few extra tips can make all the difference in the final outcome. First, always follow the manufacturer’s guidelines for how much space to leave between the bottom edge of your siding and the ground or other surfaces like decks and driveways. This clearance is critical for preventing moisture wicking. Also, remember to wear your safety gear—goggles, gloves, and a dust mask—especially when doing any final cuts or sanding. For trade professionals looking for consistent quality materials, creating a trade account can streamline the process for future projects. Finally, give the siding a gentle cleaning to remove any dust or handprints before you start painting for the best possible adhesion and finish.
How to Maintain Your Fiber Cement Siding
You’ve put in the work to install your beautiful new siding, and now it’s time to make sure it stays that way. One of the best things about fiber cement boards is their incredible durability, but a little routine maintenance will keep them looking pristine for decades. Think of it less as a chore and more as a way to protect your investment.
Regular inspections, cleaning, and prompt repairs are the keys to ensuring your siding remains a standout feature of your home. By addressing small issues as they pop up, you can prevent them from turning into bigger, more expensive problems down the road. A simple maintenance schedule is all it takes to preserve that fresh, just-installed look and extend the life of your siding.
The Right Way to Clean Fiber Cement
Keeping your fiber cement siding clean is surprisingly simple. For general dust and dirt, a soft cloth or a medium-bristle nylon brush paired with a standard garden hose is usually all you need. Start from the top and work your way down, rinsing thoroughly. It’s best to avoid using a pressure washer, as the high-powered stream can damage the surface of the panels and force water into places it shouldn’t be.
For more stubborn spots like mildew or grime, a mild solution of soap and water will do the trick. Gently scrub the area and rinse it completely. This simple cleaning routine, performed once or twice a year, will keep your siding looking its best.
Your Simple Annual Inspection Checklist
Once a year, take a walk around your home to give your siding a quick check-up. Look for any peeling or chipping paint, and pay close attention to the caulked joints around windows, doors, and corner trim. Caulk can shrink and crack over time, so it’s important to make sure those seals are still watertight.
Also, check for any loose panels or signs of moisture damage. Catching these minor issues early is the most effective way to prevent costly repairs later on. A quick annual inspection helps you stay ahead of any potential problems and keeps your home’s exterior protected from the elements.
Fixing Dings, Chips, and Scratches
Even though fiber cement is tough, minor damage like small chips or cracks can happen. The good news is that these are usually easy to fix. For small cracks or holes, you can use a high-quality, paintable exterior-grade caulk specifically designed for fiber cement. Simply fill the damaged area, smooth it out, and let it cure completely.
Once the caulk is dry, you can touch it up with matching paint to blend the repair seamlessly. Addressing these little imperfections as you find them is a cost-effective way to maintain your siding and ensure it continues to look flawless.
How to Make Your Siding Last
Beyond cleaning and inspections, a few simple habits can help protect your siding for the long haul. Keep your gutters clean and clear of debris to prevent water from overflowing and running down your walls. It’s also a good idea to trim any trees or shrubs that are close to the house, as this allows for better airflow and prevents branches from scratching the panels.
Finally, ensure your sprinklers aren’t spraying directly onto the siding, as constant moisture can lead to issues over time. These small steps, combined with regular maintenance, will maximize the longevity of your siding and keep your home looking great.
Related Articles
Frequently Asked Questions
What's the most common mistake to avoid when installing fiber cement siding? The biggest pitfall is improper moisture management. This includes skipping the weather-resistant barrier, forgetting to flash around windows and doors, or failing to seal cut edges before installation. These steps are your home's defense against water damage, so taking the time to get them right is crucial for a long-lasting, durable finish that protects your home's structure.
Do I really need special tools to cut fiber cement panels? Yes, and this is a step you definitely don't want to compromise on. Using a standard wood blade will shred the material and create excessive, harmful dust. You'll get the cleanest cuts and safest results with a circular saw that has a carbide-tipped blade made for fiber cement or with specialized fiber cement shears. This ensures a professional look and helps control the silica dust created during cutting.
Why do I have to leave gaps between the siding panels and trim? It might seem strange to leave intentional gaps, but they are essential. Fiber cement, like most building materials, expands and contracts slightly with changes in temperature and humidity. These small gaps, typically around 1/8 of an inch, give the panels room to move without buckling or cracking. You'll fill them with a flexible exterior caulk to create a weatherproof seal that moves with the siding.
Can I use a pressure washer to clean my fiber cement siding? It's best to avoid the pressure washer. While fiber cement is incredibly tough, a high-pressure stream of water can damage the surface finish, chip the paint, and force moisture behind the panels. A much safer and equally effective method is to use a soft-bristle brush, a bucket of soapy water, and a regular garden hose to gently wash away any dirt or grime.
How often will I need to repaint my fiber cement siding? One of the great benefits of fiber cement is how well it holds paint. Because the material is so stable and isn't susceptible to the moisture issues that cause wood to peel, a high-quality paint job can last for 10 to 15 years, or even longer. The key is proper prep work, including priming and painting all cut edges before installation and using a premium exterior acrylic latex paint.