


Shiplap Wall Panels 101: Your Complete Guide
That blank wall has been staring at you for months, right? You know it needs something to break up the monotony and add personality, but you're not sure where to start. Enter shiplap. It’s so much more than a passing trend—it’s a versatile design tool that can create a stunning focal point or completely transform the feel of a room. We’ll cover the different ways you can use shiplap wall panels to bring your vision to life, with plenty of design inspiration and practical tips for making smart choices on color, width, and orientation.
Key Takeaways
- Match the Material to the Room's Needs: Your shiplap's longevity depends on choosing the right material. Use classic solid wood for living rooms, cost-effective MDF for dry areas like hallways, and waterproof PVC for moisture-prone spaces like bathrooms to ensure a lasting finish.
- Proper Prep Prevents Problems Later: A professional-looking installation is all in the details. Taking time to acclimate your panels for 48-72 hours, marking studs, and painting the wall behind the shiplap will prevent common issues like warping and visible gaps.
- Use Design to Shape Your Space: Shiplap is a powerful design tool. Install boards horizontally to make a room feel wider, or vertically to add height. Don't be afraid to move beyond white—a dark, moody color can create a dramatic and sophisticated accent wall.
What Exactly Are Shiplap Wall Panels?
If you’ve spent any time looking at home design inspiration, you’ve definitely come across shiplap. But what makes it different from other types of paneling? It all comes down to the edges. Each shiplap panel has a special L-shaped groove, called a rabbet, cut along its sides. This design allows the boards to overlap neatly when installed, creating a tight seal with a distinctive, subtle gap between them. This signature look is what gives shiplap its clean, linear appearance.
Originally, this overlapping joint was designed for function, not just form. It was used on the exterior of ships and barns to create a weatherproof barrier against wind and rain. Today, that same practical design has found a new life indoors, adding texture, character, and a sense of structure to interior spaces. Whether you're aiming for a cozy, rustic vibe or a clean, modern aesthetic, shiplap wall panels offer a straightforward way to transform a room. They are relatively easy to install and can be painted or stained to match any decor, making them a favorite for contractors and DIY enthusiasts alike.
From Rustic Roots to Modern Walls
Shiplap has a rich history, but its recent surge in popularity is tied directly to the modern farmhouse trend. What was once a humble exterior siding has become a go-to feature for creating warm, inviting interiors. The horizontal boards add a touch of rustic charm that feels both timeless and fresh. While it’s a hallmark of farmhouse style, shiplap’s clean lines also allow it to fit seamlessly into coastal, traditional, and even contemporary designs. Its ability to add texture and warmth without overwhelming a space is what gives it such lasting appeal.
Perfect Spots for Shiplap in Your Home
One of the best things about shiplap is its versatility. You can use it to make a big statement or add a subtle architectural detail. Covering an entire room in shiplap creates a cozy, cohesive look, while using it on a single accent wall can create a stunning focal point behind a bed or sofa. It’s also perfect for smaller projects. Consider installing shiplap panels on a ceiling to draw the eye upward, as a durable kitchen backsplash, or as wainscoting in a hallway or dining room. The possibilities are truly endless.
Creative Uses Beyond Walls
Think beyond the accent wall. Shiplap’s clean lines make it a fantastic material for adding architectural detail in unexpected places. Installing it on a ceiling can draw the eye upward, making a room feel more spacious and grand. In the kitchen, it works beautifully as a durable backsplash or as cladding for an island, adding texture and warmth where you least expect it. You can also use it to create custom wainscoting in a dining room or entryway for a touch of traditional charm. The simple, interlocking design of these panels makes them adaptable for all sorts of creative projects, from custom headboards to fireplace surrounds.
Exterior Shiplap Applications
Shiplap was originally designed for the outdoors, and it’s making a major comeback as an exterior finish. Its overlapping joints create a tight, weather-resistant seal, making it a practical and stylish choice for siding. You can use it to cover an entire home for a classic farmhouse or coastal look, or apply it to specific features like gables or dormers for a pop of architectural interest. It’s also a popular choice for porch ceilings, adding a finished, cozy feel to your outdoor living space. When choosing materials for an exterior project, be sure to select products designed to withstand the elements, such as Exterior Shiplap Cladding or durable fiber cement boards.
Why You'll Love Shiplap Walls
So, why do so many designers and homeowners love shiplap? Its main benefit is its incredible design flexibility. Shiplap enhances both modern and traditional aesthetics, making it a reliable choice for almost any project. The clean lines can make a room feel larger and more organized, while the texture adds visual interest that you just can’t get from a flat, painted wall. It’s also a fantastic way to hide imperfections on an existing wall. For contractors and other trade professionals, shiplap is a valuable tool for delivering high-impact results that clients love.
Durability Compared to Drywall
Let’s be honest, life happens. Between moving furniture, kids playing, and pets running around, walls can take a beating. Drywall is notorious for showing every little bump and scrape, leading to a cycle of patching and repainting. Shiplap, on the other hand, is a much tougher alternative. Because it’s made from solid wood or durable composite materials, shiplap is far more resistant to the dents and scratches of daily life. This inherent durability makes it an excellent choice for high-traffic areas like entryways, hallways, and family rooms. You get a beautiful finish that not only looks great but can also withstand the wear and tear that would easily damage a standard painted wall.
Easy Hanging for Decor
If you’ve ever tried to hang a heavy mirror or a gallery wall, you know the frustration of searching for wall studs. With shiplap, that struggle is a thing of the past. One of its most practical benefits is that you don’t need to find studs to hang pictures or artwork. The wooden planks themselves are strong enough to provide good support for nails and screws almost anywhere on the wall. This gives you complete freedom to arrange your decor exactly how you envision it, without being limited by your home’s framing. It simplifies the decorating process and makes it easy to switch things up whenever inspiration strikes.
Can Shiplap Improve Room Acoustics?
Here’s a benefit you might not have considered: shiplap can help with a room’s acoustics. While it won’t soundproof a room entirely, the material and its installation method can help absorb and diffuse sound waves. The overlapping design of the panels creates a solid, continuous surface that can help in managing sound more effectively than drywall alone. This can reduce echo and make a space feel quieter and more serene, which is a great bonus for bedrooms, home offices, or busy living areas. It’s a subtle but welcome feature that adds to the overall comfort of a room.
Choosing the Right Shiplap Material
Choosing the right material for your shiplap project is the first major decision you'll make, and it sets the tone for the entire space. The best material depends on your budget, the room's function, and the aesthetic you're aiming for. Are you creating a rustic accent wall in a cozy den or adding texture to a moisture-prone bathroom? Each material comes with its own set of benefits and considerations, from the authentic charm of solid wood to the practical durability of PVC.
Thinking about these factors upfront will help you select from the wide variety of wall panels available. We'll walk through the most common options so you can feel confident in your choice. Understanding the differences in durability, cost, and maintenance will ensure your shiplap walls not only look fantastic on day one but also hold up beautifully for years to come. Let’s look at the top contenders.
Solid Wood: The Authentic Choice
When you picture traditional shiplap, you’re likely thinking of solid wood. Materials like pine and cedar bring an unmatched warmth and authenticity to a room with their natural knots and grain patterns. Each board is unique, giving your wall a truly custom feel. You can stain it to highlight the wood's character or paint it for a cleaner, more modern look. The signature feature of shiplap is the L-shaped edge on the panels, which allows them to overlap and create that distinct, subtle gap between boards. While beautiful, solid wood can be more expensive and may expand or contract with changes in humidity, making it best suited for climate-controlled spaces like bedrooms and living rooms.
Common Wood Types for Shiplap
Pine is easily the most popular choice for interior shiplap, and for good reason. It’s affordable, lightweight, and easy to work with, making it a favorite for both contractors and DIYers. Its prominent knots and distinct grain add instant rustic character, whether you choose to stain it or paint it a classic white. Cedar is another excellent option, especially for areas with higher humidity like bathrooms or even as exterior shiplap cladding on a covered porch. It’s naturally resistant to moisture and decay, and its rich, warm tones bring a sophisticated feel to any space. Both materials offer that authentic wood look that makes shiplap so appealing.
Reclaimed Wood for a Rustic Feel
For a look that’s truly one-of-a-kind, reclaimed wood is an incredible choice. Reclaimed wood shiplap is not only environmentally friendly but also adds a story and character to your space, making it a popular choice for those looking to create a rustic feel. Sourced from old barns, factories, or other structures, each board comes with its own history, complete with nail holes, weathering, and a unique patina that you simply can’t replicate. This material is perfect for creating a dramatic accent wall that serves as a conversation piece. Using reclaimed wood adds a warm, unique feel to your space and connects your home to a piece of the past.
MDF: The Budget-Friendly Option
If you love the look of shiplap but are working with a tighter budget, MDF is an excellent alternative. As an engineered product made from compressed wood fibers, MDF offers a perfectly smooth, consistent surface that’s ideal for painting. There are no knots or grain to cover, so you can achieve a flawless, uniform finish with ease. MDF shiplap panels have become a popular choice for homeowners looking to add a touch of elegance and style without the cost of solid wood. It’s also very stable and won’t warp like solid wood can. Just keep in mind that standard MDF isn’t moisture-resistant, so it’s best used for accent walls, hallways, and other dry areas of your home.
PVC and Vinyl: Your Go-To for Durability
For rooms that see a lot of moisture, like bathrooms, laundry rooms, or kitchens, PVC and vinyl shiplap are fantastic solutions. These synthetic panels are completely waterproof, so you don’t have to worry about swelling, warping, or mold growth. PVC and vinyl shiplap are known for their durability and resistance to moisture, making them incredibly low-maintenance—a simple wipe-down is all it takes to keep them clean. They are lightweight and easy to install, and they come in a variety of pre-finished colors and even realistic wood-grain textures. This makes them a practical and stylish choice for adding character to spaces where wood just isn’t an option.
Engineered Wood: A Practical and Stable Pick
Engineered wood offers a great middle ground between solid wood and MDF. It typically features a real wood veneer over a composite core, giving you the authentic look of wood with added stability. Because of its construction, engineered wood shiplap is less likely to warp or gap than solid wood when faced with minor temperature and humidity fluctuations. This makes it a practical and often more affordable choice for achieving a genuine wood aesthetic. It’s a durable option that works well in most rooms of the house, though you’ll still want to avoid using it in areas with direct water exposure, like a shower surround.
Best Shiplap for Bathrooms and Kitchens
When planning a project for a bathroom, kitchen, or basement, you have to prioritize materials that can handle humidity. As we’ve covered, PVC and vinyl are the clear winners here because they are completely waterproof and easy to clean. When you’re updating the plumbing and fixtures in these rooms, it’s the perfect time to install wall panels that will stand up to steam and splashes. It’s wise to select shiplap materials based on the specific needs of the space. Beyond PVC, some manufacturers offer specially treated, moisture-resistant MDF or fiber cement boards that can also perform well in damp environments. Whichever you choose, ensure proper installation with a moisture barrier to protect the wall behind it.
Shiplap Alternatives for a Similar Look
While shiplap has a distinct charm, it’s not the only way to achieve a clean, linear look. For a similar planked appearance with a tighter, more seamless joint, consider V-groove or tongue-and-groove panels. If you prefer a more traditional or coastal feel, beadboard provides a classic, textured look with its delicate vertical grooves, while board and batten creates a bolder, more dimensional effect. And if you're on a tight budget or renting, you can even find peel-and-stick wallpaper that mimics the style without the commitment. Exploring these different types of wall panels can help you find the perfect fit for your home's unique character.
Who Makes the Best Shiplap Panels?
Once you’ve decided to add shiplap to your home, the next big question is: where do you get it? With so many manufacturers out there, it can feel a bit like navigating a maze. The truth is, the "best" brand really depends on what you're looking for. Are you a seasoned contractor needing durable, high-performance materials, or a DIYer looking for something stylish and easy to install for a weekend project? Some companies specialize in unique colors and textures, while others focus on classic, high-quality wood.
To help you find the perfect fit for your project, I’ve put together a list of some of the most reputable shiplap manufacturers. Think of this as your starting point for research. Each of these brands brings something different to the table, from premium materials to budget-friendly options. We’ll look at what makes each one stand out, so you can confidently choose the right wall panels for your space. This guide will give you a clear overview of your options, helping you match a brand's strengths to your project's specific needs.
USA Builders Depot
If you’re looking for a straightforward, reliable source, USA Builders Depot is an excellent place to start. They offer a great variety of shiplap wall panels designed with both aesthetic appeal and easy installation in mind. This makes them a fantastic choice whether you're hiring a pro or tackling the project yourself. One of the biggest perks is their nationwide shipping, which means you can get high-quality materials delivered right to your door, no matter where your project is located. They cater to both DIY enthusiasts and professional builders, ensuring their products meet a high standard of quality that works for any skill level.
Metrie
Metrie is a name that often comes up when you’re talking about high-quality finishes and architectural details. Their shiplap options are no exception. The company focuses on premium materials and beautiful finishes that can truly transform a room. If your goal is to create a high-end, polished look, Metrie is definitely a brand to consider. Their products are well-known for their durability and straightforward installation process, giving you a final result that not only looks great but is also built to last. They are a strong contender for anyone who prioritizes a refined and elegant aesthetic in their home design.
UFP-Edge
For those who want options, UFP-Edge is a standout. This company specializes in shiplap and siding, and their expertise shows in their diverse product line. They use premium wood and offer an impressive variety of pre-painted and pre-stained styles, from timeless neutrals to bold, modern hues. This is a huge time-saver, as it eliminates the need for painting or staining after installation. If you have a specific color palette in mind or want to explore different textures like rustic or charred wood, UFP-Edge likely has a product that will match your vision perfectly, making it easier to achieve a custom look.
Great American Spaces
If you're aiming for that perfect blend of cozy and chic, Great American Spaces has you covered. Their shiplap panels are specifically designed to create a rustic yet modern feel, which is ideal for adding warmth and character to any interior. This is the brand you turn to when you want your walls to tell a story and become a focal point of the room. Their products are perfect for creating accent walls in living rooms, bedrooms, or entryways that feel both timeless and on-trend. Think modern farmhouse or coastal cottage—if that’s your vibe, you’ll find plenty of inspiration here.
Woodgrain Millwork
With a long history in the industry, Woodgrain Millwork is a trusted name for all things wood. They offer an extensive selection of shiplap wall panels that beautifully merge traditional craftsmanship with clean, modern design. This makes them a versatile choice for a wide range of architectural styles, from classic to contemporary. Because of their deep roots in millwork, you can expect a high level of quality and attention to detail in their products. If you appreciate the beauty of natural wood and want a wide array of profiles and sizes to choose from, Woodgrain Millwork is a reliable source for quality materials.
Armstrong
Armstrong is a well-known name in home improvement, particularly for flooring and ceilings, and they bring that same user-friendly approach to their shiplap panels. Their products are a popular choice for homeowners because they are designed for easy installation, making them perfect for a weekend DIY project. Armstrong offers shiplap in a variety of attractive finishes, allowing you to get the look you want without the extra work of painting. If you’re looking for a simple, accessible way to upgrade your interiors with a trusted brand, their shiplap is a practical and stylish option.
Georgia Pacific
Georgia Pacific is a powerhouse in the building materials industry, and their shiplap panels are engineered for solid performance. This is a brand you can count on for consistency and durability. Their products are designed to look good while standing up to the demands of daily life, making them suitable for both residential and commercial projects. If you’re a contractor or a homeowner who prioritizes long-term performance and structural integrity alongside aesthetic appeal, Georgia Pacific offers reliable solutions that are built to last. Their engineered approach ensures you get a high-quality finish every time.
EverTrue
EverTrue, a brand found at major retailers like Lowe's, specializes in creating shiplap that delivers on both durability and style. They offer a fantastic range of colors and textures, giving you the creative freedom to match your specific design theme. Whether you’re going for a smooth, subtle look or a more rustic, textured feel, EverTrue likely has an option that fits. Their focus on providing stylish, ready-to-install products makes them a go-to for homeowners who want to add a designer touch to their space without a complicated installation process. Their panels are designed to be both beautiful and resilient.
DPI Decorative Panels
If you’re looking to make a unique design statement, DPI Decorative Panels is a brand worth exploring. They offer a selection of shiplap wall panels that are perfect for creating one-of-a-kind interiors. Their focus is on providing high-quality, decorative surfaces that are also easy for the average person to install. This makes them an ideal choice for feature walls, backsplashes, or any area where you want to inject a bit of personality. With DPI, you can move beyond the standard white shiplap and explore different patterns and finishes to create a space that truly reflects your personal style.
Potential Downsides to Consider
As much as I love the character shiplap brings to a room, it’s smart to go into any project with your eyes wide open. Like any design choice, there are a couple of practical things to keep in mind to make sure you’ll be happy with your walls for the long haul. The two most common considerations are the upkeep required to keep it looking fresh and how to style it so it remains a timeless feature rather than a passing trend. Thinking about these points ahead of time will help you plan your project thoughtfully and ensure your new shiplap walls are a feature you'll love for years.
Keeping Shiplap Clean
Let’s be honest: those charming little grooves between shiplap boards can be magnets for dust. It’s one of the most common complaints from homeowners, as the horizontal lines create tiny ledges where dust can settle, especially on an accent wall behind a TV or sofa. The good news is that keeping it clean is pretty straightforward. A quick pass with a vacuum’s brush attachment or a microfiber duster during your regular cleaning routine is usually all it takes to keep the dust at bay. If you’re planning to install shiplap in a high-traffic area, just be prepared to add this simple step to your to-do list to keep it looking crisp and clean.
Avoiding a Dated Look
Because shiplap became so popular with the modern farmhouse trend, some people worry it might look dated down the road. The key to giving it lasting power is to make sure it fits with your home's overall style, rather than just adding it because it's popular. If you overuse it or pair it with too many other rustic elements, it can feel a bit cliché. To keep the look fresh and modern, consider using it on a single accent wall instead of an entire room. You can also create a beautiful contrast by pairing it with contemporary furniture or sleek lighting fixtures. Choosing a color other than classic white—like a sophisticated charcoal gray or a warm greige—can also give it a more timeless and personal feel.
How to Install Shiplap Panels: A Step-by-Step Guide
Ready to transform your room with shiplap? You’ve got this. Installing shiplap is a fantastic project that can dramatically change a space in just a weekend. The key to a smooth installation is all in the prep work. By taking the time to plan your layout and prepare your walls, you’ll ensure a professional-looking finish that you can be proud of. This guide will walk you through every step, from gathering your tools to putting the final board in place.
We’ll cover how to get your walls ready, what materials you’ll need, and how to map out your design before you even pick up a nail gun. Then, we’ll get into the nitty-gritty of the installation itself, including tips for creating those perfect, uniform gaps. We’ll also touch on important considerations like adding a moisture barrier for bathrooms or basements and how to handle common issues you might encounter along the way. Think of this as your complete roadmap to a beautiful shiplap wall. Before you begin, make sure you have your high-quality wall panels ready to go.
Prepping Your Walls for a Flawless Finish
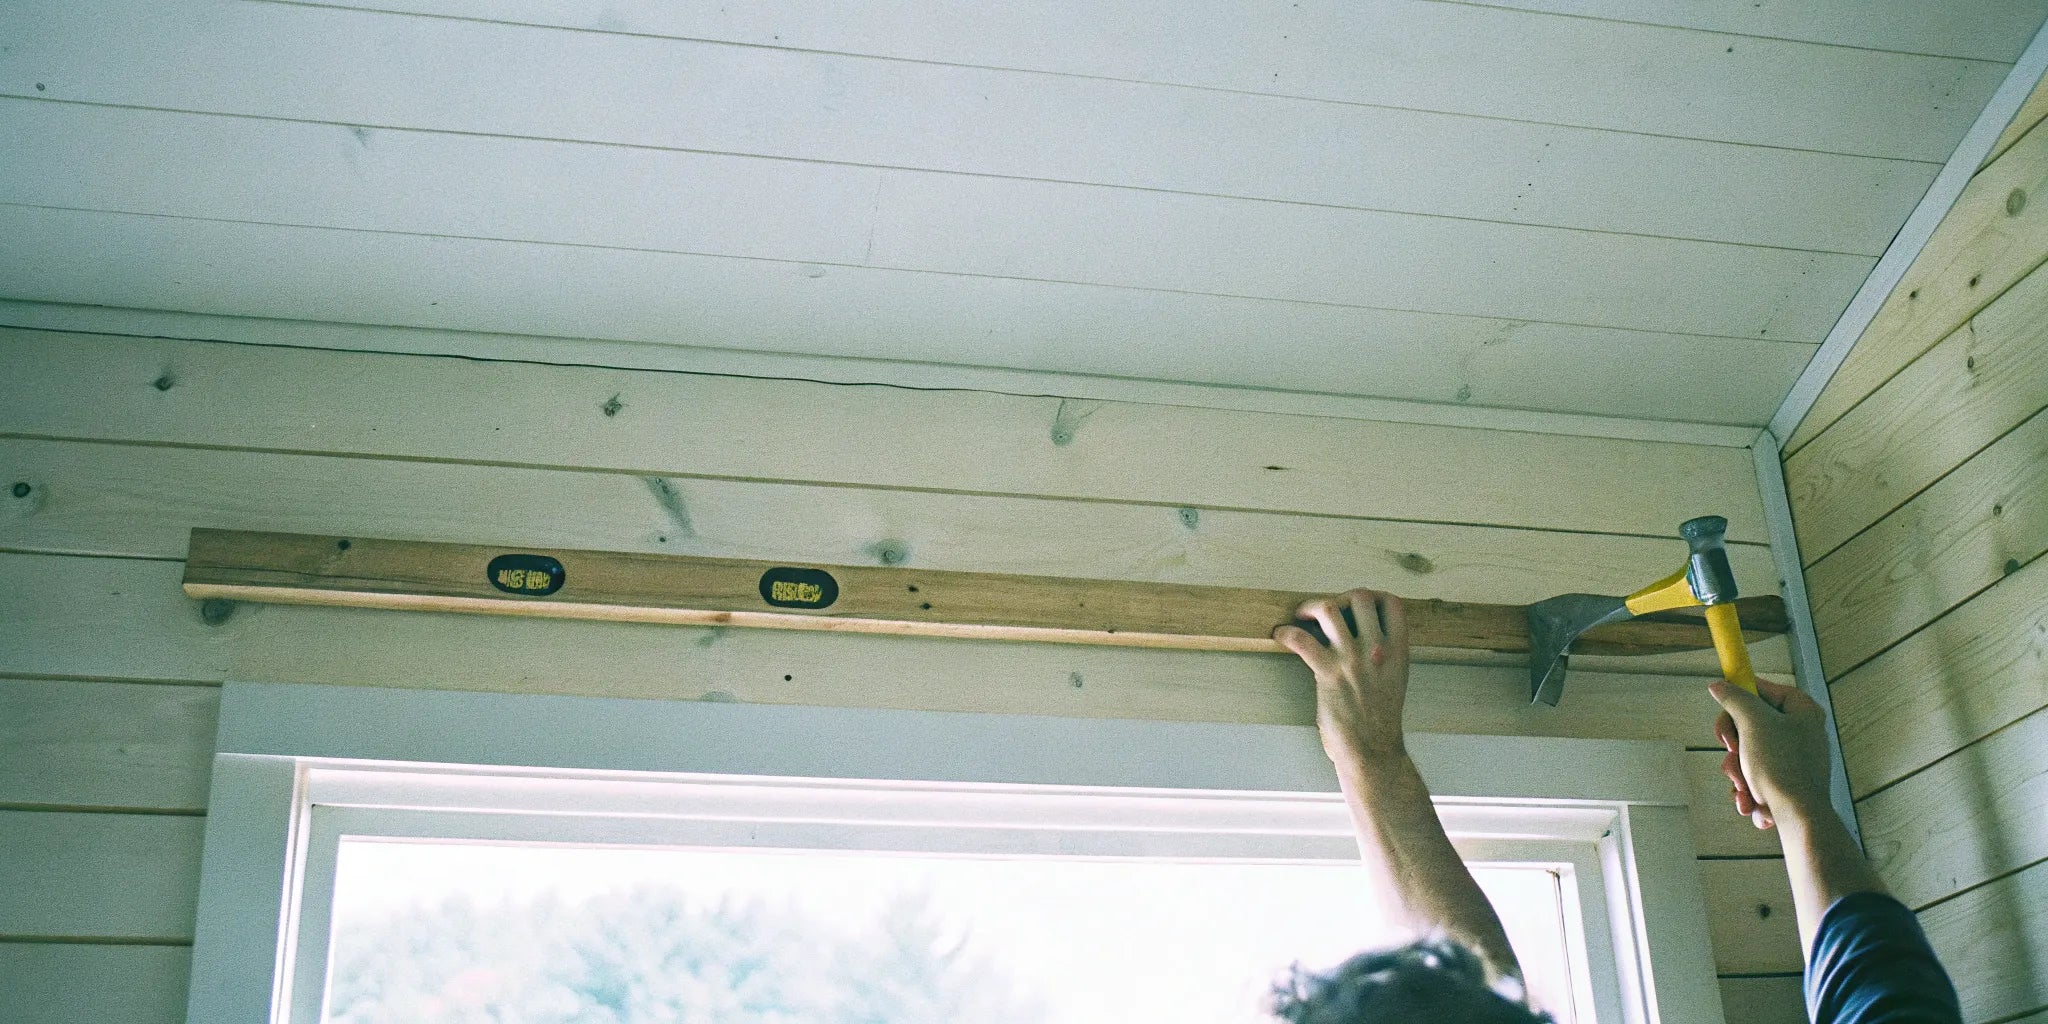
First things first, let’s get your wall ready for its makeover. Start by clearing the area and removing everything from the wall, including outlet covers, light switches, and any existing trim you plan to replace. Now for a pro tip: paint the wall the same color as your shiplap panels. This simple step is a game-changer because it hides the wall color that might otherwise peek through the small gaps between the boards. Next, use a stud finder to locate and mark the wall studs with a pencil. This is crucial because you’ll want to nail your panels directly into the studs for the most secure hold. A solid foundation makes all the difference.
What You'll Need: Tools and Materials
Having everything you need on hand before you start makes the whole process much more enjoyable. Here’s a quick checklist of the essentials. For tools, you’ll want a tape measure, a level, a stud finder, and a miter saw or circular saw for making clean cuts. A nail gun will make attaching the panels much faster and easier than a hammer. On the materials side, you’ll need your shiplap panels, construction adhesive for extra holding power, and nails for your nail gun. Don’t forget spacers—coins work perfectly—to ensure even gaps between boards. Finally, grab some paintable wood filler to cover nail holes for a seamless finish.
Mapping Out Your Shiplap Layout
A little planning goes a long way in avoiding headaches later. Before you make a single cut, measure the height of your wall, from the baseboard to the ceiling or crown molding. This helps you determine how many rows of shiplap you’ll need and if you’ll have to rip the last board to fit. Decide where you want to start—most people begin at the bottom and work their way up. Place your first board against the wall and use a level to make sure it’s perfectly straight. This first board sets the standard for the entire wall, so take your time with it. Also, plan for any cuts you’ll need to make around outlets, windows, or steel doors.
The Step-by-Step Installation Process
With your first board leveled and in position, apply a bead of construction adhesive to the back and press it against the wall. Using your nail gun, secure the board by nailing it into the marked studs. Now, place your spacers on top of the first board and fit the next board into place, ensuring the tongue-and-groove edges connect snugly. Nail the second board into the studs, and just like that, you’re on a roll. Continue this process, working your way up the wall board by board. Remember to check for level every few rows to keep everything straight. For contractors and trade professionals who handle these projects regularly, our trade application offers benefits for sourcing materials.
Applying a Protective Finish
Once your panels are securely on the wall, it’s time for the finishing touches that create a truly polished look. Start by filling any nail holes with a dab of paintable wood filler and sanding it smooth once dry. Next, run a bead of latex caulk along the seams where the shiplap meets corners, the ceiling, or baseboards. This step is a pro secret for achieving a seamless, built-in appearance and also helps protect against dust and moisture. Now, decide on your finish. A couple of coats of paint will give you that classic, clean shiplap look, while a quality stain will highlight the beautiful grain of natural wood panels. For high-moisture areas, be sure to use a waterproof sealant or a paint formulated for damp environments to ensure your beautiful new wall stands the test of time.
Do You Need a Moisture Barrier?
If you’re installing shiplap in a room that sees a lot of moisture, like a bathroom, laundry room, or basement, adding a moisture barrier is a non-negotiable step. This protective layer goes on the wall before the shiplap and helps shield the wall structure from potential water damage and mold growth. You can use a standard house wrap or a vapor barrier sheeting. Simply staple it to the wall, making sure to overlap any seams according to the manufacturer’s instructions. This extra step provides peace of mind and protects your investment for years to come. For these high-moisture areas, you might also consider materials like our durable cement boards as a wall backing.
Fixing Common Installation Mistakes
Even with the best planning, you might run into a few challenges. If your wall is longer than your shiplap boards, you’ll have vertical seams where two boards meet. To make these seams disappear, stagger them so they don’t all line up in one spot. Once the boards are up, you can use a bit of auto body filler to smooth over the seam, then sand and paint for a flawless look. Another common issue is an uneven ceiling line, which may require you to cut the top board at an angle to fit snugly. Take careful measurements and cut slowly to get it just right. These small fixes are what separate a good DIY job from a great one.
The Cost of DIY Mistakes
While installing shiplap yourself can save a lot on labor, it's a project where mistakes can be costly. Forgetting a crucial prep step, like letting your wall panels acclimate for 48-72 hours, can lead to warping and gapping down the line. If not installed correctly, especially in wet places like bathrooms, shiplap can get damaged by moisture, potentially forcing you to replace not just the panels but the wall behind them. These aren't just small cosmetic issues; they often mean buying more materials and spending more of your valuable time on fixes. A professional-looking installation is all in the details, and getting them right the first time is the best way to protect your investment and avoid turning a weekend project into a month-long headache.
Shiplap Design Ideas for Your Home
Once you’ve decided to use shiplap, the fun really begins. Think of these panels as a blank canvas for your personal style. Whether you’re aiming for a cozy, rustic retreat or a clean, modern space, shiplap provides the perfect textured backdrop. The key is to consider all the design elements—from orientation to color—to create a look that feels intentional and completely you. Let’s walk through some ideas to get your creativity flowing.
Horizontal or Vertical? Choosing a Direction
The direction you install your shiplap panels has a major impact on the feel of your room. The classic horizontal installation makes a space feel wider and more expansive, perfect for achieving that sought-after modern farmhouse or coastal vibe. On the other hand, running the panels vertically draws the eye upward, creating a sense of height and drama. This vertical orientation can feel more contemporary and formal, making it a great choice for entryways or rooms with lower ceilings. There’s no wrong answer here; it’s all about the effect you want to create with your wall panels.
Shiplap Styling for Every Room
Shiplap is incredibly versatile and isn’t just for living room accent walls. You can use it to add character and texture in almost any space. Consider installing it on a ceiling to add architectural interest from above. In the kitchen, shiplap makes a fantastic backsplash that’s more unique than standard tile. You can also use it for smaller projects, like building a custom headboard or applying it as wainscoting on the lower portion of a wall for a touch of traditional charm. For moisture-prone areas like bathrooms or laundry rooms, you can get the shiplap look with durable materials like fiber cement boards.
Choosing the Perfect Color and Finish
This is where you can truly make the look your own. While crisp white is a timeless choice that brightens any room, don’t be afraid to explore other options. A moody black or charcoal gray shiplap wall can create a sophisticated and dramatic focal point. Many panels also come in different textures, from smooth and classic to a rustic reclaimed wood style. If you have a specific color in mind, simply choose primed panels and paint them yourself. Seeing how other homeowners have used different colors and finishes in their projects can provide some great inspiration.
Does Shiplap Panel Width Matter?
The width of the shiplap planks you choose plays a subtle but important role in the final look. Wider planks tend to feel more rustic and substantial, making them a great fit for larger rooms or spaces where you want to make a bold statement. Narrower planks create a more delicate, refined look with more frequent shadow lines, which can feel more traditional or detailed. The small gap between the boards is a signature part of the shiplap aesthetic, and the plank width determines the rhythm of these lines on your wall. Trade professionals often consider this detail carefully to match the scale of the room.
How to Complete the Look with Trim
Trim is the finishing touch that pulls the entire look together and gives your shiplap installation a polished, professional appearance. Baseboards, corner trim, and casings around windows and doors hide any raw edges and create a seamless transition between the shiplap and the rest of your walls. Before you paint, be sure to caulk any gaps where the shiplap meets the trim or other walls for a clean finish. Coordinating your trim with other elements, like your flooring, helps create a cohesive design throughout the space. Taking the time to get these details right makes all the difference.
Using Corner Trim for a Polished Edge
When your shiplap walls meet at an inside or outside corner, you're left with exposed, raw edges that can look unfinished. This is where corner trim becomes your best friend. It’s the detail that gives the project a truly professional finish, separating a simple DIY attempt from a polished installation. Corner trim pieces are designed to fit snugly over these edges, creating a crisp, clean line that hides any imperfections in your cuts. It provides a seamless transition between the two walls, giving the entire room a cohesive feel. For a truly integrated look, match your corner trim style to the casings around your steel windows and doors. After installing the trim, a thin bead of caulk along the seams will make it look like it was always meant to be there.
How to Shop for Shiplap Like a Pro
You’ve picked your material and have a design in mind—now it’s time to make a purchase. Shopping for building materials can feel overwhelming, but a little preparation goes a long way. Knowing what to look for ensures you get high-quality panels that fit your budget and project needs. Think of this as your checklist for making a smart, confident purchase that you’ll be happy with for years to come. From comparing costs to storing your panels correctly, these steps will help you avoid common pitfalls and set your project up for success from the very beginning.
How Much Does Shiplap Cost?
The price of shiplap varies quite a bit depending on the material you choose. Solid wood is typically the most expensive, while MDF and engineered wood offer more budget-friendly alternatives. When you browse different wall panels, consider not just the sticker price but also the long-term value. For example, some panels are better suited for specific environments. Shiplap panels that overlap can be a great choice for climates with high heat and low humidity, as they handle expansion and contraction well. Thinking about your room’s specific conditions can help you select a material that offers the best performance for your money, preventing costly replacements down the road.
Breaking Down the Costs per Square Foot
When you're planning your budget, you'll find that shiplap is typically priced by the square foot. This cost can range significantly based on the material. For instance, MDF is often the most affordable option, making it a great choice for large projects or if you're on a tight budget. Pine is a popular mid-range choice that offers the authentic look of wood without the premium price tag of materials like cedar or other hardwoods. PVC and other synthetic options might have a higher upfront cost, but their durability in moist environments can save you money in the long run. To get an accurate estimate, measure your wall's height and width to calculate the total square footage, then add about 10% extra for cuts and mistakes.
Budgeting for Additional Supplies
The cost of the shiplap boards is just the starting point. To get that polished, professional look, you'll need to account for a few other materials. Besides the shiplap boards, you'll also need to budget for supplies like primer, paint, and wood filler to cover any nail holes. You’ll also need nails for your nail gun and construction adhesive for extra security. If you don't already own the necessary tools, you might need to budget for purchasing or renting a miter saw, nail gun, level, and stud finder. Factoring these items into your initial budget will help you avoid any surprise expenses and keep your project on track financially.
Professional Installation vs. DIY Costs
One of the biggest variables in your budget is labor. Installing shiplap yourself can save a lot of money, but it requires time, patience, and a bit of skill. If you’re comfortable with a saw and a nail gun, a DIY installation is a very achievable weekend project. However, hiring a professional ensures the job is done quickly and correctly, which can be well worth the investment, especially for complex layouts or tricky cuts. Professional installation costs can vary widely by location but are often charged by the hour or per square foot. For trade professionals, the efficiency of a quick installation often outweighs the labor cost, while for a homeowner, the satisfaction of a DIY project might be the priority.
What to Look for in a Quality Panel
Quality is in the details. When your panels arrive, take a moment to inspect them. Look for a smooth, consistent finish without blemishes. MDF shiplap, for instance, is a popular choice because it provides an exceptionally smooth surface for painting. Check that the panels are uniform in thickness and that the edges are cut cleanly and precisely. This attention to detail from the manufacturer makes installation much easier and results in a more professional-looking finish. High-quality panels will fit together snugly, creating those clean, crisp lines that shiplap is famous for.
Don't Forget to Check the Warranty
A good warranty is a sign that the manufacturer stands behind its product. Before you buy, check the warranty details. What does it cover and for how long? A strong warranty reflects a company’s commitment to customer satisfaction and product reliability. It gives you peace of mind knowing that if you run into any issues with defects or premature wear, you have a path for resolution. Don’t just see it as a piece of paper; view it as an indicator of the product's quality and the company's integrity. It’s a simple step that protects your investment.
Tips for Ordering the Right Amount
Ready to place your order? First, double-check your measurements. Measure the height and width of your wall to calculate the total square footage. Then, order about 10% extra to account for any cutting mistakes or oddly shaped pieces you might need. Before you click "buy," take a few minutes to read through customer reviews for the specific panels you’re considering. This gives you real-world insight into how the product looks and performs. For contractors and designers ordering for larger projects, see if the supplier offers a trade program, which can provide specialized support and pricing through a Trade Application.
How to Store Your Panels Before Installation
Once your shiplap arrives, don’t lean it against a wall. Storing panels improperly can cause them to warp, making installation a nightmare. The best practice is to lay the panels flat on the floor in the room where you plan to install them. Let them acclimate to the room's temperature and humidity for at least 48 to 72 hours before you begin. This simple step helps the wood or MDF adjust to its new environment, significantly reducing the risk of shrinking, swelling, or warping after it’s on the wall. It’s a bit of patience that pays off with a beautiful, long-lasting finish.
Where to Source Your Shiplap
Once you know what you're looking for, you have a few great options for sourcing your shiplap. Big-box home improvement stores are convenient for standard MDF or pine panels, making them a good starting point for many DIY projects. For higher-end solid wood or custom profiles, a local lumber yard is your best bet; the staff there can offer expert advice and high-quality materials. Then there are dedicated online suppliers, which often provide the widest selection and the convenience of home delivery. A supplier like USA Builders Depot can ship a huge variety of wall panels, from unfinished wood to specialty finishes, directly to your job site, saving you time and hassle. Exploring these different avenues will help you find the perfect panels that fit both your design vision and your project's logistics.
How to Keep Your Shiplap Walls Looking New
You’ve put in the work to install your beautiful shiplap walls, and now it’s time to make sure they stay that way. Thankfully, shiplap is surprisingly low-maintenance. A little bit of routine care is all it takes to keep your panels looking fresh and clean for years to come. Whether you have classic wood or modern MDF, these simple tips will help you protect your investment and keep your walls looking their best.
How to Safely Clean Your Shiplap
The key to cleaning shiplap is to be gentle. For regular upkeep, simply wipe the panels down with a soft, dry cloth or a duster to remove any dust that has settled on the grooves. You can also use a vacuum with a soft brush attachment. If you’re dealing with smudges or grime, a slightly damp cloth with a mild soap and water solution will do the trick. Be sure to avoid harsh chemical cleaners or abrasive sponges, as they can strip the paint or damage the finish of your panels. Always test your cleaning solution in an inconspicuous spot first to ensure it doesn’t cause any discoloration.
Can You Paint or Restain Shiplap?
One of the best things about shiplap is its versatility. If you decide to change your room’s color scheme down the road, you can easily give your panels a fresh look. For most painted shiplap, a light sanding followed by a new coat of paint is all you need. If you have natural wood panels, you can sand them down and apply a new stain to match your updated decor. For the best results with staining, it’s a good idea to apply a wood conditioner first. This helps the wood absorb the stain evenly, preventing a blotchy finish and giving you a professional-looking result.
How to Prevent Scratches and Dents
A little prevention goes a long way in keeping your shiplap pristine. The most common culprits for damage are scuffs and dents from furniture and everyday life. Try to leave a small gap between your walls and heavy pieces like sofas or bookcases to avoid constant rubbing that can wear away the paint. Be mindful when you’re vacuuming or moving things around the room to prevent accidental bumps. Taking a moment to be careful is much easier than touching up scratches later. This simple awareness is a core part of any good home maintenance routine.
Protecting Shiplap from Moisture Damage
Moisture can be a major issue for wood and MDF shiplap, so it’s important to manage humidity levels in your home. In areas like bathrooms, kitchens, and laundry rooms, always use an exhaust fan to pull steam and moist air out of the room. Proper ventilation is your best defense against warping, swelling, or mildew growth. If you’re planning a project in a moisture-prone area, your best bet is to start with a material designed for that environment. Using moisture-resistant wall panels, like PVC or specially treated options, will give you peace of mind and ensure your walls stand the test of time.
Simple Tips for Long-Lasting Shiplap
To keep your shiplap in top condition for the long haul, make a habit of giving it a quick inspection every few months. Look for any small chips, cracks, or signs of wear, especially in high-traffic areas. Addressing these minor issues right away will prevent them from turning into bigger problems. For an extra layer of protection, you can apply a coat of clear, protective sealant. This can be especially helpful in homes with kids or pets, as it adds a durable barrier against scuffs and stains. A little proactive care ensures your shiplap remains a beautiful and lasting feature in your home.
Related Articles
- What is black shiplap? Using Shiplap in Interior Design
- Wall Paneling Ideas & Trends for 2025 | Transform Your Home with Style
- Paneling Clips: Guide to Seamless Wall Panel Installation
Frequently Asked Questions
What's the real cost of a shiplap project? The final cost depends on more than just the price of the panels. The material you choose is the biggest factor, with solid wood being the most premium option and MDF offering a more budget-friendly alternative. Beyond the panels themselves, you’ll need to account for tools, especially if you don't already own a nail gun or miter saw. Other costs include construction adhesive, nails, and paint or stain if you buy unfinished boards. Always plan to purchase about 10% more material than your measurements call for to cover any cutting mistakes.
Should I install shiplap myself or hire a contractor? Installing shiplap is a very achievable DIY project if you're comfortable with basic carpentry skills. If you can accurately measure, use a level, and operate a saw and nail gun, you can get a great result. However, if your walls are uneven, you have complex cuts to make around windows or doors, or you simply want a perfect finish without the learning curve, hiring a professional is a great idea. A pro will handle the job efficiently and troubleshoot any unexpected issues that come up.
Is shiplap the same as tongue and groove? They look similar, but they are different. The distinction is in how the boards connect. Shiplap boards have an L-shaped notch, called a rabbet, on each side that allows them to overlap. This creates a distinct, narrow gap between the boards. Tongue and groove boards, on the other hand, have a "tongue" on one edge and a "groove" on the other that fit together tightly, creating a more seamless, flat surface. Both are great options, but shiplap gives you that signature shadow line.
Can I put shiplap in a bathroom or kitchen? Absolutely, as long as you choose the right material and take the proper precautions. For rooms with high humidity and potential splashes, avoid standard wood or MDF. Instead, opt for waterproof wall panels made from PVC or vinyl, which won’t warp or grow mold. It's also essential to install a moisture barrier on the wall before you put up the panels and ensure the room has good ventilation to manage steam.
What if one of my shiplap boards gets damaged? One of the great things about shiplap is that you can often repair a single damaged board without having to redo the entire wall. To replace a board, you'll need to carefully cut it out with a multi-tool, being cautious not to damage the surrounding panels. Then, you can cut a new board to size, remove the bottom part of its groove so it can fit flat, and secure it in place with construction adhesive and a few finish nails. A little wood filler and a touch of paint will make the repair disappear.