


Wall Panel Adhesive 101: The Ultimate Guide
Staring at a wall of glues in the hardware store can be overwhelming. You see construction adhesives, special formulas, and tubes promising an "instant grab." So, how do you choose? The right wall panel adhesive is the key to a project that lasts. It’s the difference between a stunning feature wall and a DIY disaster with peeling corners. The perfect choice depends on your panel’s material, its weight, and where you’re installing it. This guide cuts through the confusion, giving you a clear path to picking the right product for a secure, long-lasting bond.
Key Takeaways
- Choose the Right Adhesive for the Job: Select your adhesive based on the panel's material and the room's conditions. Heavy wood panels need a strong construction adhesive, while panels in high-moisture areas like bathrooms require a waterproof formula to last.
- Don't Skip Surface Preparation: Your adhesive needs a clean, dry, and smooth surface to create a lasting bond. Wiping down walls to remove dust and sanding any rough spots is a critical first step for a professional installation.
- Apply with Precision: Use the right amount of glue—too much causes messy squeeze-out, and too little creates weak spots. Always dry-fit your panels and use a level to ensure perfect alignment before the adhesive sets.
What Is 3D Wall Panel Adhesive?
When you’re ready to install beautiful new wall panels, it’s easy to focus on the panels themselves and treat the adhesive as an afterthought. But the glue you choose is the unsung hero of your project. Think of it as the foundation of your new wall design—get it right, and your panels will stay put for years. Get it wrong, and you could be dealing with peeling corners and sagging sections down the road.
3D wall panel adhesive is a special type of glue made to bond panels securely to your walls. Unlike all-purpose craft glue, it’s formulated to handle the weight of the panels and withstand environmental factors like changes in temperature or humidity. The right adhesive creates a permanent, reliable bond between the panel and the surface, ensuring your design looks just as good years from now as it does on installation day. Choosing the correct one is the key to a professional-looking finish that lasts.
Matching Your Adhesive to the Panel Material
The material of your 3D wall panels is the biggest factor in deciding which adhesive to use. Different materials have different weights, textures, and levels of flexibility, and your glue needs to be compatible. For example, heavier Unfinished Wood Wall Panels require a high-strength construction adhesive with a strong initial grab. Lighter WPC or PVC panels might work with a different formula. It’s also smart to consider your climate. Some adhesives are more flexible, which helps them maintain a strong bond as materials naturally expand and contract with temperature shifts. Always check the adhesive’s label to confirm it works with your specific panel material.
Why You Can't Skip Wall Prep
You could have the best adhesive in the world, but it won’t do its job if the wall isn’t ready. A clean, smooth surface is essential for a strong, lasting bond. Before you even think about opening that tube of glue, you need to prep your wall. This means wiping it down to remove any dust, dirt, or grease. If you have any peeling paint or bumps, sand them down for a smooth finish. According to a step-by-step guide, a clean surface is crucial for achieving a strong bond. Make sure the wall is completely dry before you start applying anything—moisture is the enemy of a good adhesive bond.
What to Look for in a Wall Panel Adhesive
So, what makes an adhesive great for wall panels? A good adhesive should provide a powerful, permanent bond and be easy to work with. Look for a product with a strong "initial grab" or "tack," which means it will hold the panel in place immediately so you don't have to stand there holding it for ages. It should also be easy to apply, ideally from a caulk gun for clean, even lines. Be careful not to use too much, as the excess can squeeze out from the edges and create a mess that’s tough to clean up. The best choice is always an adhesive specifically designed for wall panel installation.
Project Planning and Safety Considerations
A successful wall panel project is all about the details you handle before you even open the first tube of adhesive. Taking the time to plan your material needs and think about safety not only makes the installation process smoother but also ensures your final result is professional and durable. A little bit of prep work saves you from making extra trips to the hardware store and prevents common mistakes. Let's walk through a few key considerations that will set you up for success, from calculating how much glue you’ll need to understanding what happens if you ever decide to remove the panels down the road.
Calculate Your Material Needs
Nothing stops a project in its tracks faster than running out of materials halfway through. Before you begin, take careful measurements of your space and count the number of panels you'll be installing. This will help you create a precise shopping list. It’s always a good idea to buy a little extra of everything—panels, adhesive, and caulk—to account for any mistakes or miscalculations. Having a surplus is much less stressful than realizing you’re one tube short on a Sunday evening. Proper planning ensures you have everything you need on hand, letting you focus on the installation itself without any interruptions.
Adhesive and Caulk Quantities
When it comes to adhesive, a good rule of thumb is to plan for one 10-ounce tube of strong construction adhesive, like Loctite PL Premium 3X, for every three panels you install. This ensures you have enough product to create a secure, even bond without skimping. For finishing touches, you’ll also need a color-matching textured caulk to fill any small gaps between the panels. Plan on using about one tube of caulk for every four panels. These estimates give you a reliable baseline for your shopping list, helping you buy the right amount from the start.
Understanding Cure Times
Patience is key when working with adhesives. It’s important to understand the difference between "set time" and "cure time." An adhesive like Loctite PL Premium 3X typically sets in about 30 minutes, which means the panel will be held firmly in place and you can move on to the next one. However, the adhesive won't be fully cured—meaning it hasn't reached its maximum strength—for about 24 hours. During this curing period, it's best to avoid bumping or putting any pressure on the panels to ensure the bond becomes as strong and permanent as possible.
Don't Forget Personal Safety Gear
Whether you’re a seasoned contractor or a weekend DIYer, safety should always be your top priority. When you’re cutting wall panels or working with power tools, you need to protect yourself. Always wear safety glasses to shield your eyes from dust and flying debris. If you're using a saw, ear protection is a must to prevent hearing damage. Finally, a dust mask is essential for keeping your lungs clear of fine particles, especially when cutting wood or composite materials. These simple precautions are easy to take and are critical for a safe and successful project. For more information, you can review general workplace safety guidelines.
Consider a Vapor Barrier for Certain Walls
In some situations, you may need to install a vapor barrier before your wall panels go up. A vapor barrier is a special material that prevents moisture from passing through the wall, which can help prevent issues like mold and mildew. This step is particularly important if your wall has spray foam insulation, as the foam can trap moisture. By placing a vapor barrier between the wall studs and the wood paneling, you create an extra layer of protection that keeps your walls dry and your panels in great condition for years to come. It’s a preventative measure that can save you a lot of trouble later on.
A Note on Removal: Expect Drywall Damage
It’s important to go into this project knowing that high-strength construction adhesive creates a permanent bond. This is fantastic for ensuring your panels stay put, but it also means that removing them will not be a simple task. If you decide to take the panels down in the future, you should expect some damage to the drywall underneath, whether you used glue alone or a combination of glue and screws. The adhesive will likely pull off the paper face of the drywall, and you’ll need to plan for repairs. Thinking of this as a long-term installation helps set realistic expectations from the start.
What Are the Best Adhesives for 3D Wall Panels?
Once you’ve prepped your walls, it’s time to choose your adhesive. The right glue is the unsung hero of any successful wall panel installation, ensuring your design stays put for years to come. The best choice depends entirely on your specific project—the weight of your panels, the surface you’re applying them to, and the environment of the room. Think of it like this: you wouldn’t use the same glue for a lightweight foam panel in a bedroom as you would for a heavy wood wall panel in a bathroom.
Navigating the adhesive aisle can feel overwhelming, but most options fall into a few key categories. From heavy-duty construction adhesives that can hold up substantial materials to specialized formulas for wet environments, each type has a specific job. Understanding the strengths of each will help you pick the perfect match for your project, guaranteeing a secure bond and a professional finish. This choice is just as important as the panels themselves because the wrong adhesive can lead to sagging, peeling, or complete failure down the road. Let’s break down the most common types of adhesives and when you should use them.
When to Use a Heavy-Duty Construction Adhesive
When you’re working with heavier materials like WPC, natural wood, or fiber cement boards, you need an adhesive with serious holding power. Construction adhesives are the workhorses of the glue world, formulated for strength and long-term durability. These are typically polyurethane-based and create a permanent bond that can handle significant weight without failing. They are also a great choice for less-than-perfect walls, as their gap-filling properties can help compensate for minor surface irregularities. If you’re installing panels in an area with wide temperature swings, look for a flexible adhesive that can expand and contract without losing its grip.
Choosing an FRP Adhesive for Humid Spaces
For installations in moisture-prone areas like bathrooms, kitchens, or laundry rooms, a standard adhesive just won’t cut it. You need something that can stand up to humidity and prevent water from getting behind the panels, which can lead to mold and delamination. FRP (fiber-reinforced plastic) adhesives are specifically designed for this purpose. For example, Titebond Fast Grab FRP Construction Adhesive is a professional-strength formula made for installing FRP panels over porous surfaces. Its powerful bond and moisture resistance ensure your panels stay secure and protected, even in the most challenging environments.
Water-Based Adhesives: The Low-Mess Option
If you’re working with lightweight panels like PVC or plant fiber in a dry area, a water-based adhesive is an excellent, user-friendly option. The biggest advantage here is the easy cleanup. As long as the adhesive is still wet, you can wipe away any excess or mistakes with just a damp cloth—no harsh chemicals required. Many water-based formulas are also low-odor and have low VOCs (volatile organic compounds), making them a healthier choice for indoor projects, especially if you’re sensitive to strong smells. Just remember that their holding power isn’t as robust as construction adhesives, so reserve them for lighter materials.
Need Speed? Try an Instant Grab Adhesive
For professionals and DIYers who value efficiency, instant grab adhesives are a game-changer. These formulas are designed to create a quick, strong initial bond that holds panels in place immediately, minimizing the need for clamps or temporary bracing. This is especially helpful for vertical installations on walls where panels might otherwise slide down before the glue sets. For the best results, apply the adhesive evenly across the back of the panel with a V-notch trowel, then press it firmly onto the wall. This immediate tackiness saves a ton of time and frustration, letting you move on to the next panel more quickly.
Our Top Picks: The Best Wall Panel Adhesive Brands
When you’re ready to install your wall panels, the adhesive you choose is just as important as the panels themselves. A high-quality adhesive creates a secure, long-lasting bond that protects your investment and ensures a professional finish. While there are many options on the market, a few brands consistently stand out for their reliability and performance. Using a trusted product takes the guesswork out of the installation process, giving you peace of mind that your panels will stay put.
Our Go-To Adhesive Solutions
Choosing the right adhesive doesn’t have to be overwhelming. We recommend starting with professional-grade construction adhesives known for their strong bonding capabilities. Brands like Titebond and IZODEKOR offer products specifically formulated for paneling, providing the strength needed for a secure installation. These adhesives are designed to work with different materials and under various conditions, making them versatile choices for both homeowners and trade professionals. By selecting a product from a reputable brand, you can feel confident that your Acoustic Wall Panels will look great for years to come.
Why We Recommend Titebond for FRP Panels
Titebond is a household name in the construction world for a reason. Their Fast Grab FRP Adhesive is an excellent choice, especially for fiber-reinforced plastic (FRP) panels, but it also works well over most porous surfaces like drywall. This professional-strength formula provides a quick grab to hold panels in place with minimal bracing. Its non-flammable, low-odor properties make it safer to use indoors. We often recommend it for projects in kitchens or bathrooms where moisture resistance is a key consideration. You can learn more about its specifications directly from the Titebond website.
IZODEKOR: When You Need a Serious Bond
For heavier panels or installations on slightly uneven surfaces, a powerful construction adhesive is a must. IZODEKOR Construction Adhesive is a fantastic option known for its acrylic formula that delivers an impressive "instant grab." This feature is a huge time-saver, as it helps hold panels firmly in place right away, reducing the need for extensive support while the adhesive cures. It’s designed to create a strong, durable bond on a wide range of materials, making it a versatile workhorse for many different types of wall panel projects.
More Pro-Grade Adhesives to Consider
Beyond specific brands, it’s smart to consider adhesives with flexible properties, especially for panels installed in areas with temperature fluctuations. A flexible adhesive can expand and contract with the panels, preventing cracks and maintaining a solid bond over time. For exterior projects, like those using our Exterior Fluted Slat Wall Panels, this is especially important. Always check the product label to ensure it’s rated for outdoor use and compatible with your specific panel material. Regular maintenance, like wiping panels down and checking for loose edges, will also help extend the life of your installation.
Liquid Nails
You’ve probably seen the iconic red and black tube of Liquid Nails in just about every hardware store, and for good reason. It’s a widely used construction adhesive that provides a powerful bond for heavy materials, making it a reliable choice for many paneling projects. According to discussions among builders, it’s a common go-to for its strength and availability. If you're installing substantial Natural Veneer Wall Panels or other weighty materials, Liquid Nails offers the holding power you need to ensure they stay securely in place. Just be sure to check the specific formula, as the brand offers a range of products tailored to different applications, from general construction to heavy-duty projects.
PL Premium
Another heavyweight in the world of construction adhesives is Loctite PL Premium. This polyurethane-based adhesive is known for its exceptional durability and versatility. It bonds to a wide variety of materials, including wood, drywall, concrete, and metal, making it a fantastic all-around choice for complex installations. Professionals often recommend it because it creates a bond that is actually stronger than many of the materials it’s holding together. It’s also waterproof and performs well in a range of temperatures, so you can use it with confidence in kitchens, bathrooms, or even for some covered outdoor applications. Its gap-filling capability also helps create a solid bond on slightly irregular surfaces.
3M Adhesives (4200 & 5200)
When you need a bond that is both incredibly strong and flexible, 3M's marine-grade adhesives are in a class of their own. While designed for boats, their performance translates perfectly to demanding construction projects. As noted in a popular Reddit discussion, 3M 4200 is often considered a "gold standard" for indoor use where you need a tough, semi-permanent bond. For outdoor projects, 3M 5200 is the ultimate choice. It creates a permanent, waterproof seal that is ideal for installing materials like our Exterior Fluted Slat Wall Panels, ensuring they withstand the elements without fail.
F-26 Construction Adhesive
F-26 Construction Adhesive is another product that gets high marks from professionals for its robust bonding capabilities. It’s a solvent-based formula that offers a strong, permanent bond for a wide range of building materials. This makes it a dependable choice for various panel installations, from decorative interior panels to more structural applications. Like other high-strength construction adhesives, it’s designed to provide excellent holding power and can be a great solution for heavier panels where you can’t afford any sagging or shifting over time. When you see a product consistently recommended by people in the trade, it’s usually a safe bet for achieving a professional-quality result.
Specialty Adhesives: Epoxy and Mastic
Sometimes, your project calls for a more specialized solution. Two-component epoxy adhesives, for instance, create an incredibly strong and rigid bond that works on many different surfaces, including non-porous ones where other glues might fail. They are great for situations that require maximum strength. On the other hand, latex mastic is often suggested for installing plywood-backed panels. For the best results with mastic, it’s recommended to apply it with full coverage across the back of the panel rather than just in beads. This ensures a complete and uniform bond, preventing weak spots and ensuring the panel lies perfectly flat against the wall.
How to Choose the Right Adhesive for Your Panels
Picking the right adhesive is just as important as choosing your beautiful new wall panels. Think of it as the unsung hero of your project—it’s what keeps your design looking flawless for years to come. The wrong glue can lead to panels peeling, sagging, or even falling off the wall, and nobody wants to deal with that kind of DIY disaster. The best choice depends entirely on your specific project, so there’s no single "perfect" adhesive for every situation.
Before you even think about adding a tube of adhesive to your cart, you need to consider a few key factors. What are your wall panels made of, and how heavy are they? What kind of wall are you installing them on? Is the room humid, like a bathroom, or will it experience temperature swings? Answering these questions will help you narrow down your options from the dozens on the shelf and find the one that provides a secure, long-lasting bond. Let’s walk through exactly what you need to look for to make the right choice.
Start with Your Panel's Weight and Material
First things first, let's talk about your panels. The material and weight are the biggest factors in choosing an adhesive. Lightweight PVC or foam panels don’t need the same heavy-duty bonding power as denser Interior WPC Fluted Slat Wall Panels. For heavier materials, you’ll want a high-strength construction adhesive that can support the weight without failing. It’s also smart to consider the environment. If your panels are in a room with direct sunlight or fluctuating temperatures, look for a flexible adhesive. This allows the panels to expand and contract slightly without breaking the bond, preventing cracks and peeling down the road. Always check the adhesive’s label to confirm it’s compatible with your panel material.
Is Your Wall Surface Ready for Adhesive?
Your wall’s condition is the foundation of your project. For an adhesive to work correctly, the wall surface must be clean, dry, and smooth. Before you start, wipe down the wall to remove any dust, grease, or debris. If the surface is glossy, give it a light sanding to help the adhesive grip. The type of wall matters, too. An adhesive that works perfectly on drywall might not bond well to concrete, plaster, or tile. Porous surfaces like unpainted drywall or plaster may need a coat of primer first to prevent the wall from absorbing the adhesive before it can create a strong bond. Taking the time to prep your surface properly is a non-negotiable step for a successful installation.
Will Your Panels Be Exposed to Moisture?
Where are you installing these panels? The answer dramatically changes your adhesive needs. For high-moisture areas like bathrooms, laundry rooms, or kitchens, you absolutely need a waterproof or moisture-resistant adhesive. Standard construction glue can break down when exposed to constant humidity, causing your panels to peel away from the wall. Look for products specifically designed for these environments, like FRP (Fiberglass Reinforced Panel) adhesives. The same logic applies to Exterior Shiplap Cladding, which requires a durable, weatherproof adhesive that can withstand rain, sun, and temperature changes. Don’t skip this step—using the right glue in a damp environment is critical for longevity.
How Will You Apply the Adhesive?
Finally, consider how you’ll be applying the adhesive. Some formulas offer an "instant grab," which holds the panel in place immediately. This is great for speeding up installation, but it leaves little room for error if you need to adjust the panel’s position. Other adhesives have a longer "open time," giving you a few minutes to slide the panel into perfect alignment. As a general rule, avoid using too much adhesive. A little goes a long way, and applying a thin, even layer is more effective than big globs. Excess glue can squeeze out from the seams, creating a mess that’s difficult to clean and can ruin the look of your finished wall. For more tips, check out our complete guide to stunning walls.
A Step-by-Step Guide to Installing Wall Panels
Now that you’ve chosen the perfect adhesive, you’re ready for the fun part: the installation. Taking a methodical, step-by-step approach is the key to achieving a professional-looking finish that you’ll be proud of. Don’t rush the process—taking your time with preparation and planning will save you from headaches later on. From letting your panels acclimate to adding the final finishing touches, each step is important. We’ll walk you through the entire process, giving you the clear, actionable advice you need to transform your space with confidence.
Step 1: Acclimatize Your Panels
This is a simple step, but it’s one that people often skip. Before you install them, you need to let your wall panels get used to their new home. Bring the panels into the room where they’ll be installed and let them sit for at least 48-72 hours. This allows the material, especially natural products like our Unfinished Wood Wall Panels, to adjust to the room's temperature and humidity levels. Acclimatizing helps prevent the panels from warping, shrinking, or expanding after they’re on the wall, which could otherwise create unsightly gaps or buckling down the line. Just lay them flat or stand them against a wall, and let them be.
Step 2: Prepare Your Wall Surface
As we’ve mentioned, your adhesive needs a clean, dry, and smooth surface to create a lasting bond. Start by wiping down the walls with a damp cloth to remove any dust, dirt, or grime, and let it dry completely. If you have any bumps, old nail holes, or peeling paint, now is the time to sand them down and fill them in. A smooth, even surface is a critical first step for a professional installation. If your wall is freshly painted, make sure you wait for the paint to fully cure—not just dry—before applying any adhesive. This can take several days, so check your paint can for specific instructions.
Handling Uneven Walls with Furring Strips
If your walls are noticeably uneven or wavy, don’t worry—you can still get a perfectly flat finish. The solution is to install furring strips, which are thin strips of wood or metal that you attach to the wall first. These strips create a new, perfectly level framework for your panels. You’ll typically install them horizontally, spaced about 16 inches apart, creating a grid that bridges any dips or bows in the original wall. This ensures your panels lie flat and your seams line up perfectly, giving you a much more professional result than if you tried to glue them directly to a bumpy surface.
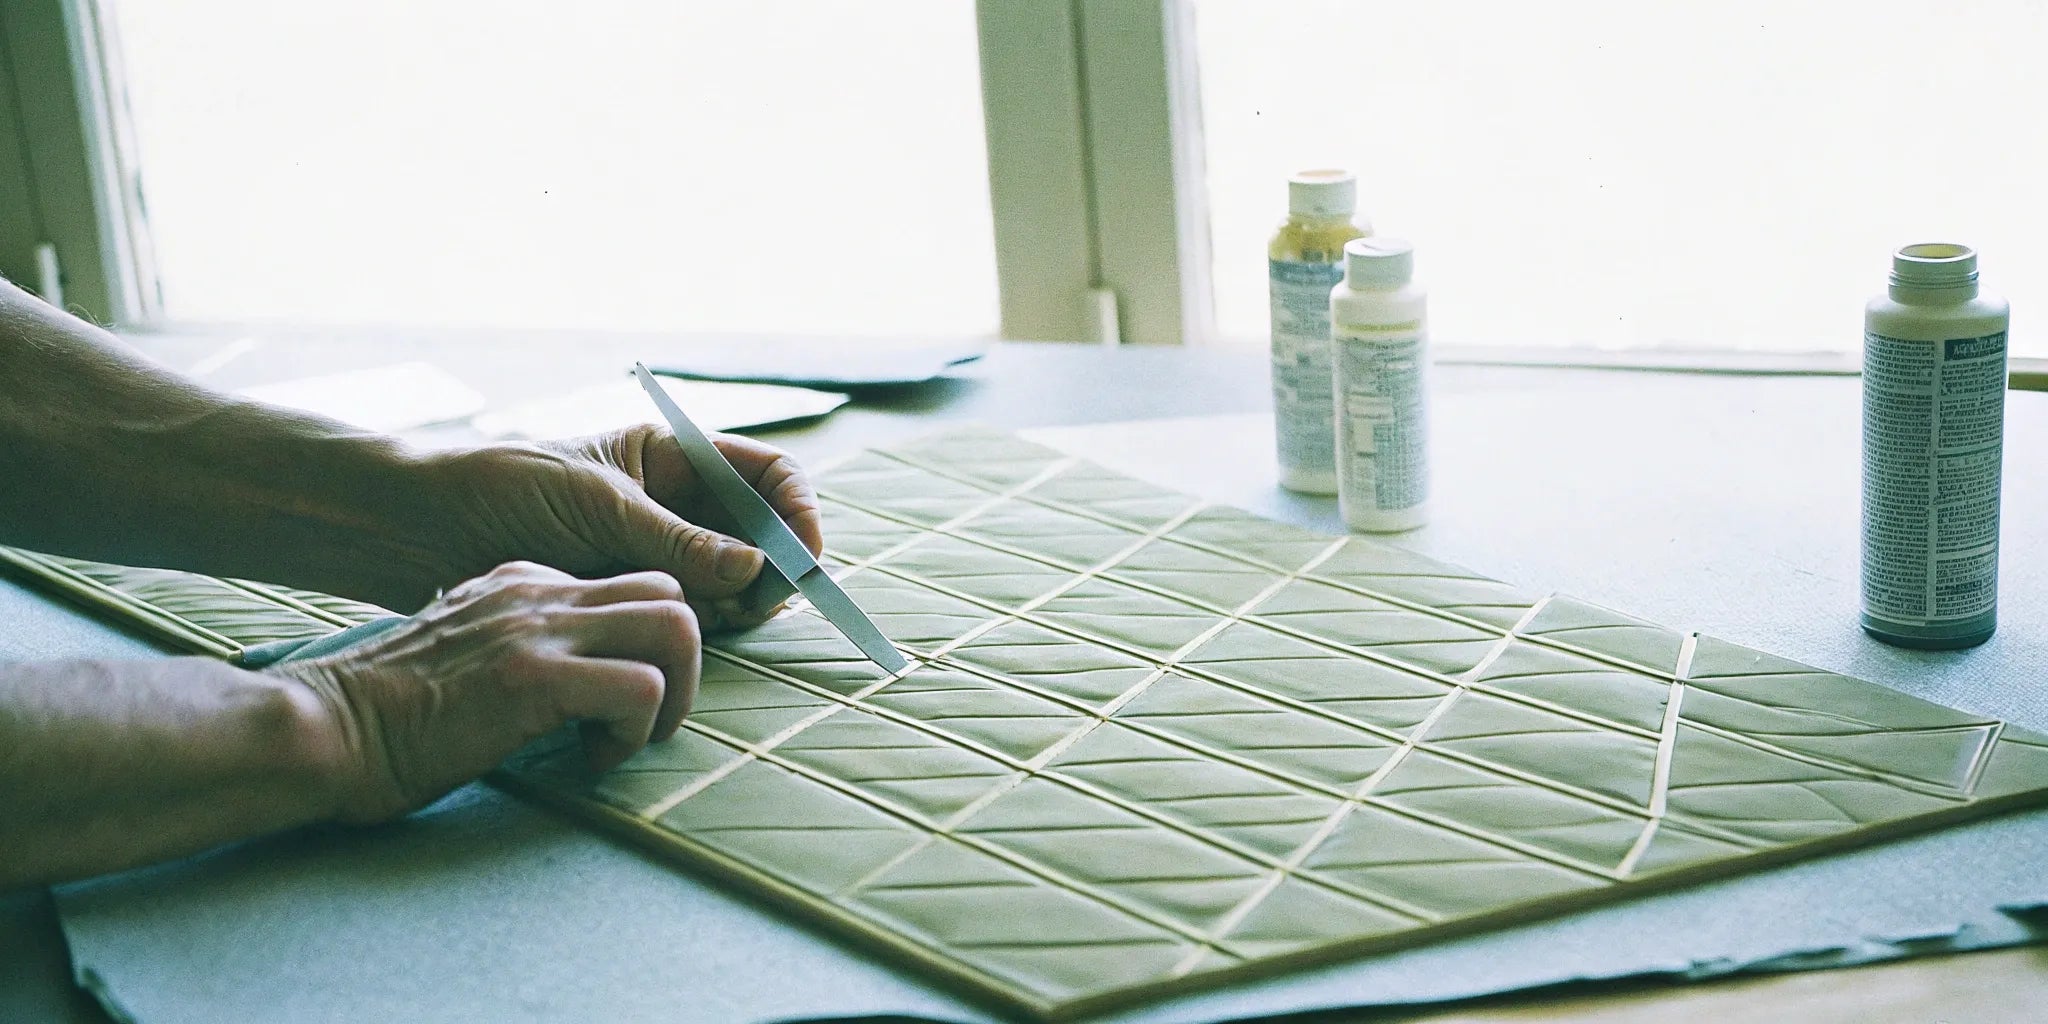
Step 3: Plan Your Layout and Make Cuts
Before you open a single tube of adhesive, plan your layout. Lay the panels out on the floor to see how they’ll fit on the wall. This is called "dry-fitting," and it helps you decide where to start your first panel and where your cuts will need to be. It’s usually best to start in the center of the wall and work your way out, which makes the design look balanced. Measure your wall carefully and mark your panels for any necessary cuts. A good rule of thumb is to measure twice and cut once. Use a fine-toothed saw for clean cuts on wood or WPC panels and a utility knife for lighter materials like PVC.
How to Mark Cutouts for Outlets
Cutting around outlets and light switches can seem tricky, but there’s a simple trick to get it right. First, turn off the power to the outlet at the breaker box. Then, apply a bit of lipstick or chalk to the edges of the electrical box. Carefully press your panel into position over the box, then pull it away. The lipstick or chalk will leave a perfect outline on the back of the panel, showing you exactly where you need to cut. Use a jigsaw or a drywall saw to carefully cut out the marked area, and your panel should fit perfectly around the outlet.
Step 4: Apply the Adhesive Like a Pro
With your panels cut and your layout planned, it’s time to apply the adhesive. The goal is to get an even application without using too much. Applying too much glue can cause it to squeeze out from the seams when you press the panel to the wall, creating a mess that’s difficult to clean. On the other hand, using too little can create weak spots where the panel doesn’t fully bond to the wall. A steady, consistent application is key. Always work in a well-ventilated area, especially when using strong construction adhesives.
Adhesive Application Techniques
For the best results, use a caulk gun to apply your adhesive. This gives you much better control than trying to squeeze it directly from the tube. A common technique is to apply small dabs of glue every 10 to 12 inches across the back of the panel, making sure to keep them about an inch from the edge to prevent squeeze-out. Some pros prefer applying the adhesive in a wavy "S" pattern. After applying the glue, press the panel firmly against the wall, then gently pull it away for a moment. This allows the adhesive to become tacky, creating a stronger initial grab when you press it back into place for good.
Step 5: Install the Panels
Now, it’s time to put the panels on the wall. Start with your first panel, pressing it firmly into place. Use a level to make sure it’s perfectly straight—this first panel will guide all the others, so it’s critical to get it right. Once it’s in position, apply even pressure across the entire surface to ensure a solid bond with the adhesive. Move on to the next panel, fitting it snugly against the first one, and repeat the process. Work your way across the wall, checking for level as you go and wiping away any excess adhesive with a damp cloth before it has a chance to dry.
Remember to Leave an Expansion Gap
For materials like wood, WPC, or even some plastics, it’s important to leave a tiny gap between the panels and at the edges of the wall (where it meets the floor, ceiling, or corners). This is called an expansion gap, and it should be about the thickness of a dime. This small space allows the panels to naturally expand and contract with changes in temperature and humidity without buckling or putting stress on the seams. Don’t worry, this gap will be covered later by your baseboards, crown molding, or corner trim, so it won’t be visible in the finished design.
Step 6: Add the Finishing Touches
Once all your panels are installed and the adhesive has had time to cure, it’s time for the finishing touches that will make your project look truly complete. This is where you hide any minor imperfections and tie the whole look together. Reinstall any baseboards, crown molding, or trim that you removed earlier. This will cover the expansion gaps and give your new wall a clean, polished edge. Take a step back and admire your work—you’ve just completely transformed your space.
How to Hide Seams and Fill Nail Holes
If you used any finishing nails to help secure the panels while the glue set, you’ll want to hide the holes. Use a colored wood putty or filler that matches your panels and apply a small amount to each hole. Once it’s dry, you can lightly sand it for a perfectly smooth finish. If any of your seams are more visible than you’d like, you can run a thin bead of paintable caulk along the joint. This will create a seamless transition between panels. For our Paint and Stain Grade Panels, this is the perfect final step before applying your chosen color.
Beyond Adhesives: Alternative Installation Methods
While construction adhesive is the most common method for installing wall panels, it’s not the only option. Depending on the weight of your panels, the type of wall you’re working with, and whether you might want to remove the panels in the future, alternative methods can offer a more secure or flexible solution. Sometimes, a combination of methods provides the best of both worlds, offering the bonding power of glue with the mechanical strength of fasteners. Let’s explore a few other ways to get your panels on the wall.
Combining Screws with Adhesive for Drywall
For an extra-secure hold, especially on drywall, it’s a great idea to use both adhesive and screws. This hybrid method gives you the all-over bond of glue plus the targeted strength of mechanical fasteners. After applying your adhesive and pressing the panel to the wall, drive a few screws through the panel and into the wall studs. This is particularly useful for heavier panels or for ceiling installations where gravity is working against you. The screws will hold the panel firmly in place while the adhesive cures and provide long-term peace of mind that your installation isn’t going anywhere.
Mechanical Fasteners: Z-Clips and Hook Strips
If you want the option to remove your panels later without destroying the wall, mechanical fasteners are the way to go. Z-clips are a popular choice for hanging heavy items like large Acoustic Wall Panels or artwork. They work in pairs: one clip is attached to the wall and the other to the back of the panel, and they interlock to create a secure, hidden mount. Hook-and-loop strips (like industrial-strength Velcro) can also work for lighter panels, offering an easy way to install and remove them as needed. These methods are great for renters or for commercial spaces where designs might change frequently.
Other Methods: Dowels and Keyhole Slots
For more custom or high-end installations, other methods like dowels or keyhole slots might be used. Dowels can be used to align panels perfectly and add some structural support, often in combination with adhesive. Keyhole slots are routed into the back of a panel, allowing it to be hung on screws that have been precisely placed in the wall. These techniques require more woodworking skill and precision but can create a very clean, high-end look with no visible fasteners. They are typically reserved for specific types of wood paneling or custom-built features.
Adhesive vs. Welding for Metal Panels
When working with metal panels, or even our custom steel doors and windows, the conversation shifts from standard adhesives to more industrial bonding methods. The two primary options are high-strength panel bonding adhesives and welding. Both can create incredibly strong joints, but they have very different processes, costs, and applications. Choosing between them depends on the project's requirements for strength, appearance, and the skill level of the installer. Let's break down the key differences between these two powerful techniques.
Strength and Durability
When it comes to raw strength, welding is the undisputed champion. The process of welding actually melts and fuses the two pieces of metal together, creating a single, continuous piece. This joint is typically as strong as, or even stronger than, the original metal itself. However, modern panel bonding adhesives have come a long way and are incredibly strong. While they don’t fuse the metal, they create a continuous bond across the entire surface, which helps distribute stress evenly and can reduce vibrations. For many applications, the strength of an adhesive is more than sufficient, but for critical structural joints, welding remains the gold standard.
Cost, Skill, and Appearance
This is where adhesives really shine. Panel bonding adhesives are generally much cheaper than welding, which requires expensive equipment and a high level of skill and training to perform safely and effectively. Applying adhesive is a much simpler and faster process that doesn't require heat or specialized safety gear beyond standard personal protective equipment. From an appearance standpoint, adhesives can create a clean, smooth bond with no visible marks, whereas a weld leaves a bead that must be ground down and finished to look seamless. For projects where aesthetics are key and structural fusion isn't required, adhesives offer a cost-effective and visually appealing alternative.
Common Adhesive Application Mistakes to Avoid
You’ve picked out the perfect wall panels, chosen a high-quality adhesive, and are ready to transform your space. But even the best materials can lead to a disappointing result if they aren’t applied correctly. A successful installation is all in the details, and avoiding a few common mistakes can make the difference between a professional finish and a project you’ll have to fix later.
Getting the application right from the start saves you time, money, and a lot of frustration. It ensures your panels not only look fantastic but also stay securely attached to your wall for years to come. Let’s walk through the most frequent missteps I’ve seen and, more importantly, how you can steer clear of them for a flawless installation.
Mistake #1: Skipping Wall Prep
Think of your wall as the foundation of your project. If it’s not clean, dry, and smooth, your adhesive won’t be able to create a strong, lasting bond. One of the biggest mistakes is jumping straight to the adhesive without preparing the surface first. As experts advise, you must "ensure the wall is free of dust, grease, or debris." Any grime or loose particles will prevent the glue from sticking properly. Take a few extra minutes to wipe down the wall with a damp cloth, let it dry completely, and make any necessary repairs to holes or cracks. This simple step is non-negotiable for a secure installation.
Mistake #2: Using Too Much (or Too Little) Adhesive
When it comes to adhesive, more isn’t always better. A common tip is to "avoid using too much adhesive; a little goes a long way." Applying a thick, uneven layer can cause the excess to squeeze out from behind the panels, creating a sticky mess that’s difficult to clean up. On the flip side, being too stingy with the glue can lead to weak spots where the panel doesn’t fully adhere to the wall. The best approach is to follow the manufacturer’s instructions, typically applying a consistent bead of adhesive around the perimeter and in a serpentine pattern across the center of the panel.
Mistake #3: Not Planning Your Panel Layout
Once a panel is pressed onto the wall, repositioning it can be tricky and messy. That’s why it’s so important to get the alignment right the first time. Before you even open the adhesive, do a dry fit to see how your panels will lay out on the wall. Use a level and a pencil to draw guidelines. This is especially critical for panels with a distinct pattern, like WPC Fluted Slat Wall Panels. Always "pay attention to the direction of the wall panel while applying," ensuring each new piece follows the established pattern. A laser level can be a huge help here, giving you a perfectly straight line to follow.
Mistake #4: Not Giving the Adhesive Time to Cure
Adhesive needs time to cure, which is the chemical process that allows it to reach its maximum strength. Rushing this process can compromise the bond. Curing time can be affected by temperature and humidity, so always check the adhesive’s instructions for the ideal conditions. Avoid installing panels in extreme heat or cold, as this can prevent the glue from setting correctly. Once the panels are up, give them time to set before putting any stress on them, like hanging decor or leaning furniture against the wall. Patience here is key to ensuring your panels stay put for the long haul.
Mistake #5: Failing to Secure Panels While They Set
Your job isn’t quite done once the last panel is installed and the adhesive has cured. A little long-term care will keep your new feature wall looking its best. For most panel types, all you need to do is "wipe panels with a soft cloth and mild detergent" to keep them clean. It’s also a good idea to periodically "inspect bonds," especially around the edges, to make sure everything is still securely attached. Catching a loose corner early is a much easier fix than reattaching an entire panel later. For contractors, this level of care ensures happy clients and great reviews.
Where to Buy the Best Wall Panel Adhesives
Once you’ve picked out the perfect wall panels for your space, the next step is finding the right adhesive to get them on the wall. Knowing where to shop can make a big difference in price, selection, and the advice you get. Whether you’re a DIY homeowner tackling a weekend project or a contractor outfitting an entire commercial building, here’s a breakdown of where to find the best adhesives for the job.
Should You Buy Online or at a Local Store?
Deciding between online retailers and your local hardware store often comes down to balancing convenience with immediacy. Online suppliers typically offer a much wider selection, giving you access to specialized adhesives like polyurethane-based formulas that might not be on local shelves. This is ideal when you need a high-performance bond for specific panel materials or environments. The downside is waiting for shipping. Local suppliers, on the other hand, are perfect when you need something now. You can also get face-to-face advice from staff, which can be helpful if you’re unsure what you need for your project.
How to Save Money on Large Projects
If you’re working on a large-scale project, buying adhesive one tube at a time is a quick way to go over budget. This is where bulk pricing becomes your best friend. Many suppliers, both online and at brick-and-mortar stores, offer significant discounts when you purchase by the case instead of by the unit. For really big jobs, it’s even worth reaching out to manufacturers directly to see if they offer better rates for large orders. Planning ahead and buying all your adhesive at once can lead to substantial savings, freeing up more of your budget for other materials.
How to Access Trade Professional Pricing
For contractors, designers, and other industry professionals, trade pricing is a major perk. Many building material suppliers have programs that offer exclusive discounts to those in the business. This often extends beyond just panels and doors to include essentials like adhesives, fasteners, and tools. To get access, you’ll usually need to fill out an application and provide proof of your business, like a license or tax ID number. Here at USA Builders Depot, we make it easy for professionals to get the best pricing with our trade program. It’s a simple step that can save you a lot of money over the long run.