


How to Install 3D Wall Panel: A DIY Guide
A stunning feature wall can completely change the feel of a room, and a 3D wall panel is one of the best ways to make a statement. But let's be real—the difference between a 'wow' result and a DIY disaster is all in the details. Rushing the prep work or making sloppy cuts can ruin the whole effect. I created this guide to walk you through it, step-by-step. Think of me as your expert friend, showing you exactly how to install 3D wall panels with total confidence. We'll cover everything from the right adhesive to those finishing touches for a polished, professional look.
Key Takeaways
- Start with a flawless foundation: Prepare your wall by cleaning and smoothing it completely, then let your panels acclimate to the room for at least 48 hours. This prevents common issues like poor adhesion and future warping.
- Your first panel sets the standard: Use a level to ensure your first panel is perfectly straight, as it will guide the rest of your installation. Measure twice before cutting to guarantee a seamless fit around corners and outlets.
- Refine the details for a professional finish: Seal all gaps with paintable caulk for a built-in look, use a brush to apply paint evenly into the grooves, and position lighting to accentuate the wall's new texture and depth.
What Are 3D Wall Panels?
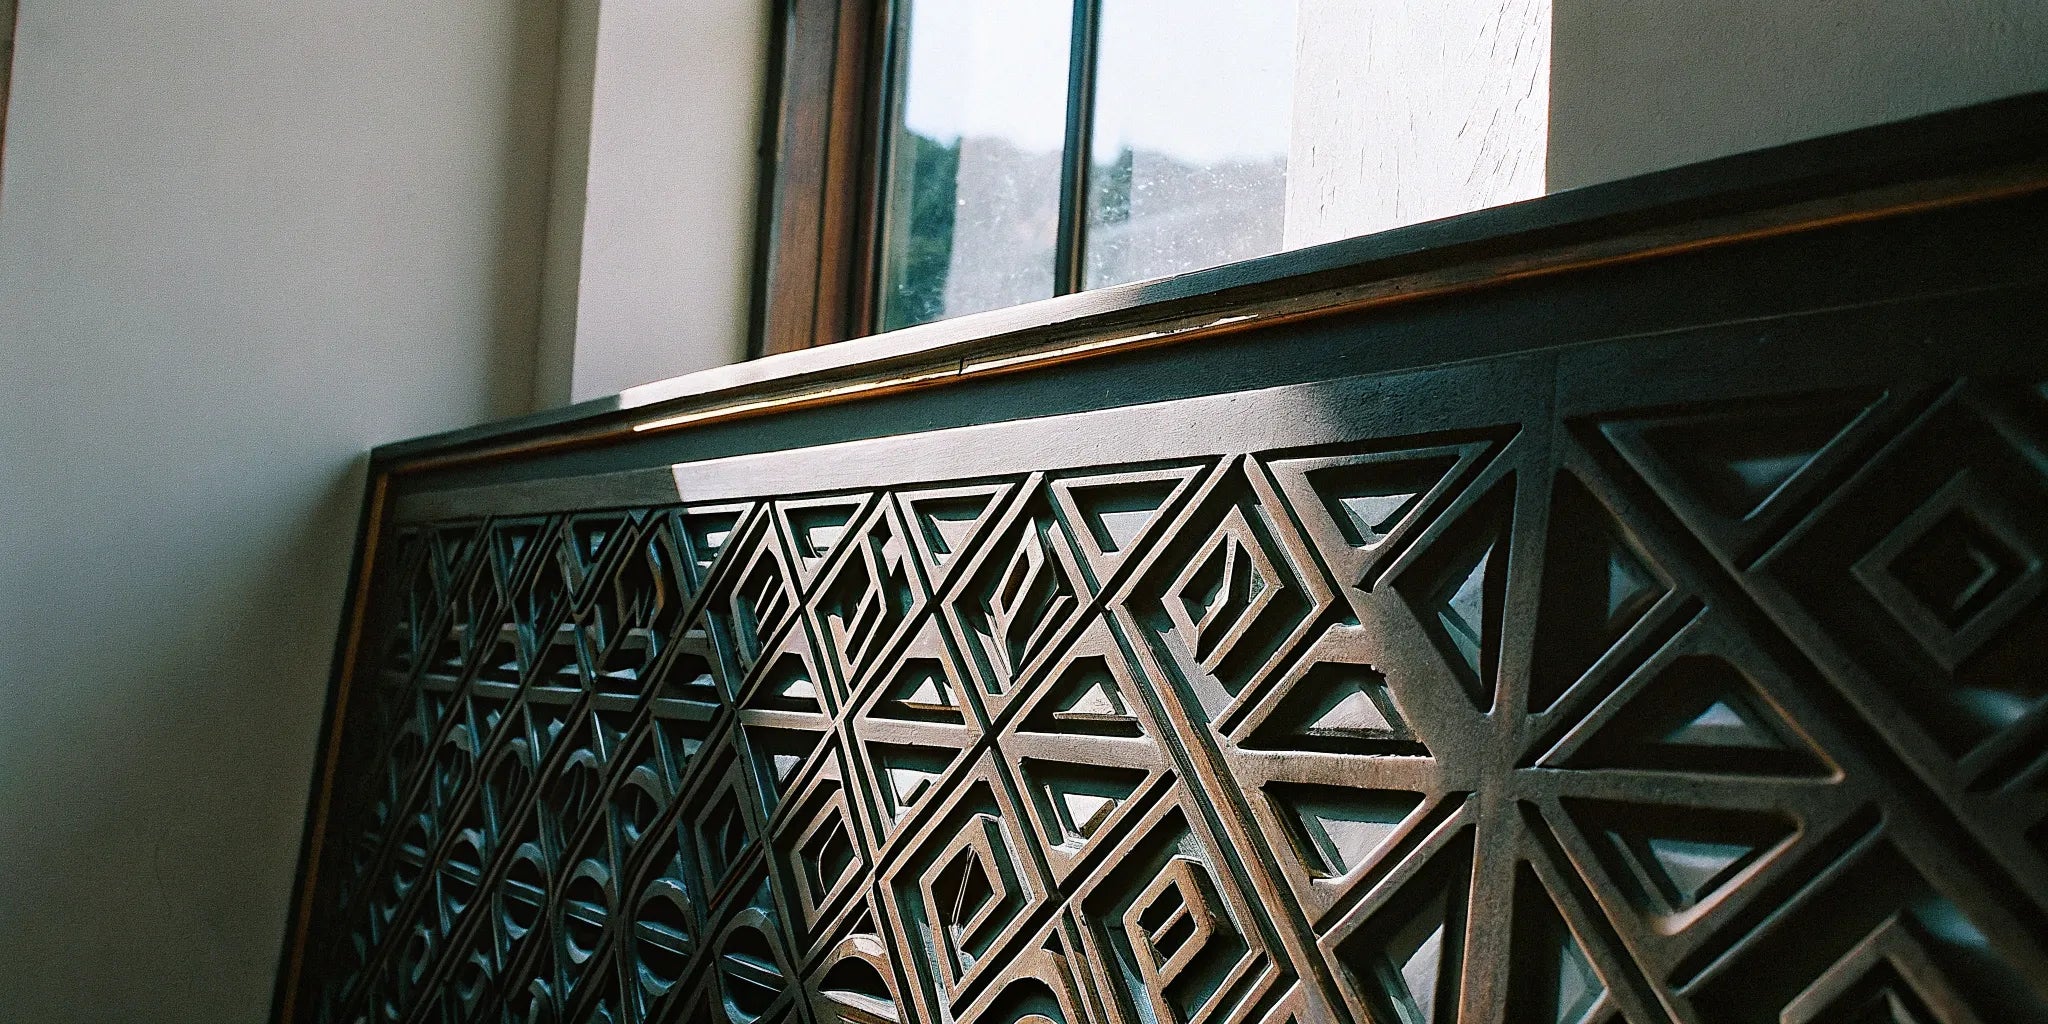
If you’re looking to add a serious dose of personality to a room, 3D wall panels are your new best friend. Forget flat, boring walls—these panels add texture, depth, and visual interest that can completely change the feel of a space. They feature sculpted, raised patterns that turn a plain wall into a stunning focal point. Think of them as architectural elements that you can add to any room, creating dynamic patterns with light and shadow.
The best part? Installing them is a surprisingly simple do-it-yourself (DIY) project that delivers a high-end, professional look. Whether you’re designing a cozy living room, a sleek office, or a dramatic entryway, 3D panels offer a versatile and impactful solution. They can cover an entire wall for a bold statement or be used more sparingly to create a unique accent. From subtle waves to sharp geometric designs, there’s a style to match any aesthetic. Our collection of wall panels includes everything from natural wood to modern fluted designs, giving you plenty of options to get started.
What Are 3D Panels Made Of?
When you start exploring 3D wall panels, you’ll find they come in a variety of materials, each with its own look and benefits. Many panels are crafted from robust materials like MDF (medium-density fiberboard), PVC (polyvinyl chloride), or natural wood, ensuring they’re built to last. MDF is a popular choice because it’s smooth, easy to paint, and can be milled into intricate designs. PVC panels are lightweight and water-resistant, making them a great option for kitchens or bathrooms. For a touch of warmth and natural beauty, nothing beats real Unfinished Wood Wall Panels, which you can stain or paint to match your decor perfectly.
Wood, WPC, and Bamboo
You'll also find panels made from Wood Plastic Composite (WPC), which combines recycled wood fibers and plastic for a material that’s both durable and moisture-resistant. This makes our Interior WPC Fluted Slat Wall Panels an excellent choice for spaces where humidity is a concern, like basements or bathrooms. Bamboo is another fantastic sustainable option, known for its natural waterproof properties that make it well-suited for humid environments. Each of these materials offers a unique texture and finish, allowing you to tailor the final look to your specific design vision while ensuring it performs well in its environment.
Thermoformed PVC and Lightweight Foam
If you’re looking for something incredibly lightweight and easy to work with, thermoformed PVC or foam panels are a great way to go. These materials are simple to cut and install, making them a favorite for DIY enthusiasts. Because they are water-resistant, PVC panels are a practical and stylish solution for kitchens, laundry rooms, and bathrooms where splashes are inevitable. Despite being light, these panels are designed for longevity. They are manufactured to resist moisture, fading, and minor impacts, ensuring your feature wall looks fresh and new for years with minimal upkeep.
Specialty Panels: Acoustic and Fire-Rated Options
Sometimes, a wall needs to do more than just look good. That’s where specialty panels come in. If you’re creating a home theater, a podcasting studio, or just a quiet home office, Acoustic Wall Panels are designed to absorb sound and reduce echo, creating a more peaceful atmosphere. Many modern materials, including some WPC varieties, also come with a fire rating for added safety and peace of mind. These functional panels prove you don’t have to sacrifice style for performance, offering the perfect blend of sophisticated design and practical benefits for any room.
How 3D Wall Panels Can Transform a Room
3D wall panels can make your space feel entirely new and exciting, often at a fraction of the cost of expensive artwork or major renovations. They instantly create a focal point, drawing the eye and adding a layer of sophistication. Beyond aesthetics, certain panels offer practical benefits. For example, Acoustic Wall Panels are specifically designed to absorb sound, which can help reduce echo and noise in open-concept living areas, home offices, or media rooms. They’re also a fantastic way to hide minor imperfections like small cracks or uneven surfaces on an existing wall, giving you a flawless finish without needing to replaster.
Popular Panel Types and Styles
The world of 3D wall panels is incredibly diverse, with styles ranging from rustic and natural to ultra-modern and geometric. Understanding the most popular types can help you narrow down the options and find the perfect fit for your project. Whether you want to add warmth with wood tones or create a bold, artistic statement, there’s a panel style that will match your vision. Exploring the different materials and designs is the first step in transforming your space. Let’s look at some of the top choices homeowners and designers are using right now to bring their walls to life with our extensive collection of wall panels.
Wood Slat and Fluted Panels
Wood slat and fluted panels are consistently a top choice for adding warmth and sophisticated texture to a room. These designs create a sense of linear rhythm and are perfect for modern, minimalist, or Scandinavian aesthetics. Beyond their visual appeal, many of these panels offer excellent sound-dampening qualities, making them a stylish and functional choice for living rooms, home theaters, or offices where noise reduction is key. Our Acoustic Wall Panels, for example, are specifically designed to absorb sound while looking beautiful. You can find them in rich finishes like walnut and teak, or opt for unfinished versions that you can paint or stain to your exact specifications.
Faux Finishes: Brick, Stone, and Subway Tile
If you love the timeless look of exposed brick, rustic stone, or classic subway tile but want a simpler and more affordable installation, faux-finish panels are an excellent solution. Many of these are available in a lightweight, peel-and-stick format, making them a popular DIY project for a weekend transformation. Because they are often waterproof, they work exceptionally well for kitchen backsplashes or bathroom accent walls where moisture is a concern. This style allows you to achieve an industrial, farmhouse, or traditional look without the cost, mess, and complexity of hiring a mason or tile setter for the job.
Geometric Patterns: Diamond, Wave, and Flower Designs
For those looking to make a bold, contemporary statement, panels with geometric patterns are the way to go. Designs featuring sharp diamonds, flowing waves, or intricate floral shapes can turn a plain wall into a true piece of art. Typically made from durable and lightweight PVC, these panels play with light and shadow to create a dynamic effect that changes throughout the day. They are especially popular for creating eye-catching accent walls in living rooms, bedrooms, and even dedicated gaming rooms where a strong, immersive visual backdrop is desired to set the mood.
Classic Wainscoting Panel Kits
Wainscoting is a classic design element that adds a touch of elegance and architectural detail to any room. Traditionally, it involves installing wood paneling on the lower portion of a wall to protect it from scuffs while adding visual interest. Modern wainscoting panel kits make it much easier to achieve this sophisticated look without needing advanced carpentry skills. These kits often come with pre-cut pieces or flexible materials that simplify the installation process. It’s a timeless style that works beautifully in dining rooms, hallways, and entryways, adding a layer of traditional charm and character to your home.
Expanded Uses and Applications
While creating a single accent wall is the most common use for 3D panels, their versatility allows for much more creative applications. Think beyond the living room feature wall and consider how texture and dimension can enhance other areas of your home. From overlooked spaces like ceilings to functional areas like home offices, these panels can solve design challenges and add a custom touch that makes your space feel unique. Here are a few inspiring ways to use 3D wall panels throughout your home, pushing the boundaries of conventional interior design.
Accent Walls Behind a TV or Bed
Using 3D panels behind a television or bed is a fantastic way to anchor the room and create a polished focal point. A textured wall behind a media console helps frame the TV, making it feel like a more integrated part of the room’s design rather than just an electronic device on the wall. Similarly, installing panels behind a bed can create the effect of a grand, built-in headboard, adding a touch of luxury and comfort to the bedroom. This application works well in almost any room, from the main living area to a cozy den or master suite, defining the space's primary function.
Textured 3D Ceiling Tiles
Don't forget to look up! The ceiling, often called the "fifth wall," is a frequently missed opportunity for high-impact design. Applying textured 3D tiles overhead can add incredible architectural interest and make a room feel more complete and custom-designed. This is a great way to hide imperfections like old popcorn texture or minor cracks without a messy and labor-intensive scraping job. Many ceiling tiles are also lightweight and easy to install, and some even come with practical features like being waterproof or fire-rated, making them suitable for basements, kitchens, or commercial spaces.
Backdrops for Gaming Rooms and Home Offices
In an age of frequent video calls and content streaming, having a professional and visually appealing background is more important than ever. 3D wall panels are a perfect solution for quickly transforming a spare room into a stylish home office or an immersive gaming setup. A textured backdrop adds depth and personality to your on-camera presence, making your space look thoughtfully designed and professional. It’s a simple update that can make a huge difference in how you present yourself online or how you experience your favorite hobby, creating an environment that is both functional and inspiring.
How Durable Are Different Panel Materials?
Choosing the right material also means thinking about longevity. Different materials offer varying levels of durability. For instance, PVC panels can last 20–30 years, while quality MDF panels typically have a lifespan of 10–15 years. Some premium options, like bamboo charcoal or WPC (wood-plastic composite) panels, can last even longer. While more durable materials may have a higher upfront cost, they often provide substantial long-term benefits. Investing in quality from the start means you’ll spend less time and money on repairs and maintenance down the road, making it a smart choice for any project. This focus on material durability ensures your beautiful new wall stands the test of time.
Choosing the Right 3D Wall Panels for Your Project
Navigating the Market: Popular Brands and Variety
Once you start looking for 3D wall panels, you'll see just how many options are out there. Brands like Art3d have become popular for their wide range of decorative styles, from peel-and-stick tiles to intricate panels. The sheer variety can feel a bit overwhelming, with some retailers offering nearly a hundred different designs. The key is to narrow your focus based on the aesthetic you want to achieve. Are you looking for a modern, geometric pattern to create a dynamic accent wall, or something more organic and natural? At USA Builders Depot, we focus on premium materials that offer both style and function, including Acoustic Wall Panels for sound control and beautiful Unfinished Wood Panels that you can customize to fit your exact vision.
Understanding Panel Costs and Budgeting
Budget is always a key factor in any renovation project, and 3D wall panels come at a wide range of price points. You can find basic PVC or foam panels for just a few dollars per square foot, which makes them an accessible option for a quick update. However, the price often reflects the material's quality and durability. Materials like high-density fiberboard, WPC composites, and natural wood veneers typically cost more but offer a more substantial, high-end finish that lasts for years. When planning your budget, think about the long-term value. Investing in a more durable material can save you from future replacements. For contractors and designers, programs like our trade application can also help manage costs on larger projects by providing access to bulk discounts.
What Tools and Materials Do You Need?
Getting a professional-looking result starts with having the right gear on hand. Before you even think about attaching the first panel, it’s smart to gather all your tools and materials. This simple step saves you from making frantic trips to the hardware store mid-project and helps the entire installation process go smoothly. The good news is that you probably already have many of these tools in your garage or workshop.
The most important material, of course, is your choice of wall panels. Whether you've selected lightweight plant-fiber panels or durable WPC fluted slats, the right tools will ensure they fit perfectly and stay put for years to come. Think of this as your project’s recipe for success—having every ingredient ready makes the final outcome so much better. Let’s walk through exactly what you’ll need to bring your vision to life.
Your Must-Have Tool Checklist
To get started, lay everything out so it’s within easy reach. This simple prep step makes the entire installation feel more organized and less overwhelming. Here’s a straightforward list of the essentials you’ll want to have ready:
- Measuring Tape & Pencil: For accurate measurements and marking.
- Level: To ensure your layout lines and panels are perfectly straight.
- Construction Adhesive: The key to a secure, long-lasting bond.
- Caulking Gun: For applying the adhesive neatly.
- Jigsaw or Utility Knife: For cutting panels to size.
- Sandpaper (Fine-Grit): To smooth any cut edges for a seamless fit.
- Putty Knife: Helpful for cleaning up any excess adhesive.
- Paint & Primer (Optional): If you plan to paint your panels after installation.
How to Choose the Right Adhesive
Your choice of adhesive is one of the most critical decisions you'll make. The wrong glue can lead to panels peeling or falling off the wall, so it’s worth getting this part right. For most 3D wall panels, a high-quality construction adhesive is your best bet. Look for brands like Loctite Power Grab or Liquid Nails, as they are formulated to create a strong, permanent bond on common surfaces like drywall, wood, and concrete.
Always read the adhesive label to check for compatibility with your panel material and wall surface. It will also provide important information on application and drying times. Applying a consistent bead of glue to the back of the panel ensures it will adhere evenly without any weak spots.
Your Go-To Tools for Measuring and Cutting
The old saying "measure twice, cut once" is your best friend during this project. Precise cuts are what separate a DIY job from a professional finish, especially when you’re working around outlets, light switches, or corners. Use a reliable measuring tape and a level to draw your guidelines directly on the wall and to mark your panels for cutting.
For making the cuts, a jigsaw with a fine-toothed blade usually provides the cleanest results on thicker panels. For thinner, more flexible materials, a sharp utility knife may be all you need. After cutting, run a piece of fine-grit sandpaper along the edge to smooth out any roughness. This ensures each panel will sit flush against the next for a truly seamless look.
How to Prepare Your Wall for Installation
Before you can get to the fun part of seeing your new wall take shape, a little prep work is in order. I know it’s tempting to jump right in, but taking the time to prepare your wall surface is the single most important thing you can do to get a flawless, professional-looking result. Think of it as creating the perfect canvas. These simple steps will ensure your panels adhere properly and look fantastic for years to come, preventing issues like peeling or uneven lines down the road.
Step 1: Clean and Smooth Your Walls
First things first, you need a clean slate. Wipe down your entire wall with a damp cloth to remove any dust, dirt, or grime. If you’re working in a kitchen or a high-traffic area, you might need a mild degreaser. Once it’s clean and completely dry, inspect the surface for any imperfections. Fill any nail holes or cracks with spackle, then lightly sand the patches until they’re flush with the wall. A smooth, clean surface is crucial for getting the best bond from your adhesive, ensuring your beautiful Acoustic Wall Panels stay put.
Step 2: Let Your Panels Acclimate
This step requires a bit of patience, but it’s non-negotiable, especially for wood or composite panels. Unbox your panels and lay them flat in the room where you plan to install them for at least 48 to 72 hours. Building materials can subtly expand or contract as they adjust to a new environment's temperature and humidity. Letting them acclimate first prevents them from warping, buckling, or creating gaps after they’re already on your wall. This simple waiting period is a key part of any successful DIY project and ensures a stable, long-lasting installation.
Step 3: Mark Your Guidelines
Don’t trust your eyes on this one—grab a tape measure, a pencil, and a long level. To ensure your first row of panels is perfectly straight, you need to draw a level guideline on the wall. This line will be your reference for the entire project. Decide where you want the bottom of your first row to sit and use your level to draw a faint horizontal line across the wall. Getting this first line perfectly straight is critical because every other panel will align with it. A crooked start will only get more noticeable as you work your way up the wall.
How to Install Your 3D Wall Panels
With your walls prepped and tools ready, it’s time for the exciting part. A little patience here pays off with a flawless, professional-looking feature wall. We’ll walk through each step, from planning your design to securing the final panel.
Plan Your Layout and Find Your Starting Point
Before applying any adhesive, plan your design. Lay your wall panels on the floor to see how the pattern flows and make adjustments. Once you’re happy, find the center of your wall and draw level vertical and horizontal lines to guide your first panel. It’s also smart to let the panels acclimate in the room for at least 48 hours. This helps them adjust to the temperature and humidity, preventing any warping or shrinking after they’re installed, ensuring a lasting finish.
How to Cut Panels for a Perfect Fit
You’ll likely need to make some cuts for a perfect fit. For straight cuts, a utility knife or jigsaw works well. Measure the space carefully and mark your cut line on the back of the panel. When cutting around outlets or switches, trace the shape precisely and use a jigsaw for a clean cutout. Remember the old rule: measure twice, cut once. Accurate cuts are essential for a seamless look, so don’t rush this step. It’s the key to a professional-grade installation.
Applying Adhesive and Mounting Your First Panel
Now you’re ready to attach the panels. A strong construction adhesive like Loctite Power Grab or Liquid Nails is your best bet for a secure bond. Apply a generous amount of glue to the back of your first panel, focusing on the perimeter and adding a few lines in an “S” shape through the middle for even coverage. Avoid applying it too close to the edge to prevent messy squeeze-out. Once the adhesive is on, you’re ready to place it on the wall.
How to Align and Secure Each Panel
Carefully place your first panel on the wall, using the guidelines you drew. This first piece is the most important, as it sets the standard for the rest of the wall. Press it firmly into place and use a level to make sure it’s perfectly straight. Hold it for a moment to let the adhesive grab. For each following panel, apply adhesive and nestle it tightly against the previous one, checking for level and alignment as you go. Wiping away any excess adhesive with a damp cloth immediately keeps your project looking clean.
Alternative Installation Methods
Working with Peel-and-Stick Panels
While construction adhesive offers a permanent bond, some panels provide an even simpler route. Peel-and-stick panels are a game-changer for DIY projects, coming with a self-adhesive backing that makes installation incredibly straightforward. The process is exactly what it sounds like: start by cleaning your wall to ensure it’s smooth and free of dust, then measure and cut your panels as needed. After that, you simply peel off the protective backing and press the panel firmly onto the wall. No power tools, no messy glue, and no nail guns required—just a clean, fast way to get a beautiful new feature wall.
Installing Drop-in Ceiling Grid Tiles
Shifting our focus from walls to ceilings, drop-in tiles offer another way to add dimension to a room. Unlike panels that adhere directly to a surface, these are designed to fit into a suspended grid system. The most critical part of this installation is ensuring the metal grid is perfectly level and square. Once the framework is securely in place, the tiles simply drop into each opening. This method is often used in basements and home theaters because it provides a clean look while still allowing easy access to any plumbing or wiring hidden above the ceiling.
Common Installation Mistakes to Avoid
Even the most stunning wall panels can look amateurish if they aren't installed correctly. It’s tempting to get excited and jump right into the main event, but a little patience goes a long way. Avoiding a few common slip-ups will make all the difference between a DIY headache and a professional-grade feature wall you’ll be proud of. Think of it like painting a room—you wouldn't skip the primer and painter's tape, would you? The same logic applies here. A flawless finish is all in the details.
The most frequent errors usually happen during the prep work, the actual panel placement, and the cutting process. Rushing these steps can lead to panels that don't stick properly, crooked lines that are impossible to ignore, and awkward gaps that ruin the entire effect. Not only does this look bad, but it can also cost you more time and money in the long run when you have to fix mistakes or replace wasted materials. We want your project to be a success, so let's walk through exactly what to watch out for. Getting these three areas right is the secret to a seamless, high-end finish.
Why You Can't Skip Wall Prep
This is hands-down the most common mistake, and it’s also the easiest to avoid. Before a single panel goes up, your wall needs to be clean, dry, and completely smooth. Any dust, grease, or moisture will prevent the adhesive from creating a strong bond, which could lead to panels peeling off later. Take the time to wipe down the surface and patch any holes or bumps with spackle, sanding them smooth once dry. A properly prepped wall is the foundation for a perfect installation. Think of it as creating a blank canvas—it ensures your beautiful new panels are the only texture you see.
The Problem with Rushing Adhesion and Alignment
Once you start applying panels, the temptation to speed through is real. But this is where precision is your best friend. The first panel you place sets the standard for the entire wall, so use a level to ensure it’s perfectly straight. When you press each panel to the wall, apply firm, even pressure across the entire surface to ensure the adhesive bonds correctly. If you rush, you risk creating a crooked pattern that becomes more and more obvious as you go. Take a deep breath, work methodically, and double-check your alignment with each piece. Your patience will pay off in the final result.
How Inaccurate Cuts Can Ruin Your Project
The old saying "measure twice, cut once" has never been more true. Inaccurate measurements lead to panels that are too short, leaving unsightly gaps, or too long, causing them to buckle or fit improperly. Before you cut, double-check your numbers. Use a sharp utility knife or a jigsaw for clean, precise cuts, especially when fitting panels around outlets or corners. Rushing this step not only wastes expensive materials but also creates a lot of frustration. Taking an extra minute to confirm your measurements is far easier than trying to patch a mistake later, especially when working with premium building materials.
How to Achieve a Professional Finish
You’ve done the hard work of preparing the wall and installing the panels. Now it’s time for the finishing touches that truly make the project shine. These final steps are what separate a good DIY job from a stunning, professional-looking feature wall. It’s all about refining the details—from creating invisible seams to choosing the perfect paint and using light to your advantage. Taking a little extra time here will pay off, ensuring your new wall looks polished and perfectly integrated into your space. Whether you've chosen dramatic fluted slats or a subtle geometric pattern from our wall panels collection, these techniques will help you showcase their texture and depth.
Think of this as the final act where you get to add your personal style and make the design truly your own. A professional finish isn't just about hiding mistakes; it's about enhancing the inherent beauty of the materials you've chosen. It’s the difference between a wall that simply has panels on it and a wall that becomes a true architectural feature. By carefully sealing gaps, applying a clean coat of paint, and strategically placing lights, you control how the final installation interacts with the rest of your room. This is your chance to create a cohesive look that feels intentional and high-end. Let's walk through exactly how to seal, paint, and light your new wall to get that flawless finish you're aiming for.
How to Seal Gaps for a Seamless Look
Once your adhesive has fully cured, take a close look at your wall. You might notice tiny gaps between the panels or along the edges where they meet the ceiling or floor. Sealing these is key to achieving that seamless, built-in look. Grab a quality paintable caulk or putty and a caulk gun. Carefully apply a thin bead into any gaps, then use your finger or a small putty knife to smooth it out. Wipe away any excess with a damp cloth before it dries. This simple step makes a huge difference, creating clean lines and a polished appearance that looks professionally done.
Picking the Perfect Paint and Finish
Now for the fun part: adding color. You can paint your 3D panels to match your existing walls for a subtle, textural effect or choose a bold accent color to make them a focal point. For the best results, I always recommend using a paintbrush instead of a roller. A brush allows you to get into all the grooves and angles of the 3D design without causing drips or missing spots. Keep in mind that some panel materials can absorb a bit of paint, which might slightly dull the final sheen. It’s a good idea to test your paint on a scrap piece first to see how it looks once dry.
How to Use Lighting to Highlight Your 3D Wall
The "3D" in 3D wall panels is all about depth and shadow, and the right lighting is what brings it to life. Think about how light will hit your new feature wall. Installing track lighting, wall sconces, or even an uplight from the floor can create dramatic shadows and highlights that accentuate the panel’s texture. This interplay of light and shadow is what gives the wall its dynamic, eye-catching quality. Take a moment to experiment with a movable lamp to see what angles work best before installing permanent lighting fixtures. This final touch will make your wall a true centerpiece of the room.
Related Articles
- 3D Wall Panels Peel and Stick: The Ultimate Guide
- 3D Wall Panel Guide: Everything You Need to Know
- The Ultimate 3D Wall Panel Guide for Your Home
Frequently Asked Questions
Can I install 3D wall panels in a bathroom or kitchen? You absolutely can, but your choice of material is critical. For rooms with high humidity or the potential for splashes, you’ll want to choose a water-resistant material like PVC or WPC (wood-plastic composite). These materials won't warp or get damaged by moisture. I would steer clear of standard MDF or unfinished wood panels in these areas, as they can absorb moisture over time.
Do I have to paint the panels after installing them? Not always. It really depends on the specific panels you choose. Some come pre-finished and ready to go, while others, like our Unfinished Wood or Paint Grade panels, are designed to be customized. Think of them as a blank canvas. Painting them to match your wall creates a subtle, textured look, while a contrasting color can turn your wall into a bold statement piece.
How do I clean 3D wall panels once they're installed? Keeping them looking great is pretty simple. For regular dusting, you can use a soft brush attachment on your vacuum cleaner to get into the grooves of the design. If you notice any smudges or marks, a slightly damp microfiber cloth will usually do the trick. Just be sure to avoid using harsh chemical cleaners, as they could damage the panel's finish.
What if my walls aren't perfectly straight or smooth? This is a common issue, and it’s why wall prep is so important. Minor imperfections like nail holes or small cracks should be filled with spackle and sanded smooth before you begin. If your wall is significantly uneven, the panels won't sit flat, and you'll see gaps. Taking the time to create a smooth, level surface is the best way to guarantee a professional-looking result.
Can I remove the panels later on without damaging my wall? It’s best to think of 3D wall panels as a more permanent feature. The construction adhesive used to install them creates a very strong, lasting bond. While it is possible to remove them, it will almost certainly pull off the paper layer of the drywall underneath. You should expect to do some significant patching, sanding, and priming to restore the wall surface afterward.
