


How to Install WPC Wall Cladding the Right Way
That stunning, fluted accent wall you’ve been dreaming of is closer than you think. Wood Plastic Composite (WPC) panels make it easy to get a modern, high-end look that’s also incredibly durable and low-maintenance. But the secret to a perfect, seamless finish? It’s all in the installation. Getting it right ensures your wall not only looks amazing but stays that way for years. This guide gives you the confidence to tackle the project yourself. We’ll walk you through everything you need to know to install WPC wall cladding for a truly professional result.
Key Takeaways
- A Strong Foundation is Non-Negotiable: Your final result is only as good as your prep work. Start with a clean, flat wall and install a support framework to create a crucial air gap for ventilation and a perfectly level surface.
- Give Panels Room to Breathe: Always let your WPC panels acclimate to the room for at least 24 hours before installation. Remember to leave a small expansion gap around the edges to prevent warping and buckling as temperatures change.
- Master the Finishing Touches: Use the correct hidden fasteners for a seamless look and install trim around obstacles like windows and doors. These details cover cut edges and give your project a polished, professional appearance.
Is WPC Wall Cladding Right for Your Home?
When you’re planning a renovation or a new build, choosing the right materials is everything. You want something that looks incredible but won’t create a ton of work for you down the road. That’s where WPC wall cladding comes in. It offers the timeless, warm aesthetic of natural wood without the demanding upkeep. This innovative material gives you the best of both worlds, blending beautiful design with serious, long-lasting performance that protects your investment and keeps your property looking its best for years.
First, What Exactly is WPC?
So, what exactly is WPC? The name stands for Wood Plastic Composite, and it’s a hybrid material engineered from a unique blend of wood fibers and thermoplastics like PVC or polyethylene. This mixture is heated and formed into durable boards that have a consistent structure and finish. By combining the organic texture of wood with the stability and resilience of plastic, you get a product that outperforms many traditional building materials. It’s a smart, sustainable choice that delivers on both form and function, making it a go-to for modern construction projects.
Key Advantages of WPC
The biggest draw of WPC is its incredible durability combined with minimal maintenance. Unlike traditional wood, WPC is engineered to resist common issues like moisture, rot, termites, and mold. This makes it an excellent choice for both interior and exterior applications, as it won’t warp, crack, or fade when exposed to the elements. You get the beautiful, warm appearance of wood without the constant need for sanding, staining, or sealing. For busy homeowners and contractors, this means a stunning finish that lasts for years with just simple cleaning, giving you more time to enjoy your space instead of working on it. Our Interior WPC Fluted Slat Wall Panels are a perfect example of this blend of style and strength.
Potential Disadvantages
While WPC is a highly versatile material, it’s important to know its limitations. One key consideration is its performance in high-heat environments. WPC can deform or change shape if exposed to temperatures above 158°F (70°C), so it’s generally not recommended for use in areas like commercial kitchens or directly around fireplaces. Additionally, while modern WPC products do an amazing job of mimicking natural wood, some purists might find that the look and feel aren't an exact match for solid timber. For most projects, however, the trade-off for superior durability and low maintenance is well worth it.
Common WPC Specifications and Finishes
When you start shopping for WPC, you’ll notice a few key specifications. The boards typically come in thicknesses ranging from 2 mm to 25 mm, allowing you to choose the right profile for your project's needs. The density can also vary, usually between 600 kg/m³ and 800 kg/m³, which affects its weight and rigidity. Beyond the technical specs, WPC is available in a huge variety of finishes. You can find panels that replicate different wood grains, from oak to walnut, as well as solid colors for a more contemporary look. This versatility makes it easy to find the perfect wall panels to match your design vision.
Beyond Wall Panels: Other WPC Uses
The benefits of WPC extend far beyond interior accent walls. Its robust, weather-resistant properties make it a popular choice for a wide range of applications. You’ll often see WPC used for outdoor decking, fencing, and roofing, where it provides a long-lasting, low-maintenance alternative to traditional wood. It’s also used to create outdoor furniture and even modular building structures. For exterior home renovations, WPC shiplap cladding is an excellent option for updating your home’s facade with a material that is built to withstand the elements while maintaining its beautiful appearance for years to come.
How WPC Compares to Wood and Vinyl
If you’ve ever worked with traditional wood, you know it can be susceptible to a whole host of issues. WPC was designed to solve those problems. Unlike standard wood or MDF boards, WPC is highly resistant to rot, mold, and insects, so you don’t have to worry about termites or water damage compromising your walls. This durability means it requires very little maintenance—no need for seasonal staining, sealing, or painting. It’s a key reason why so many modern wall panels are crafted from this composite material. You get to install it and simply enjoy the finished look without a demanding upkeep schedule.
How Does WPC Stand Up to the Elements?
Beyond pests and rot, WPC cladding is built to handle whatever the weather throws at it. It’s engineered to be dimensionally stable, meaning it won’t warp, splinter, or bend when exposed to moisture or fluctuating temperatures. The material also includes UV inhibitors that protect it from the sun’s harsh rays, preventing the color from fading over time. Whether you’re dealing with intense sun, heavy rain, or high humidity, WPC maintains its structural integrity and appearance. This makes it an incredibly reliable choice for projects in any climate, giving you peace of mind that your cladding will look great for years to come.
Understanding the Cost and Value of WPC Cladding
While WPC cladding offers incredible long-term benefits, it's important to understand the initial investment. The great news is that it’s a cost-effective solution that provides significant value over time, especially when you factor in the minimal maintenance costs. It’s a smart choice that balances upfront spending with lasting durability and style. Let's break down what you can expect to pay for your project and explore why this material is becoming such a popular choice in modern construction and renovation.
Typical Costs for WPC Projects
When you're budgeting for your project, a good starting point for WPC panels is around $5 to $10 per square foot. Of course, this price can shift based on a few factors, like the specific design, finish, and the quality of the material you choose. Some options might be as low as $2.50 per square foot, while premium styles could be a bit higher. For contractors or homeowners tackling a large project, buying in bulk can also influence the final cost. At USA Builders Depot, we offer a variety of Interior WPC Fluted Slat Wall Panels to fit different budgets, ensuring you get that high-end look without compromising on quality. It's best to view this as an investment in a durable, long-lasting finish that won't require costly upkeep later on.
Market Trends for Composite Materials
The demand for composite materials like WPC is definitely on the rise, and it’s easy to see why. Market forecasts show a steady interest in these products, driven by a growing preference for building materials that are both sustainable and low-maintenance. Homeowners and builders are increasingly looking for solutions that offer long-term performance and aesthetic appeal without the constant work of traditional wood. This trend confirms that choosing WPC isn't just about what's popular now; it's a forward-thinking investment in your property's value. As more people recognize the benefits, composite materials are becoming a standard for modern, efficient construction.
Get Your Tools and Materials Ready
A smooth installation starts with good preparation. Before you begin, take the time to gather everything you’ll need. Having all your tools and materials laid out and ready to go prevents frustrating mid-project runs to the hardware store and helps you work more efficiently. Think of it as setting up your workspace for success. A well-organized project is almost always a well-executed one, ensuring you get the professional-looking results you want without any unnecessary delays.
We’ve broken down your shopping and tool lists into three simple categories: the core materials for the job, the everyday tools you’ll need to get it done, and a few extra items that will give your project a polished, high-end finish. Let’s get everything in order so you can focus on the installation itself.
Your WPC Cladding Materials Checklist
This list covers the essential components for building your WPC wall. Make sure you have enough of each material to cover your entire project area, plus a little extra for any mistakes or tricky cuts.
- WPC Panels: The star of the show. Measure your wall space carefully to determine how many Interior WPC Fluted Slat Wall Panels you’ll need. It’s always a good idea to order about 10% more than your calculation to account for cuts and waste.
- Support Beams (Joists or Battens): These create the framework that your panels will attach to, ensuring proper airflow and a level surface.
- Stainless Steel Screws and Clips: You’ll need starter clips for the first row and hidden fasteners or clips for the subsequent rows to create a clean, seamless look.
- Finishing Trims: These are used to frame the installation, cover exposed edges, and create a clean border around your new wall.
The Everyday Tools You'll Need
You don’t need a state-of-the-art workshop to install WPC cladding. Most of these tools are likely already in your garage or tool kit.
- Tape Measure: For accurate measurements of your wall and panels. Remember the old rule: measure twice, cut once.
- Level: Crucial for ensuring your support framework and first row of panels are perfectly straight.
- Circular or Miter Saw: A saw with a fine-toothed blade is necessary for making clean, precise cuts through the WPC material.
- Drill/Driver: You’ll use this for securing the support beams to the wall and fastening your clips.
- Safety Gear: Don’t forget your safety goggles to protect your eyes from dust and debris, and a good pair of work gloves to protect your hands.
Specialty Tools That Make the Job Easier
While not strictly required, these items are what separate a good-looking installation from a great one. They provide those final touches that create a truly professional and durable finish.
- Corner and Edge Trims: Specifically designed trims for inside and outside corners give your project a seamless, integrated look. They cover the cut ends of the panels and provide a crisp, clean edge that looks intentional and well-planned.
- Caulking Gun and Sealant: Applying a color-matched sealant around the perimeter of your installation, especially around windows or doors, can help protect against moisture and create a perfect, gap-free finish. This is particularly important for exterior applications to ensure a watertight seal.
How to Prep Your Walls for a Flawless Finish
A beautiful, long-lasting WPC wall starts with a solid foundation. Before you even think about installing your first panel, taking the time to properly prepare your wall surface is the single most important thing you can do for a professional-looking finish. Think of it as setting the stage for your project’s success. A clean, flat, and stable wall ensures your cladding goes on smoothly, looks fantastic, and stays that way for years. Rushing this step can lead to uneven panels, moisture issues, and headaches you just don’t need. Let’s walk through exactly what you need to do to get your wall ready for its upgrade.
Start with a Thorough Wall Inspection
First, give your wall a thorough once-over. You’re looking for a surface that is clean, flat, and completely dry. Run your hand over it and use a level or a long straightedge to check for any significant bumps, dips, or waves. Even minor irregularities can throw off the alignment of your WPC wall panels and create visible gaps or an uneven finish. Also, check for any signs of moisture, like damp spots or water stains. WPC is water-resistant, but the wall behind it needs to be dry to prevent mold or structural issues down the line. Taking a few minutes to carefully inspect the surface now will save you from bigger problems later.
Clean the Surface and Make Any Repairs
Once you’ve inspected the wall, it’s time to get it in perfect shape. Start by giving it a good cleaning to remove any dust, grease, or grime. A simple wash with a mild detergent and water usually does the trick, but make sure the wall is completely dry before you proceed. Next, address any imperfections you found during your inspection. Fill any cracks or holes with a suitable filler, sand them smooth, and patch any peeling paint. This isn't just about aesthetics; it creates a solid, stable base for the cladding to adhere to. A smooth, repaired wall ensures your panels sit flush and secure, giving you that seamless, high-end look you’re after.
How to Measure and Plan Your Layout
Now for the fun part: planning your design. Before you cut a single panel, measure the height and width of your wall to calculate the total square footage you need to cover. This will help you determine exactly how many panels to order. I always recommend sketching a quick diagram of the wall, including any windows, doors, or outlets. This helps you visualize how the Interior WPC Fluted Slat Wall Panels will be arranged and where the seams will land. Planning your layout allows you to minimize waste, ensure a balanced look, and prepare for any tricky cuts you’ll need to make. A little bit of planning goes a long way toward a flawless installation.
Consider the Weather on Installation Day
You probably check the weather before a picnic, but what about before an indoor project? It might sound strange, but the temperature on installation day can make a real difference. WPC material naturally expands a bit in the heat and contracts in the cold. To prevent future warping, it’s crucial to let your WPC panels acclimate. Just let them rest in the room where they'll be installed for at least 24 hours. This simple step allows the material to adjust to the room’s temperature and humidity, ensuring a stable, long-lasting finish.
The best time to install is on a mild day, avoiding extreme heat or cold. While WPC is incredibly durable, installing it in intense, direct sunlight can make the material temporarily soften, which you want to avoid during setup. Think of it as giving your project the best possible start. By working in moderate conditions and letting the panels acclimate, you’re ensuring the material’s built-in resilience can do its job perfectly for years. It’s a small consideration that protects your investment and guarantees that flawless, professional look you’re after.
Building the Support Framework
Before you can start attaching those beautiful WPC panels, you need to build a solid foundation. This comes in the form of a support framework, usually made of wooden or composite battens (also called joists or furring strips). Installing your cladding directly onto the wall is a common mistake that can trap moisture and lead to serious problems down the road. The framework creates a crucial air gap between the wall and the cladding. This space allows for proper ventilation and drainage, which is essential for preventing mold, mildew, and rot.
Think of this step as setting the stage for a flawless finish. A well-built framework ensures your wall panels will be perfectly level, straight, and secure for years to come. It also helps accommodate any imperfections in the existing wall surface, giving you a smooth, flat plane to work with. Taking your time here will pay off immensely, making the panel installation process much easier and ensuring the final result looks professional. Rushing this foundational step is a shortcut you’ll definitely want to avoid.
How to Treat Wooden Support Beams
Your WPC panels are built to handle moisture, but the wooden support beams behind them need a little help to do the same. Wood is naturally porous and can absorb moisture from the air, which could lead to rot or warping over time and compromise the integrity of your entire wall. Treating your support beams is a simple, proactive step that ensures the foundation of your project is just as durable as the beautiful finish. Before installing the framework, apply a quality wood preservative or waterproof sealant to all sides of each beam. Pay special attention to the cut ends, as this is where wood is most vulnerable. Let them dry completely before you begin, and you’ll have a rock-solid base that’s protected for the long haul.
Marking Your Batten Placement
First things first, you need to plan where your support battens will go. These are the vertical strips that your WPC panels will attach to. Using a measuring tape, pencil, and a long level or chalk line, mark out the placement for each batten. For a secure installation, the battens should be spaced between 16 and 24 inches (400-600mm) apart, center to center. This spacing provides robust support for the cladding panels and prevents any sagging or warping over time. Make sure your lines are perfectly vertical (plumb) and parallel to each other. A precise layout is the key to a clean, professional-looking wall.
How to Secure the Vertical Supports
Once your layout is marked, it’s time to attach the support beams to the wall. These joists create the flat base that is so important for a successful installation. Align each batten with your vertical chalk lines and fasten it securely. You’ll want to use screws that are appropriate for your wall’s material—for example, use masonry screws for a brick or concrete wall and exterior-grade wood screws if you’re attaching to wood sheathing. Ensure every batten is perfectly plumb. If your wall is uneven, use shims behind the battens to create a single, flat plane. This step is critical for ensuring your cladding looks straight and seamless.
Don't Forget Ventilation and Drainage
The gap created by the support framework isn’t just for show—it’s essential for the health of your wall. This space allows air to flow freely behind the panels, which helps moisture evaporate and prevents it from getting trapped against your home’s structure. It also creates a clear path for any water that gets behind the cladding to drain away safely. When installing your Exterior Fluted Slat Wall Panels, make sure the bottom and top of the framework are left open to allow for this airflow. You can install a ventilated trim or insect mesh to keep pests out while still promoting circulation.
How to Install WPC Wall Cladding Panels
With your wall prepped and framework in place, you’re ready for the most satisfying part: installing the panels. Getting the first panel right is the key to a smooth and professional-looking finish, so take your time and follow these steps carefully.
Why You Need to Acclimate Your Panels First
Before you even think about picking up a drill, let your WPC wall panels get used to their new home. Lay the panels flat in the room where you’ll be installing them for at least 24 to 48 hours. This simple step allows the material to acclimate to the room’s temperature and humidity levels. Skipping this can cause the panels to expand or contract after installation, leading to warping or buckling down the road. It’s a bit of a waiting game, but your patience will pay off with a wall that looks great for years to come.
Installing Your First Panel: The Key to Success
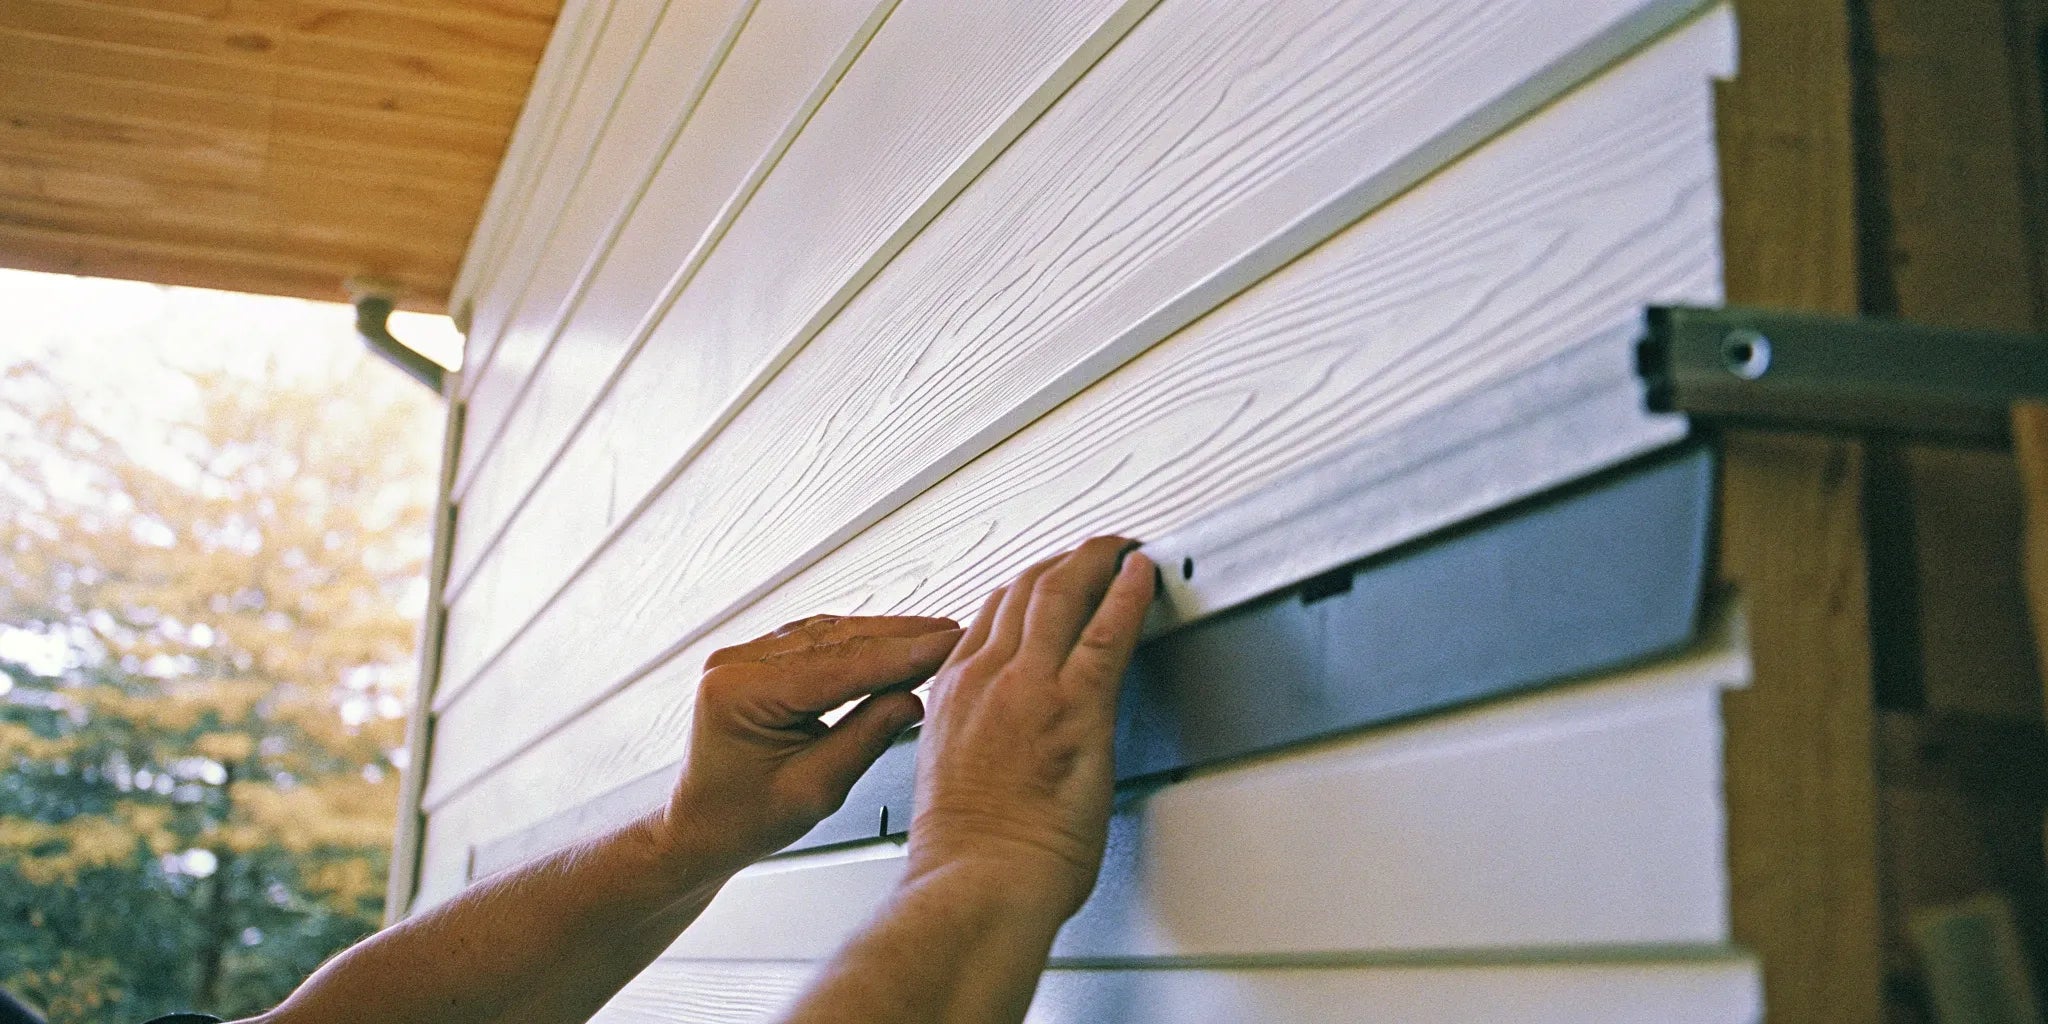
Your first panel sets the standard for the entire wall, so precision is key. Start by installing starter clips along the bottom support beam, leaving a small gap of about a quarter-inch from the floor. This ensures your first panel has a secure base to rest on. Place your first WPC panel onto the clips, making sure its bottom groove connects firmly. Use a level to check that it’s perfectly straight, both horizontally and vertically. Once you’re happy with the position, screw the panel into the support beams through the panel’s tongue or designated fastening strip.
Using Starter and Hidden Clips Correctly
WPC panels are designed with an interlocking tongue-and-groove system that makes installation straightforward. After securing your first panel, slide the next one into place, fitting its groove over the tongue of the previous panel. Use hidden clips to fasten this panel to the support beams. These clips slide into the groove and are then screwed into the framework, creating an invisible fastening system. As you work, remember to leave a small expansion gap (about 5-7mm) between the ends of the panels and any adjoining walls. This gives the material room to breathe with temperature changes.
Pre-Drilling Holes for a Secure Fit
While WPC is a tough material, taking a moment to pre-drill your screw holes is a pro move that ensures a perfect finish. This simple step prevents any chance of the material splitting or cracking as you drive the screws in, especially when working near the edges of a panel. Use a drill bit that’s slightly smaller than the diameter of your screw. This creates a clean pilot hole that guides the screw in straight and true. Always use the specialized hidden clips and screws recommended for your panels. These fasteners are designed to work perfectly with the tongue-and-groove system, creating that smooth, professional look where the hardware is completely invisible.
Using Adhesives for Extra Hold
For an installation that’s truly rock-solid, consider adding a layer of construction adhesive to the back of each panel. While the clip system provides the primary support, a good quality adhesive offers extra grip and eliminates any potential for slight movement or rattling. This is especially helpful for ceiling installations or in high-traffic areas. Before placing a panel, apply a continuous bead of adhesive in a serpentine or "S" pattern on the back. Press the panel firmly against the support beams to ensure good contact. Always follow the adhesive manufacturer’s instructions and check that it’s compatible with composite materials like the Interior WPC Fluted Slat Wall Panels you're installing.
How to Build Up Your Wall, Row by Row
Continue this process, working your way across and up the wall. Lock each new panel into the previous one, check that it’s level, and secure it with hidden clips. This row-by-row method ensures a consistent and secure installation. When you reach the last row, you’ll likely need to trim the final panel to fit snugly against the ceiling or edge. Once all the panels are in place, you can add corner and edge trims to cover any exposed ends. This gives your project a clean, polished look and a professional finish. Professionals doing this for clients can apply for our trade program to get bulk discounts.
How to Cut Panels for a Perfect Fit
Almost every wall has a window, door, outlet, or light switch. Working around these obstacles is what separates a good installation from a great one. It might seem intimidating, but it’s really just a matter of careful measuring and cutting. Taking your time here ensures your new WPC wall panels look like they were custom-made for your space. This is where your project truly comes to life, blending seamlessly with your home’s existing features. With a few simple techniques, you can achieve a clean, professional finish that looks fantastic and is built to last. We’ll walk through exactly how to measure, cut, and finish your panels around any interruption on your wall.
Measuring and Marking Around Obstacles
The old saying "measure twice, cut once" is your best friend when fitting panels around obstacles. Use a reliable tape measure to determine the exact height and width of the area you need to cut out for a window, outlet, or door frame. Transfer these measurements carefully onto the back of the WPC panel. A T-square and a sharp pencil will help you draw straight, accurate lines for a perfect fit. Double-check that your marks are level and correctly placed before you even think about picking up a saw. This small step prevents costly mistakes and ensures your panel will slide perfectly into place.
Adding Extra Support Around Windows
Windows and doors interrupt the vertical flow of your support battens, so you’ll need to add some extra framing around them. This isn't just about filling a gap; it’s about creating a solid, continuous structure for your panels to attach to. Think of it as building a mini-frame around the opening. You’ll want to install horizontal battens above and below the window, connecting them to the vertical supports on either side. This ensures the panels around the window are just as secure as the ones on the main wall. It also provides a solid base for attaching your finishing trims, which is crucial for a clean, watertight seal around your beautiful new steel windows or existing frames.
Tips for Making Clean, Precise Cuts
Once your panel is marked, it’s time to make the cut. A circular saw, jigsaw, or fine-toothed handsaw will all work well with WPC material. The key to a clean cut is a sharp blade and a steady hand. Before you start, always put on your safety goggles and gloves to protect yourself from dust and debris. Follow your pencil lines slowly and carefully to avoid chipping the panel. If you’re cutting out a space for an outlet, you can drill a pilot hole in each corner to make it easier to start your cut with a jigsaw. After cutting, do a quick test fit to see if the panel sits correctly around the obstacle before you fasten it to the wall.
Adding the Finishing Touches with Trim
Trim is the secret to a truly polished look. It neatly covers the cut edges of your panels and creates a clean border around windows, doors, and corners. For a professional finish, you can install L-shaped corner pieces with screws, which adds stability and hides any imperfections. Using special trims designed for WPC cladding will give your project a cohesive and high-end appearance. These finishing pieces are simple to install and make a huge difference in the final result, tying the entire wall together and ensuring every edge looks sharp and intentional. It’s the final step that makes your hard work shine.
A Specific Technique for Finishing Around Windows
When you get to the windows, the finishing details are what really make the project shine. The best way to get a clean, professional look is to use trim to frame the window. This trim is designed to neatly cover the cut edges of your WPC panels, creating a crisp border that looks intentional. It’s the difference between a project that looks finished and one that looks truly polished. This step hides any minor imperfections from your cuts and gives the entire installation a high-end, custom-built feel, ensuring the final result is something you're proud of.
For the corners around the window frame, L-shaped corner pieces are your best friend. These trims are specifically made to fit snugly over the edges of your Exterior Fluted Slat Wall Panels, providing a perfect 90-degree finish. You can secure them with small screws, which not only hides the raw panel edges but also adds a bit of extra stability to the structure. This small detail ensures every edge looks sharp and clean, tying the whole wall together and giving it a cohesive, well-planned appearance that looks like it was done by a pro.
Combining these finishing trims with the hidden fasteners you used for the main wall creates that seamless look you're aiming for. The goal is to make the cladding feel like a natural part of the room's architecture. Paying attention to these final touches around windows and doors is what truly completes the installation. It ensures your new wall not only looks fantastic from a distance but also holds up to close inspection, showing off the quality of your work and the care you put into every step of the process.
Common WPC Installation Mistakes to Avoid
You’ve done the hard work of planning and preparing, and now you’re ready to see your vision come to life. But before you finish, let’s cover a few common installation mistakes that can trip up even seasoned DIYers. Getting these details right is the key to a flawless finish that not only looks professional but also stands the test of time. A little extra attention here ensures your beautiful new cladding won’t warp, buckle, or loosen over the years. We’ll walk through the three most important things to watch for so you can sidestep any potential issues and feel confident in your work.
Mistake #1: Forgetting the Expansion Gap
This might be the single most important tip for installing WPC cladding. Like most building materials, WPC panels naturally expand and contract with temperature changes. If you install them too tightly against each other or against trim, they’ll have nowhere to go when they expand. This pressure can cause the panels to warp, buckle, or even pop off the wall. To prevent this, always leave a small expansion gap of about 5-7mm at the ends of the boards and where they meet corners or window frames. It’s a tiny detail that makes a huge difference in the longevity of your project.
Mistake #2: Using the Wrong Fasteners
The clips and screws you use are the unsung heroes of your wall cladding project. Using the wrong type of fastener—or not using enough of them—can lead to serious structural problems. Before you begin, make sure your wall surface is solid, dry, and level enough to provide a secure anchor. Always follow the manufacturer’s guidelines for your specific Interior WPC Fluted Slat Wall Panels. They will specify the correct type and size of screws and clips designed to work with the system. Don’t be tempted to substitute with whatever you have lying around; the right hardware ensures each panel is held securely in place for years to come.
Mistake #3: Ignoring Heat and Sunlight
While WPC is incredibly durable, it’s not invincible, especially when it comes to extreme heat. WPC materials can soften or change shape if exposed to temperatures above 158°F (70°C). This is something to keep in mind when choosing an installation location. A wall that gets blasted with intense, direct afternoon sun might not be the best candidate, especially in hotter climates. Also, be mindful of heat-concentrating surfaces nearby, like reflective windows or metal flashing, which can amplify the sun’s rays. Ensuring you have proper ventilation behind the panels will help dissipate heat and keep your cladding stable and looking great.
How to Maintain Your WPC Wall Cladding
Your new WPC wall cladding is designed to be durable and low-maintenance, but a little care will ensure it looks fantastic for years to come. One of the biggest draws of WPC is that it frees you from the constant upkeep of traditional wood—no more yearly staining or sealing. Instead, WPC requires just a bit of straightforward attention to keep its color and integrity intact. Think of it less as a chore and more as a simple way to protect your investment and keep your space looking polished. By following a basic cleaning schedule and keeping an eye out for any potential issues, you can easily maintain that fresh, just-installed look without a lot of effort. The following steps will walk you through everything you need to know, from routine dust removal to handling unexpected stains, ensuring your walls always look their best.
Your Simple WPC Cleaning Routine
The best way to keep your cladding looking pristine is with a simple, regular cleaning routine. For most dust and dirt, a quick wipe-down with a soft cloth or sponge and some mild, soapy water is all you need. It’s best to avoid harsh chemical cleaners or abrasive scrubbers like steel wool, as they can scratch or damage the composite surface. If you need something a bit stronger for a tougher spot, look for cleaners specifically designed for WPC materials. Making this a seasonal habit—say, once every few months—is a great way to prevent grime from building up and keep your Interior WPC Fluted Slat Wall Panels looking sharp.
A Note on Using Pressure Washers
While it might be tempting to pull out the pressure washer for a quick and powerful clean, it’s best to proceed with extreme caution. The high-pressure stream can be too aggressive for the composite material, potentially scratching the surface, causing discoloration, or even forcing water into the seams between panels. The protective finish on your Exterior Fluted Slat Wall Panels is tough, but it's not designed to withstand that kind of concentrated force. If you feel you must use a pressure washer, select the lowest possible pressure setting, use a wide fan-tip nozzle, and always keep a safe distance from the wall. Be sure to test it on a small, hidden area first. Honestly, the safest and most effective method remains the gentle approach: a soft brush and soapy water will get the job done without risking any damage.
What to Look for in an Annual Inspection
Once a year, take a few minutes to give your WPC cladding a closer look. A quick walk-around is perfect for spotting any potential issues before they become problems. Check for any signs of unusual fading, warping, or small cracks that might have developed. Pay close attention to areas that get a lot of direct sun or are exposed to heavy rain. This is also a good time to look for any stubborn stains or blots you might have missed during regular cleanings. Catching these things early makes them much easier to address. This annual check-up is especially important for exterior cladding, which endures changing weather throughout the year.
How to Fix Common Cladding Issues
If you spot a stain from things like pollen, mildew, or a spilled drink, don’t worry—it’s usually an easy fix. Start by mixing a gentle cleaning solution of mild soap and warm water. Dip a soft cloth or sponge into the solution and gently wipe the affected area. Try not to completely soak the panel; a damp cloth is all you need. After you’ve cleaned the spot, it’s important to rinse the area with a clean, damp cloth and then dry it thoroughly with another clean, dry cloth. This final step prevents water spots or streaks from forming. This simple method works for most common issues you’ll encounter with your wall panels and keeps them looking flawless.
Related Articles
- The Ultimate Guide to WPC Exterior Wall Cladding
- The Ultimate WPC Exterior Wall Cladding Installation Guide
Frequently Asked Questions
Can I install WPC panels directly onto my existing wall? While it might seem like a tempting shortcut, installing a support framework is a step you really don't want to skip. This framework creates a small air gap behind the panels, which is essential for proper ventilation. It prevents moisture from getting trapped against your wall, which protects against mold and rot, and it also gives you a perfectly flat surface to work with, ensuring your final wall looks smooth and professional.
Are WPC panels a good choice for bathrooms or kitchens? Yes, they are an excellent option for rooms with higher humidity. Because WPC is a composite of wood and plastic, it’s highly resistant to moisture and won't warp or swell the way traditional wood can. This makes it a durable and low-maintenance choice for spaces like bathrooms, laundry rooms, or kitchen backsplashes where splashes and steam are common.
Can I paint WPC wall cladding if I want to change the color later on? It’s generally not recommended to paint WPC panels. The material has a non-porous surface that is designed to be a finished product, which means paint doesn't adhere to it very well and can easily peel or chip over time. It's best to choose a color and finish you love from the start to ensure a beautiful, long-lasting result without the extra maintenance.
What's the best way to clean a really stubborn stain? For tougher spots that soap and water can't handle, you can try a non-abrasive, all-purpose cleaner. Apply a small amount to a soft cloth and gently work on the stain. It's always a good idea to test the cleaner on a small, inconspicuous area first to make sure it doesn't affect the panel's finish. Avoid using harsh solvents or abrasive scrubbers, as they can damage the surface.
Do I need special professional tools to cut WPC panels? Not at all. You can get clean, precise cuts using standard woodworking tools that you likely already have. A circular saw, miter saw, or even a jigsaw equipped with a fine-toothed blade will work perfectly. The key is to use a sharp blade and take your time to follow your marked lines for a clean, professional-looking fit around any obstacles.
%20panels%20make%20it%20easy%20to%20get%20a%20modern,%20high-end%20look%20that%E2%80%99s%20also%20incredibly%20durable%20an...)