


How to Paint Wood Wall Panels for a Modern Look
Getting a professional-looking paint job isn't about being a pro—it's about knowing the pro secrets. And when it comes to wood paneling, those secrets are all in the prep work. Proper sanding, using a stain-blocking primer, and applying thin, even coats are what separate a stunning result from a frustrating one. You don't need to hire anyone to get a finish that looks amazing. This step-by-step tutorial on how to paint wood wall panels gives you the confidence and techniques to achieve a truly flawless, long-lasting result you’ll be proud of.
Key Takeaways
- Your Finish is Only as Good as Your Prep Work: The secret to a durable, professional-looking paint job isn't the painting itself—it's the preparation. Taking the time to properly clean, fill, and sand your wood panels creates the perfect canvas and prevents issues like peeling and uneven texture.
- Use a Stain-Blocking Primer to Prevent Discoloration: Wood contains natural oils (tannins) that can bleed through and cause yellow stains on your new paint. A quality stain-blocking primer is essential because it creates a barrier, ensuring your final color stays clean and true.
- Master the "Cut In and Roll" Technique: For a seamless finish without drips or brush marks, always paint the grooves and edges with a brush first, then immediately follow with a roller on the flat surfaces. This method helps you maintain a wet edge and blends the textures perfectly.
Should You Paint or Remove Your Wood Paneling?
Before you commit to painting, it’s worth asking a bigger question: should you be painting this paneling at all? While a fresh coat of paint can work wonders, it’s not always the best solution. Think seriously about whether you'd rather remove the paneling and install drywall or a more modern wall treatment. If your paneling is thin, damaged, or has a dated texture, painting it might just be putting a bandage on a bigger design problem. Painting is a multi-step process that requires a lot of prep work, and if you’re not in love with the underlying texture of the panels, you might go through all that effort and still not be happy with the result.
On the other hand, if the paneling is made of high-quality wood and is in good condition, painting can be a fantastic way to preserve its character while updating the room. The decision often comes down to the quality of the material and your long-term vision for the space. If the goal is a quick refresh, paint is your best friend. But if you're aiming for a complete transformation, removing the old panels gives you a blank slate. This opens up a world of possibilities, from smooth drywall to stunning new materials like Unfinished Wood Wall Panels or sleek fluted designs that can completely redefine a room’s aesthetic.
Consider the Alternative: Removing Paneling
Many people assume that removing paneling is a massive, complicated job, but it can sometimes be the more straightforward path to a high-end finish. As many DIYers have discovered, painting paneling is a lot of work and might not look as good as fresh drywall in the end. The process of cleaning, sanding, priming, and painting every groove can be incredibly tedious. Tearing it out, while messy, can be faster and ultimately more rewarding. Once the panels are gone, you can assess what’s underneath. You might find perfectly good drywall that just needs a few patches, or you may need to hang new sheets. Either way, you get a smooth, modern surface that offers more versatility for paint and decor.
Elevate the Look with New Trim
If you decide that painting is the right move, don’t stop with just the paint. One of the best ways to make painted paneling look intentional and sophisticated is by upgrading the trim. Adding decorative trim like wainscoting, chair rails, new baseboards, and crown molding can make the painted paneling look much better. This simple addition breaks up the vertical lines of the panels and adds architectural interest, framing the walls and giving them a custom-built feel. Consider installing a chair rail and painting the lower portion of the wall a different color or finish. Or, replace thin, dated baseboards with something taller and more substantial to ground the room and create a more polished, contemporary look.
How to Prep Wood Panels for a Flawless Finish
I know it’s tempting to jump right into painting, but trust me on this: the prep work is where the magic really happens. Taking the time to properly prepare your wood panels is the single most important thing you can do to get a smooth, durable, professional-looking finish. Think of it like building a house—you wouldn't start putting up walls without a solid foundation. In painting, prep is your foundation. If you skip these steps, you risk dealing with peeling paint, uneven texture, and old stains bleeding through your beautiful new color. A little bit of effort now saves you a massive headache later. So, roll up your sleeves, put on some good music, and let’s get these panels ready for their transformation. This process of cleaning, filling, and sanding ensures your primer and paint stick perfectly, giving your unfinished wood wall panels a flawless look that lasts for years to come.
Secure Loose Panels and Remove Hardware
Before you even think about opening a can of primer, let's make sure your canvas is solid. Give your walls a quick inspection by walking along them and pressing gently on the panels. If you find any that feel loose or wobbly, secure them with a few finishing nails. This simple step prevents the paint from cracking later on as the panel shifts, saving you from a major headache down the road. Once everything is firmly in place, it’s time to clear the surface. Carefully remove any old nails, screws, or picture hooks. Most importantly, take off all the electrical outlet and switch plate covers. While it might seem easier to just tape around them, removing them is the secret to getting those crisp, clean lines that scream "professional." It ensures you get a perfect coat of paint right to the edge, with no messy tape lines to peel away later.
Start by Cleaning the Surface
First things first, you need a clean slate. Over time, walls collect dust, grime, grease (especially in kitchens), and residue from cleaning products. Paint simply won't stick to a dirty surface. Start by giving your wood panels a thorough cleaning with a degreasing cleaner. You can find products specifically for this at any hardware store. Mix your cleaner according to the directions and use a sponge or cloth to wash the walls from top to bottom. This step is crucial for ensuring the primer can properly adhere to the wood. Once you’re done washing, rinse the panels with a clean, damp cloth to remove any leftover soap residue and let them dry completely.
Fill in Any Dents and Imperfections
Now that your panels are clean, take a close look at the surface. You’re hunting for any imperfections like nail holes, dents, scratches, or small cracks. These little flaws will stick out like a sore thumb once they’re covered in a fresh coat of paint. Grab a putty knife and some high-quality wood filler or vinyl spackling compound. Apply a small amount of filler to each imperfection, pressing it in firmly and smoothing it over. It’s better to overfill slightly, as you’ll be sanding it down later. This step makes a huge difference in achieving that seamless, high-end finish. Let the wood filler dry completely according to the manufacturer's instructions.
Use Caulk for Seams and Filler for Holes
Here’s a pro tip that will save you from future frustration: use caulk for the seams between panels and wood filler for holes on the flat surfaces. It’s tempting to use the same spackle for everything, but the two materials behave very differently. Wood panels naturally expand and contract with changes in temperature and humidity. Paintable caulk is flexible, so it can stretch and move with the wood, preventing ugly cracks from forming along the seams. Wood filler, on the other hand, dries hard and isn't flexible, making it perfect for creating a solid, sandable patch over nail holes and dents. Using the right product in the right place is a small detail that ensures your finish stays looking perfect.
Apply Filler with Your Finger for a Natural Texture
When you’re filling those small nail holes or dings, ditch the putty knife and use your finger instead. I know it sounds a bit unconventional, but it’s a fantastic trick for maintaining the natural look of the wood. A putty knife tends to flatten the area around the hole, creating a perfectly smooth spot that can stand out against the subtle grain of the paneling once it's painted. By applying a small dab of wood filler with your fingertip, you can press it into the hole while gently blending it into the surrounding texture. This helps the patch blend in seamlessly, so once you sand it lightly and paint, the repair will be virtually invisible.
Sand Everything for a Smooth Base
Sanding is a non-negotiable step, especially if your panels have any kind of glossy or semi-gloss finish. The goal here isn't to strip the old finish off completely, but to "de-gloss" it. This light scuffing creates a slightly rough texture, or "tooth," that gives the primer something to grip onto. Use a fine-grit sandpaper (a 180 or 220-grit sanding sponge works great) and lightly go over the entire surface of the paneling. Pay extra attention to the areas you filled to make them perfectly flush with the wood. The surface should feel smooth to the touch but look dull when you’re done. This simple step is key to preventing peeling paint down the road.
Choosing the Right Sandpaper Grit
For this type of project, you don't need an aggressive, heavy-duty sandpaper. Your goal is simply to scuff up the surface enough for the primer to bond securely. A fine-grit sandpaper is perfect for this. I recommend using a 180 or 220-grit sanding sponge, as it’s flexible enough to get into the grooves of the paneling while being gentle on the wood. Remember, you are just trying to "de-gloss" the existing finish, not remove it entirely. After a light sanding, the surface should feel smooth but look dull. This creates the ideal texture, or "tooth," that allows the primer to grab hold, which is the key to a durable, long-lasting paint job that won't chip or peel.
Consider "Liquid Sandpaper" for a Dust-Free Option
If the thought of sanding dust filling your home makes you want to abandon the project altogether, there’s a great alternative you should know about. "Liquid sandpaper," also known as a deglosser, is a chemical solution that etches the surface of the paneling, creating that necessary tooth for the primer without any of the mess. You simply apply it with a cloth, let it sit for the recommended time, and then wipe it clean. For best results on a glossy surface, you might want to apply it twice. It’s an excellent, dust-free option that saves a lot of cleanup time and is especially useful for preparing slick, hard-to-sand surfaces for painting.
Wipe Away Dust Before You Begin
You’ve cleaned, filled, and sanded—now it’s time for one final clean-up. Sanding creates a surprising amount of fine dust, and if you paint over it, you’ll end up with a gritty, bumpy texture. First, use a vacuum with a soft brush attachment to remove the bulk of the dust from the panels and the surrounding area. After vacuuming, go over the entire surface with a tack cloth or a slightly damp, lint-free rag. A tack cloth is my personal favorite because it’s sticky and picks up every last particle. Make sure your panels are completely dust-free and dry before you even think about opening a can of primer.
Plan Your Painting Order
With your panels perfectly prepped, it’s time to map out your painting strategy. A methodical approach is key to achieving that professional, streak-free finish. Always begin with a high-quality stain-blocking primer; this is non-negotiable as it forms a barrier to prevent natural wood oils from bleeding through and discoloring your paint. When you're ready to apply both the primer and the paint, use the "cut in and roll" technique. First, use a brush to paint the grooves and edges, then immediately follow with a roller on the flat surfaces. This method helps you maintain a wet edge, which prevents drips and blends the textures seamlessly. Finally, be patient and apply several thin coats rather than one thick one. Wood can absorb a lot of paint, and thin layers build up to a more durable, even color that truly lasts.
What's the Best Primer for Wood Panels?
After all that cleaning and sanding, you might be tempted to jump straight to the paint can. But trust me, priming is the single most important step for a durable, professional-looking finish. Think of it as the foundation for your paint job. It ensures the paint adheres properly, covers imperfections, and creates a uniform surface for your color to shine. More importantly, it prevents frustrating issues like stains and discoloration from ruining your hard work down the line.
Match the Primer to Your Paneling Type
Not all wood panels are the same, so the primer you choose shouldn't be a one-size-fits-all solution. The material your paneling is made from—whether it's a slick laminate, a natural wood veneer, or a solid wood like cedar—will determine what kind of primer you need. The primer’s first job is to create a strong bond with the panel surface, and its second is to provide the perfect base for your paint. Using the wrong type can lead to peeling, chipping, or stains bleeding through your new color. To get the best results, you need to match the primer to the paneling. This is especially important whether you're working with brand new unfinished wood wall panels or updating older, existing ones.
For Laminate or Veneer Panels
Laminate and veneer panels have a smooth, non-porous surface that can be tricky for standard primers to stick to. If you try to use a regular latex primer on these materials, you’ll likely find that the paint scratches or peels off easily. For these challenging surfaces, you need a specialty bonding primer. A product like Insl-X Stix Primer is specifically designed to adhere to glossy, hard-to-paint materials. It creates a powerful bond that locks onto the surface, giving your topcoat a solid foundation to grip onto for a durable, long-lasting finish.
For Tannin-Rich Woods like Cedar or Redwood
If you're painting real wood panels, especially woods like cedar, redwood, or oak, you have to watch out for something called "tannin bleed." Tannins are natural oils within the wood that can seep through latex-based primers and paints, leaving yellowish or brownish stains on your beautiful new finish. To prevent this, you must use a stain-blocking primer. An oil-based primer is your best defense here, as it creates an effective barrier that seals the tannins in the wood. Look for products specifically labeled as "stain-blocking" to ensure your final paint color stays crisp and true.
Match the Primer to Your Paint
Once you’ve chosen a primer that works with your paneling, you also need to make sure it’s compatible with your paint. The general rule is to stick with the same type for both: use a latex primer with latex paint and an oil-based primer with oil-based paint. However, there’s a key exception that gives you flexibility: you can apply latex paint over an oil-based primer once it has fully cured. This is actually a great combination, as you get the superior adhesion and stain-blocking power of an oil-based primer with the easy cleanup and low odor of a latex topcoat. Just remember that you should never apply oil-based paint over a latex primer, as it will not adhere properly and is likely to crack and peel over time. Getting this pairing right is essential for a finish that looks great and stands up to daily life.
Why a Stain-Blocking Primer is a Must
If you’re working with real wood panels, especially woods like cedar or redwood, you’re dealing with tannins. These are natural oils in the wood that can bleed through layers of paint, leaving yellowish or brownish stains. A high-quality stain-blocking primer acts as a barrier, sealing in these tannins and any other stubborn stains from smoke or water damage. This crucial step ensures your final paint color looks clean, crisp, and true to the swatch you picked out. Skipping it is a gamble that almost never pays off.
Why a Separate Primer Beats a 2-in-1 Product
You’ve probably seen "paint and primer in one" products all over the store, and while they’re great for simple jobs like repainting a light-colored wall, they are not the right tool for this project. These products are essentially just a thicker paint; they don't contain the specialized sealing agents of a true primer. A dedicated, high-quality stain-blocking primer creates an actual barrier between the wood and your paint. This is what stops wood tannins, old water spots, or smoke residue from bleeding through and ruining your beautiful new color. Using a separate primer is the only way to guarantee your light-colored paint stays light and your finish remains flawless for years to come.
Pro Tip: Tint Your Primer
Here’s a simple trick that professionals use to save time and get a richer, more even color: have your primer tinted. When you buy your paint, ask the person at the paint counter to add a small amount of your final color to the primer. This gives your primer a grayish or muted tone that’s closer to your topcoat. A tinted base helps the paint cover better, which often means you'll need fewer coats of your more expensive paint to achieve full coverage. This is especially helpful if you're making a dramatic change, like painting dark wood paneling a light color. It’s a small step that makes a big difference in both your wallet and your final result.
A Few of My Favorite Wood Primers
Not all primers are created equal, and the right one depends on your specific wall panels. If you're painting over a laminate or veneer surface, an adhesion-gripping primer is your best bet. For beautiful hardwood panels, look for a high-hiding primer that can cover the natural grain. If you know your wood is prone to bleeding tannins, an oil-based primer will offer the strongest seal. It’s always a good idea to read the product label and match the primer to both your Unfinished Wood Wall Panels and your chosen topcoat.
How Primer Creates a Foundation for Paint
Ultimately, a flawless paint job is built on meticulous preparation. The time you spend cleaning, filling, sanding, and priming is far more critical than the time you spend painting. This prep work is what separates an amateur-looking finish from a professional one that will last for years. By creating a smooth, stable, and well-sealed foundation with the right primer, you’re setting yourself up for success. It ensures better paint adhesion, true color, and a durable finish that can handle daily life without chipping or staining.
Your Essential Painting Supply Checklist
With your wood panels prepped, it's time to gather your supplies. Having the right tools on hand makes the entire painting process smoother and helps you achieve that professional finish you're aiming for. A little organization now saves you from frantic searching later when you have a wet paintbrush in hand. Let's walk through exactly what you'll need, from the best applicators to the right paint and essential safety gear.
Choosing the Right Brushes and Rollers
For wood panels, a two-pronged approach is best. Use a high-quality angled brush to paint the grooves and a roller for the flat surfaces. This combination ensures crisp lines and even coverage without drips. A 2-inch angled sash brush is perfect for cutting in and getting into detailed grooves. For the larger, flat areas, a 4- to 6-inch mini roller with a foam or short-nap cover will give you a beautifully smooth finish. Don't forget a paint tray to load your roller evenly. Using the right painting tools is half the battle.
Recommended Roller Sizes for a Smooth Finish
To get that perfectly smooth, texture-free finish on your wood panels, the most important detail on your paint roller is its "nap" size—which is just a simple way of saying the length of its fibers. You’ll want to look for a very short nap, specifically one that is 3/16-inch to 1/4-inch. This size applies a thin, even coat of paint without creating any unwanted texture. While foam rollers are common, I always recommend a microfiber roller instead. A quality microfiber trim roller will hold more paint than a foam one, which means you get better coverage and work more efficiently. Using a 4- or 6-inch roller for the flat surfaces not only speeds up the process but also provides a more consistent finish than a brush alone, giving you that truly professional result.
How to Pick the Perfect Paint and Sheen
Choosing the right paint is key to a lasting finish. For a durable, furniture-like look, a waterborne alkyd paint is an excellent choice. If you prefer a finish with some shine and mildew resistance, a premium latex paint in a satin or semi-gloss sheen is a great option. These sheens are also easier to clean, a huge plus for high-traffic areas. Our Unfinished Wood Wall Panels provide the perfect blank canvas, allowing you to select the exact color and finish that brings your vision to life. Always invest in quality paint—it makes a difference in coverage and durability.
Safety First: What Gear You'll Need
Let’s talk about safety. Painting can be messy, and it’s important to protect yourself. Always use a mask and goggles when sanding to protect yourself from dust. When it's time to prime and paint, make sure the room has plenty of fresh air while you're working, especially with an oil-based primer. Open the windows and use a fan to keep air circulating. Your basic safety checklist should include a dust mask, safety glasses, gloves, and drop cloths to protect your floors. A little precaution goes a long way in making your project a success.
How to Paint Wood Wall Panels Like a Pro
Now for the fun part—actually putting paint on the panels! The right technique is just as important as the prep work, as it’s what separates a standard DIY job from a professional-looking finish. Don’t worry, you don’t need to be a pro to get it right. The key is to be methodical and patient. By breaking the process down into a few simple steps, you can avoid common mistakes like drips, brush marks, and uneven coverage. We’ll focus on a system that ensures every inch of your wood wall panels looks flawless, from the deep grooves to the wide, flat surfaces.
The Professional's Multi-Step Priming Process
If you want a finish that looks truly high-end, you have to think like a professional painter. Pros know that priming isn't just a single step—it's a multi-layered process designed to create the absolute perfect canvas for paint. This isn't about rushing through to get to the color; it's about methodically building a foundation that guarantees your paint job will be smooth, even, and incredibly durable. Each step serves a specific purpose, from sealing stubborn knots to creating a uniform surface that absorbs paint perfectly. Following this multi-step approach is the secret to transforming your wood wall panels from a simple DIY project into a stunning, long-lasting feature in your home.
Step 1: Spot Prime Knots
Before you even think about priming the entire wall, you need to address the biggest potential troublemakers: the knots in the wood. Wood knots contain a high concentration of tannins, which are notorious for bleeding through multiple layers of primer and paint, leaving ugly yellow or brown stains. To stop this from happening, you need to spot prime. Apply a coat of a shellac-based or oil-based stain-blocking primer directly onto each knot. This targeted application creates an extra-strong barrier right where you need it most, effectively sealing the tannins in for good. Let these spots dry completely before moving on to the next step.
Step 2: Apply the First Full Coat
With the knots sealed, it’s time to apply your first full coat of primer to the entire surface. Using your angled brush for the grooves and your mini roller for the flat areas, apply a thin, even layer of your chosen stain-blocking primer. The goal here isn’t to achieve perfect, opaque coverage in one go. Instead, you’re creating a consistent base layer that the next coats can build upon. This first coat does more than just help with adhesion; it also acts as a diagnostic tool, revealing any tiny dents, dings, or imperfections you might have missed during your initial prep work.
Step 3: Fill Holes and Sand
Once your first coat of primer is completely dry, take a walk along the wall and inspect it carefully. The uniform color of the primer makes it much easier to spot any remaining minor imperfections like nail holes or scratches. This is your final opportunity to create a perfectly smooth surface. Use a high-quality wood filler to address these spots, applying it with a putty knife and slightly overfilling each area. After the filler has fully cured according to the manufacturer's instructions, sand it down with 220-grit sandpaper until it’s perfectly flush with the surrounding surface. Remember to wipe away all the sanding dust with a tack cloth before proceeding.
Step 4: Apply the Second Full Coat
This final priming step is what truly separates an amateur job from a professional one. Applying a second full coat of primer does two critical things. First, it seals the porous wood filler you just applied, ensuring it won’t absorb your topcoat differently than the rest of the wall. Second, it creates a completely uniform base in both color and porosity, which is the key to achieving a flawless, even paint sheen without any patchiness. Apply this second coat just as you did the first, with a thin, even layer. Once it’s dry, your wood panels are perfectly prepped and ready for paint.
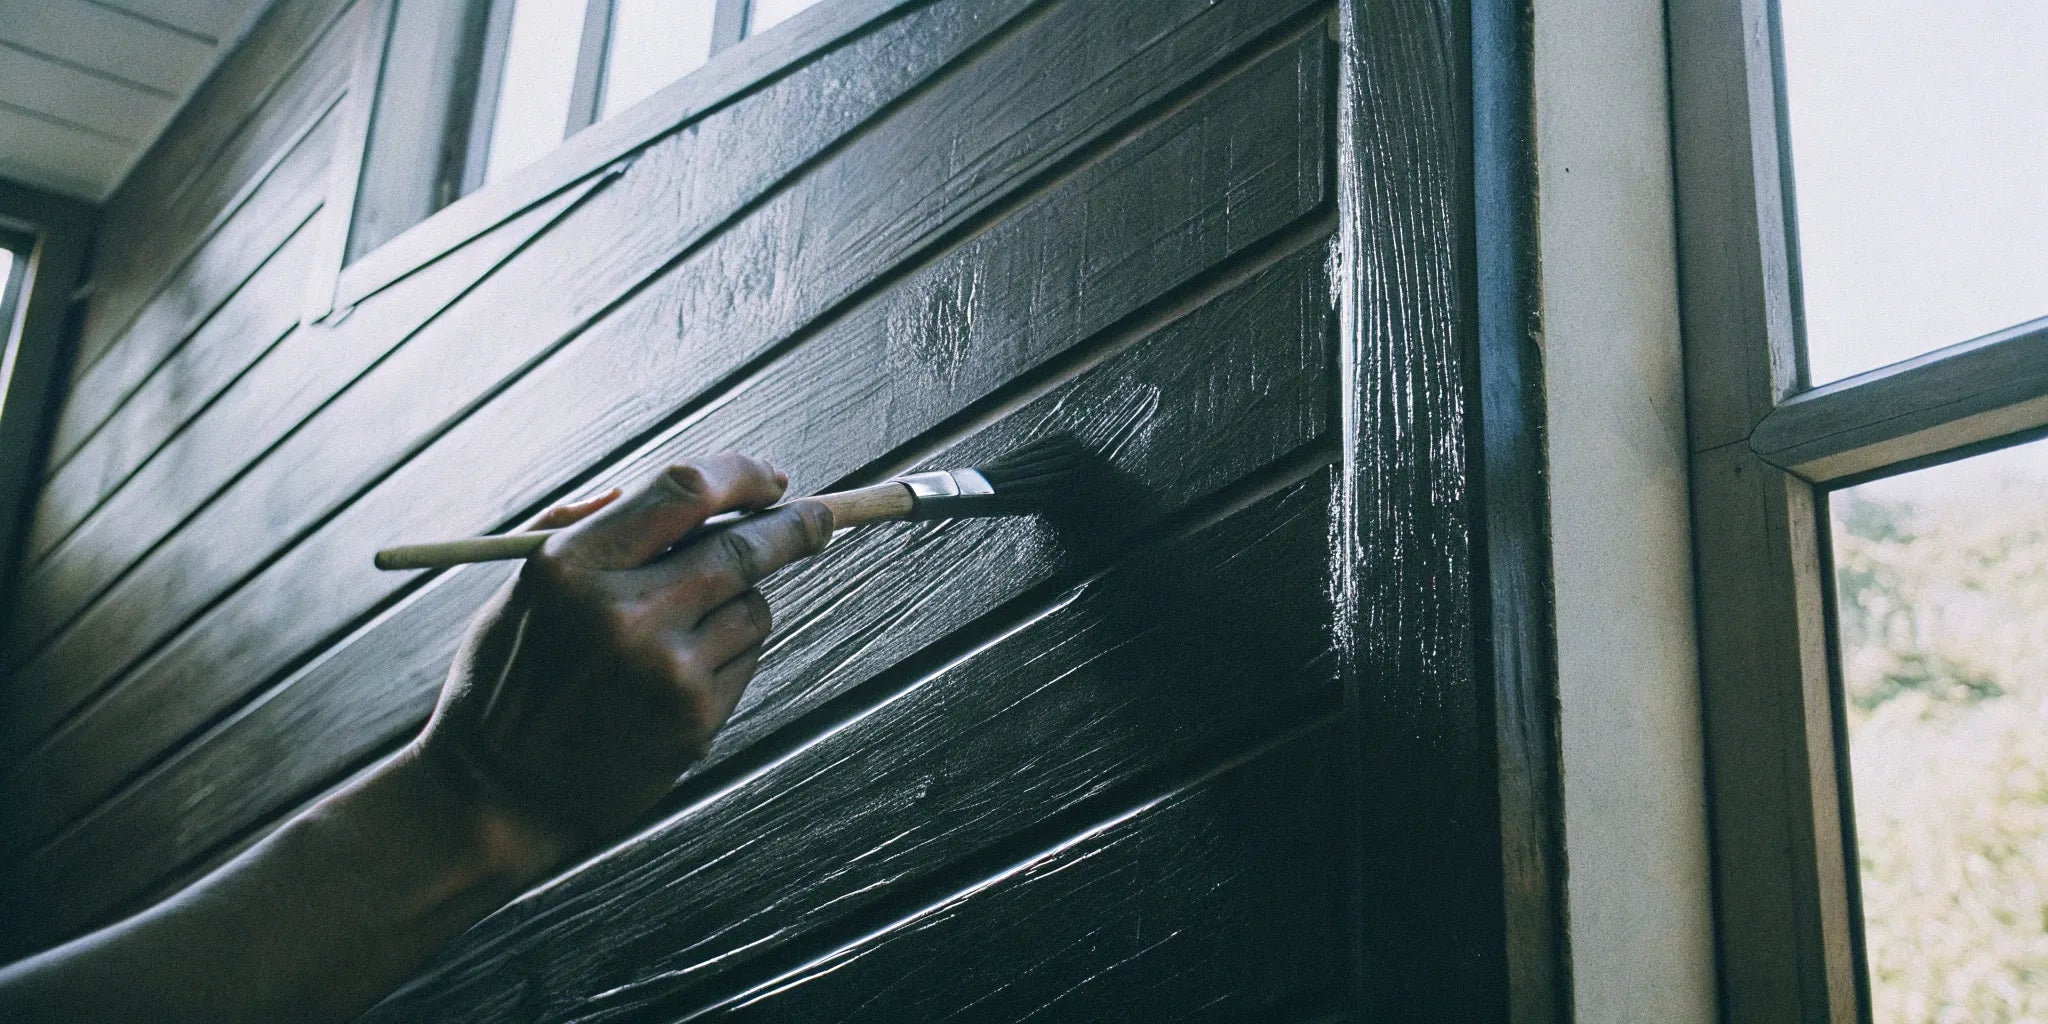
Start by Cutting in the Edges and Grooves
Before you grab a roller, you need to “cut in.” This just means using a paintbrush to carefully paint all the areas a roller can’t easily reach. Think corners, the edges where the panels meet the ceiling or floor, and especially the grooves between each panel. I recommend using a 2-inch angled brush for better control. This step creates a clean border and ensures the grooves get full coverage, so you don’t have any old color peeking through. Taking your time here makes the next step—rolling—so much faster and neater.
Try the "Glop-and-Smear" Method for Grooves
When it comes to painting the grooves in wood paneling, achieving even coverage can be a real challenge. One of the most effective techniques is what I like to call the "glop-and-smear" method. It sounds a bit unrefined, but it works perfectly. The idea is to load your brush with a generous amount of paint—a "glop"—and then smear it directly down into the grooves. This ensures the paint fully penetrates the channels, preventing any missed spots that can ruin the look of an otherwise perfect finish. Don't be shy with the paint here; you want to make sure those grooves are completely filled.
After applying paint to a section of grooves, immediately follow up with a roller on the flat surfaces of the paneling. This combination is key because it helps you maintain a wet edge, which is crucial for blending the brushed areas with the rolled areas. It creates a seamless transition between the textured grooves and the smooth panels, preventing drips and obvious brush marks. As a helpful tutorial from Miss Mustard Seed demonstrates, this method is fantastic for achieving a professional-looking finish without the usual frustration of painting detailed surfaces.
Next, Roll the Large, Flat Surfaces
Once your edges and grooves are painted, it’s time to cover the large, flat areas with a roller. A small 4-inch or 6-inch roller with a low-nap cover usually works best for paneling, as it provides a smooth finish without overloading the grooves with paint. As you roll, slightly overlap the edges you just painted with your brush. This helps blend the two textures for a seamless, uniform look. The goal is to make it impossible to tell where your brushwork ends and the roller work begins.
Tackle One Small Section at a Time
Painting an entire wall at once can feel overwhelming and often leads to mistakes. Instead, mentally divide the wall into small, manageable sections, maybe about 3 feet by 3 feet. Start at the top corner of a section and work your way down. This top-down approach helps you catch any drips before they run down the finished part of the wall. Focusing on one small area at a time allows you to maintain control over your application and ensures you can keep a wet edge, which is crucial for the next step.
Avoid Lap Marks by Keeping a Wet Edge
Have you ever seen a painted wall with faint, overlapping lines? Those are called lap marks, and they happen when you paint over an area that has already started to dry. To avoid this, you need to “keep a wet edge.” This simply means that each new stroke of your roller should overlap the previous one while the paint is still wet. Working in small sections makes this much easier. If you need to take a break, try to finish an entire panel or stop at a natural break, like a corner, to make the transition less noticeable.
Remove Painter's Tape While the Paint is Still Wet
This might be the most satisfying step of the entire project, but timing is everything. To get those perfectly crisp, clean lines you see in magazines, you need to remove your painter's tape while the paint is still wet. If you wait until the paint is fully dry, it creates a film over both the wall and the tape. When you pull the tape off, you risk tearing the paint and ruining your hard work. As the pros at Benjamin Moore point out, this simple trick is the key to achieving a clean edge. Pull the tape slowly and at a 45-degree angle away from the wall. This helps shear the paint film cleanly, leaving behind a flawless line that makes your newly painted wood panels look truly professional.
How Many Coats of Paint Do Your Wood Panels Need?
The number of coats you’ll need depends on the paint color you’ve chosen and the original color of your panels. While it’s tempting to get it done in one go, planning for two coats is usually the best strategy for a flawless, professional-looking finish. A second coat ensures deep, even color and helps the paint job last longer. For projects starting with new, unfinished wood wall panels, two coats over a quality primer will give you that perfect, durable surface you’re looking for.
Getting the First Coat of Paint Right
With your primer fully dry, it’s time for the first coat of paint. The best technique is to work in small, manageable sections to maintain a wet edge and avoid lap marks. Start by using a high-quality angled brush to "cut in" around the edges and paint any grooves or intricate details on the paneling. Immediately after, use a roller to apply a thin, even layer of paint to the flat surfaces of that section. This brush-and-roll method ensures complete coverage and a smooth, consistent finish across the entire wall.
How Long to Wait Before the Second Coat?
Patience is your best friend when waiting for paint to dry. Applying a second coat too soon can pull up the first layer, creating a tacky, uneven mess. Check the paint can for the manufacturer’s recommended recoat time—it’s usually listed right on the label. This can vary from a few hours to a full day depending on the type of paint and the humidity in the room. The surface should be completely dry to the touch, not cool or sticky. Giving the paint adequate time to dry is a simple step that makes a huge difference in the final quality of your project.
How to Check for Full, Even Coverage
After the first coat is dry, step back and examine the wall from different angles and in different lighting. If you’re painting a light color over a white primer, you might find that one coat is enough for a solid, even look. However, if you're making a dramatic color change—like going from dark to light or using a bold, saturated hue—you will almost certainly need a second coat. Look for any thin, patchy, or semi-transparent spots where the primer is peeking through. A second coat will fix these inconsistencies and give your color its true depth and richness.
Drying vs. Curing: What's the Difference?
It’s important to know the difference between paint that is dry and paint that is cured. Paint is typically dry to the touch within a few hours, meaning the liquid has evaporated. Curing, however, is the process of the paint hardening into a durable, scratch-resistant finish, which can take anywhere from several days to a few weeks. To be safe, wait at least 24 to 48 hours before gently placing furniture or decor back against your newly painted walls. This prevents scuffs and ensures your beautiful finish cures properly and lasts for years.
How to Choose the Perfect Paint Color
Choosing a paint color can feel like the most exciting—and overwhelming—part of the project. The right shade can completely transform your space, making it feel cozy, modern, or anything in between. It’s not just about picking a color you like; it’s about finding one that works with your wood panels, your lighting, and your overall vision. Let’s walk through how to narrow down the options and find the perfect hue for your home.
Start with Your Room's Overall Vibe
First, think about the mood you want to create. Are you aiming for a warm, rustic vibe or a clean, modern look? The style of your room will guide your color choices. For example, pairing dark wood with lighter, muted shades of red or orange can create a unique, rustic aesthetic. If you're working with our Paint and Stain Grade Panels, you have a blank canvas to bring any vision to life. For a fresh, contemporary feel, consider crisp whites or cool grays that make the wood’s texture pop. Think about your furniture and decor, and choose a color that ties everything together seamlessly.
Never Skip This Step: Test Your Colors
I can't stress this enough: never skip this step! A paint chip can look completely different on your wall. Lighting, existing colors, and even the time of day can change a color’s appearance. Buy a few sample pots of your top choices and paint large swatches directly on the wall or on a piece of poster board you can move around the room. This is also the best way to see how a color interacts with your wood panels. You generally want to avoid colors that are too similar to the wood, as this can make the room feel flat and monotonous. Live with the samples for a few days before making your final decision.
Complementary or Contrasting? How to Decide
Now, let's talk strategy. Do you want a color that complements the wood or one that contrasts with it? Complementary colors create a harmonious, cohesive feel. For instance, a light blue-green can beautifully complement the warm tones in many woods, creating a calm and inviting space. Contrasting colors, on the other hand, create a more dynamic and modern look. A crisp white against a dark wood panel is a classic example of a high-contrast pairing that feels fresh and bold. The right lighting fixtures will also play a huge role in how these shades appear, so consider your light sources when making your choice.
Managing Expectations for Your Project
Alright, let's talk about the reality of a project like this. Painting wood paneling is one of the most transformative DIYs you can do, but it’s not a quick weekend job if you want to do it right. Understanding the process, from the time commitment to the unique quirks of wood, will help you stay motivated and ensure you’re thrilled with the final result. Think of this as your friendly heads-up on what to expect, so you can plan accordingly and avoid any frustrating surprises along the way. A little bit of mental prep goes a long way in making this a smooth and rewarding experience.
Be Realistic: Painting Paneling Takes Time
One of the biggest misconceptions is that painting paneling is just like painting a flat wall. In reality, it takes significantly more time, and it's almost entirely because of the grooves. All that detailed brushwork adds up. You have to carefully paint each channel before you can roll the flat surfaces, which makes the process more methodical. You should also plan for multiple coats. Even if you’re using a high-quality primer and paint, it’s very common to need at least two topcoats to achieve a smooth, even color, especially with lighter shades like white. As one expert explains, it's a project that rewards patience, so give yourself plenty of time to get it done without rushing.
Why Some Panels Soak Up More Paint Than Others
If you feel like your walls are drinking up paint, you’re not imagining things. The material of your paneling plays a huge role in how much paint it will absorb. Older paneling, which is often made from materials like MDF with a very thin wood veneer, is notoriously thirsty. These porous surfaces can soak up a lot of primer and paint, sometimes requiring anywhere from two to five coats to get full coverage. This is another reason why a high-quality, stain-blocking primer is so essential—it helps seal the surface so your topcoat can sit on top rather than sinking in. Don't get discouraged if your first coat looks patchy; it's a normal part of the process when dealing with absorbent materials.
Understanding Wood Movement and Future Touch-Ups
If you're working with real wood panels, it’s important to remember that wood is a natural material that breathes. It will expand and shrink slightly with seasonal changes in temperature and humidity. This is completely normal. Over time, this movement might cause tiny, hairline cracks or gaps to appear in the paint, usually along the seams of the panels where the old wood color might peek through. This isn't a sign that you did something wrong! It’s just the nature of wood. Plan on doing minor touch-ups every year or two to keep your walls looking perfect. It’s a small bit of maintenance that keeps your beautiful finish looking fresh for the long haul.
Common Painting Mistakes to Avoid
Even the most careful DIYer can make a mistake, but knowing the common pitfalls is the best way to sidestep them. When it comes to painting wood paneling, a few key errors can turn a dream project into a frustrating mess. The good news is they are all completely avoidable. Let’s walk through the most frequent slip-ups so you can get a flawless, professional-looking finish on your first try.
Mistake #1: Skipping the Prep Work
The temptation to jump right into painting is real, but please, resist the urge. As painting experts often say, "Proper preparation... is more important than the painting itself for a professional result." Skipping this step is the number one reason for a poor finish. Dust, grime, and oils on the surface of your Unfinished Wood Wall Panels will prevent the primer and paint from adhering properly, leading to peeling and chipping down the road. Taking the time to clean, sand, and prime creates the ideal canvas for your paint and ensures the beautiful finish you’re picturing will last for years.
Mistake #2: Using the Wrong Products
Not all primers are created equal, and this is especially true for wood paneling. Wood, particularly older or darker varieties, contains natural oils called tannins that can bleed through latex paint, leaving yellowish or brownish stains. To prevent this, you need a high-quality, stain-blocking primer. Many people find they get great results with a water-based, stain-blocking primer and don't need to deal with a smelly oil-based one. Applying one or two solid coats of the right primer is your best defense against bleed-through and is essential for achieving a rich, even paint color.
Mistake #3: Rushing Between Coats
Patience is a virtue in painting. After you’ve applied your first coat of paint, it’s crucial to let it dry completely before adding the next one. Rushing this step can cause the roller to pull up the still-tacky first layer, resulting in streaks, an uneven texture, and a weak finish. Check the paint can for the manufacturer's recommended recoat time—it’s usually a window of a few hours. Giving each coat the proper time to dry ensures better coverage and a much more uniform, durable result. It might feel slow, but it’s a non-negotiable step for a professional look.
Mistake #4: Forgetting Proper Ventilation
Whether you’re using primer or paint, proper ventilation is a must for your safety and comfort. Some products, especially oil-based primers, can have a very strong smell and release fumes that aren't great to breathe in. Before you start, open up windows and doors to get fresh air circulating through the room. Using a box fan in a window can also help pull the fumes out of your workspace. If you’re particularly sensitive to smells or working in a small, enclosed area, wearing a respirator mask is always a smart idea.
Quick Fixes for Common Paint Problems
Even when you follow every step perfectly, paint can sometimes have a mind of its own. Don't panic if you see a stubborn stain peeking through or a few brush marks. These common issues are usually simple to fix, and knowing how to handle them is part of becoming a confident DIYer. Most paint problems stem from rushing the prep work or applying coats too quickly, but even pros run into surprises. Let's walk through how to tackle a few of the most frequent paint problems so you can get that flawless finish you're after on your wood wall panels.
How to Stop Stain Bleed-Through
Have you ever finished painting only to see a yellowish or dark spot from the old wood stain slowly reappear? That’s called bleed-through, and it’s a classic issue when painting over wood, especially pieces with knots or a dark original finish. The secret weapon here is a high-quality, stain-blocking primer. An oil-based primer is especially tough on stubborn stains. Before you even think about your color, apply a coat of primer and let it dry completely. This creates a seal that stops the old stain in its tracks. Once it's dry, you can proceed with two coats of your chosen paint for a beautiful, even finish.
Smoothing Out Brush Marks and Bumps
Visible brush marks or an uneven, textured finish can take away from an otherwise great paint job. This usually happens when the paint is applied unevenly or starts to dry too quickly while you're still working. To avoid this, always "cut in" the edges and corners with a paintbrush first, then immediately follow up with a roller on the larger, flat surfaces. As you roll, gently go over the brushed edges to blend the two areas together for a seamless look. This technique, combined with maintaining a wet edge, is key to achieving that professional, super-smooth appearance. If marks have already dried, you’ll need to lightly sand the area until it's smooth before applying another thin coat.
What to Do About Peeling or Bubbling Paint
Seeing your fresh paint bubble or peel is frustrating, but your first instinct might make it worse. Whatever you do, don't try to fix it while the paint is wet—you’ll just create a bigger mess. Patience is your best friend here. Let the area dry completely, which might take a day or two. Once it's fully cured, use a scraper or sandpaper to gently remove the peeling paint and smooth out the edges of the problem spot. Wipe away the dust, then apply a thin coat of primer to the bare area before touching it up with your topcoat. Feather the new paint into the surrounding area for a flawless repair.
Maintaining Your Newly Painted Wood Panels
After all the effort you put into painting your wood wall panels, you’ll want to keep them looking fresh and clean. The good news is that maintenance is pretty straightforward. With a few simple cleaning habits and quick touch-up tricks, you can easily handle everyday dust, scuffs, and grime that come with a busy home or commercial space. A little proactive care will preserve that beautiful finish for years, ensuring your walls remain a stunning feature. It’s all about using the right methods to protect the paint while keeping the surface spotless, so your project continues to look as good as the day you finished it.
How to Clean Painted Panels Without Damage
For routine cleaning, always opt for gentle methods to protect the paint. A great DIY solution is a simple mix of one part white vinegar to one part warm water. This natural cleaner is effective enough to cut through grime without being harsh on the finish. For regular dusting, a soft microfiber cloth is your best friend. Unlike feather dusters that just move dust around, microfiber cloths trap particles, preventing them from settling back on the surface or causing tiny scratches. A quick wipe-down every week or so will go a long way in keeping your panels looking pristine.
Quickly Touch Up Scuffs and Scratches
Life happens, and so do scuffs and scratches. For minor marks where the paint is still intact, you can often buff them out with a damp sponge and a mild cleaner. Just apply a small amount of cleaner, let it sit for a moment, and gently wipe it away. If you have a deeper scratch or a chip that exposes the wood underneath, a quick touch-up is the best fix. Use a small artist's brush to carefully apply a bit of your matching paint directly to the spot. This targeted approach helps the repair blend in seamlessly, making the damage virtually disappear.
Simple Tips for a Long-Lasting Finish
Every so often, your painted panels might need a deeper clean to restore their original vibrancy. For a more powerful solution that’s still safe for painted surfaces, you can mix your own wall cleaning formula. A good recipe is one gallon of warm water combined with one cup each of clear non-sudsing ammonia, distilled white vinegar, and borax. Use a soft cloth or sponge to apply the solution, gently wiping down the panels. This periodic deep clean removes stubborn buildup that regular dusting might miss, helping to maintain the color and integrity of your paint job for the long haul.