


Engineered Hardwood Flooring: The Ultimate Guide
Laying a new floor can feel like a huge undertaking, one reserved only for the pros. But it doesn't have to be. With the right prep and a clear plan, installing your own engineered hardwood flooring is an incredibly rewarding project you can absolutely tackle yourself. This guide is your trusted partner for every step. We’ll walk you through everything from preparing your wood subfloor to laying each plank perfectly. Let’s build your confidence and get you the beautiful, professional-looking floor you deserve.
Key Takeaways
- Prep Your Subfloor Meticulously: The success of your project hinges on the foundation. A perfectly clean, flat, and dry subfloor is the single most important factor in preventing squeaks, gaps, and other issues down the road.
- Give Your Floor Room to Breathe: Wood naturally expands and contracts with changes in humidity. To prevent your floor from buckling, you must leave a 1/4 to 1/2-inch expansion gap between the flooring and all walls and fixed objects—this is a step you can't afford to skip.
- Let Your Flooring Acclimate First: Rushing the installation is a common mistake. Allow your engineered hardwood planks to adjust to your home's environment by letting them sit in the room for at least three days before you start laying them down. This simple step prevents future warping.
What Is Engineered Hardwood Flooring?
If you love the timeless look of wood floors but need something more versatile, engineered hardwood is your answer. Think of it as a hybrid flooring that combines the best of both worlds. It’s made of a thin top layer of real, solid hardwood—like oak, maple, or hickory—bonded to a high-quality plywood or fiberboard core. This layered construction is what makes it so special.
Unlike solid hardwood, which is one piece of wood from top to bottom, engineered planks are designed for superior stability. The core layers are stacked in opposite directions, which prevents the floor from expanding, contracting, or warping when exposed to changes in temperature and humidity. This means you get the authentic beauty and texture of genuine wood on the surface, with a durable, resilient structure underneath. It’s a smart design that makes beautiful hardwood flooring accessible for almost any room in your home.
Construction: The Core and Veneer Layer
The magic of engineered hardwood lies in its smart construction. Each plank is built with a top layer of real hardwood veneer bonded to a stable core of plywood or high-density fiberboard. This layered design is what gives the flooring its strength and resilience. According to building material experts, this structure makes it highly "resistant to moisture and temperature changes," which is a major advantage over solid wood. The core layers are arranged in a cross-grain pattern, which counteracts the natural tendency of wood to swell or shrink. This means you get the authentic look and feel of solid wood without worrying about it warping in areas like basements or kitchens where moisture levels can fluctuate.
Understanding Veneer Thickness
The veneer is the top layer of real wood you see and walk on, and its thickness is a key indicator of your floor's quality and longevity. Veneer thickness can range from less than 1mm to over 4mm. A thicker veneer allows the floor to be sanded and refinished multiple times, just like solid hardwood. As flooring specialists at Bruce Hardwood Flooring note, the number of times you can refinish depends on the thickness of this top layer. While a thinner veneer might be more budget-friendly, investing in a thicker one means you can refresh your floors down the line, extending their life for decades.
Total Plank Thickness and Stability
Beyond the veneer, the total thickness of the plank contributes to its stability and feel underfoot. The multi-layered core is specifically designed to keep the plank flat and prevent warping, even as humidity and temperatures shift. This structural integrity is what makes engineered hardwood so reliable. It offers the classic appearance of real hardwood but with practical benefits that make it suitable for a wider range of environments. This stability also simplifies the installation process, making it a great choice for DIY projects and professional installations alike.
Appearance: Species, Textures, and Plank Sizes
One of the best parts about choosing engineered hardwood is the incredible variety of styles available. Because the top layer is real wood, you have access to a wide range of species, each with its own unique grain pattern and color. You can also select from different surface textures and plank widths to create a look that is perfectly tailored to your space. This flexibility allows you to achieve a custom aesthetic, whether you're aiming for a rustic farmhouse vibe or a sleek, modern design. Let's look at how these elements come together.
Popular Wood Species
The species of wood used for the veneer layer defines the floor's character. You can find engineered hardwood in many popular options, including the classic, pronounced grain of oak, the smooth and subtle look of maple, or the rich, rustic feel of hickory. Each species brings a different personality to the room. At USA Builders Depot, our collection of hardwood flooring includes a variety of species, ensuring you can find the perfect match for your home’s style. The choice of wood will influence everything from the color palette to the overall atmosphere of your space.
Common Surface Textures
Surface texture adds another layer of depth and personality to your floors. A smooth finish offers a clean, traditional look that is timeless and elegant. For something more rustic, a hand-scraped or wire-brushed texture creates a distressed, lived-in appearance that can beautifully hide minor scratches and dents from daily life. These textures not only contribute to the visual appeal but also affect how the floor feels underfoot, adding a tactile dimension to your home’s design. The right texture can make your floor a true focal point.
Plank Width and Design Impact
The width of the flooring planks can dramatically influence the perception of a room. Wider planks, typically 5 inches or more, are increasingly popular because they create a more open, expansive feel with fewer seams. This look works well in modern and rustic interiors. Narrower planks, usually under 3 inches, provide a more traditional, classic look that can make a small room feel a bit busier. The choice often comes down to personal preference and the scale of your space, but it’s an important design decision that shapes the final outcome of your project.
Engineered vs. Solid Hardwood: What's the Difference?
The main difference comes down to construction. A solid hardwood plank is milled from a single piece of lumber. An engineered hardwood plank, on the other hand, is built in layers. While the top layer is genuine hardwood, the core is made of multiple layers of plywood or high-density fiberboard.
This layered structure makes engineered wood more dimensionally stable. It’s less likely to react to moisture and temperature fluctuations, which is why it can be installed in areas where solid hardwood is not recommended, like basements. You still get that classic wood look because what you see and walk on is real wood.
Why Engineered Hardwood Works So Well on Wood Subfloors
Engineered hardwood is an excellent match for wood subfloors because of its versatility and stability. Its construction makes it less susceptible to the subtle shifts and moisture changes that can occur in a wood subfloor system. This resilience allows for more flexible installation methods—you can float, glue, or nail it down, depending on your specific needs and subfloor condition.
Because it handles moisture better than solid hardwood, you can confidently install it on any level of your home, from the basement to the top floor. This makes it a reliable and beautiful solution for creating a seamless wood floor look throughout your entire house, without worrying about potential moisture issues causing your planks to warp or buckle.
Benefits and Considerations of Engineered Hardwood
Choosing the right flooring is a big decision, and engineered hardwood comes with a unique set of advantages and things to keep in mind. It’s not just about looks; it’s about finding a floor that fits your lifestyle, budget, and home environment. Let's break down what makes engineered hardwood a popular choice and what you should consider before you commit. From its impressive durability and installation flexibility to its cost and environmental impact, understanding these factors will help you decide if it’s the perfect foundation for your space. This way, you can invest with confidence, knowing you’ve picked a floor that will serve you well for years to come.
Durability, Lifespan, and Warranties
When you invest in a new floor, you want it to last. Engineered hardwood is designed to stand up to the demands of daily life, but its longevity depends on its construction and how you care for it. The thickness of the top wood layer, the quality of the core, and the protective finish all play a role in how well it wears over time. It’s also important to understand the warranty that comes with your flooring, as it gives you a clear idea of the manufacturer's confidence in their product and what is covered, from structural integrity to finish wear.
How Long Does It Last?
With proper care and maintenance, you can expect your engineered hardwood floors to last a solid 20 to 30 years. The key to reaching that lifespan is consistent upkeep—regular cleaning with the right products, protecting the surface from scratches with furniture pads, and managing spills quickly. The quality of the flooring you choose also matters. A well-constructed plank with a durable finish will naturally hold up better over the decades. Think of it as a long-term relationship; the more care you put in, the longer its beauty will last in your home.
Understanding Refinishing Limitations
One of the great things about wood floors is the ability to refinish them, and engineered hardwood is no exception—with a catch. Unlike solid hardwood, which can be sanded down multiple times, engineered flooring can only be refinished a few times, if at all. It all depends on the thickness of the top veneer layer. A thicker veneer (3mm or more) might allow for one or two refinishing sessions, while a thinner one won't. This is a critical factor to consider, as refinishing is the best way to erase deep scratches and restore the floor's original luster after years of wear.
Water Resistance and Protective Finishes
Thanks to its layered construction, engineered hardwood is more resistant to moisture and temperature changes than solid wood. The plywood core provides stability, preventing the planks from warping or cupping in moderately humid environments like kitchens or basements. Most engineered floors also come with a tough, factory-applied finish that protects the wood from spills and everyday wear. While it's not waterproof, this structure makes it a more forgiving and practical option for areas where solid hardwood might be too risky, giving you more freedom to bring the warmth of wood into more rooms.
Installation Versatility
One of the biggest draws of engineered hardwood is its incredible versatility when it comes to installation. Its stable core allows it to be installed in ways and places that are off-limits for solid hardwood. This flexibility not only simplifies the installation process but also opens up new design possibilities for your home. Whether you're renovating a basement, building a new condo, or simply want a consistent look across different levels of your house, engineered hardwood provides a reliable and beautiful solution that adapts to your specific needs and subfloor conditions.
Ideal for Any Level of Your Home
Because engineered hardwood handles humidity so well, you can install it on any level of your home with confidence. It’s a perfect fit for below-grade installations in basements, where moisture can be a concern. It also performs beautifully on ground-level concrete slabs and upper-story plywood subfloors. This adaptability means you can create a seamless flow of beautiful wood flooring from your basement family room all the way up to your second-floor bedrooms, achieving a cohesive aesthetic throughout your entire living space without worrying about environmental limitations.
Compatibility with Radiant Heating Systems
If you dream of the comfort of heated floors, engineered hardwood is an excellent choice. Its dimensional stability allows it to withstand the temperature fluctuations of radiant heating systems without warping or gapping, a common issue with solid hardwood. The planks effectively transfer heat, creating a warm and inviting surface to walk on during colder months. This compatibility makes it a modern and luxurious flooring option that combines the timeless appeal of wood with the cozy, efficient warmth of in-floor heating, adding both comfort and value to your home.
Cost of Materials
Budget is always a key factor in any home improvement project, and flooring is no different. Engineered hardwood typically sits in a sweet spot between laminate and solid hardwood, offering a high-end look without the premium price tag of solid planks. The cost can vary significantly based on several factors, including the species of the wood veneer, the thickness of that top layer, the plank width, and the type of finish. Understanding these variables will help you find a beautiful floor that aligns with your budget and project goals.
Typical Price Range
Generally, you can expect the price for engineered hardwood flooring to range from about $4 to $10 per square foot. Options on the lower end might feature a thinner veneer and more common wood species like oak, while premium choices on the higher end will offer thicker veneers, exotic wood species, and specialty finishes. When planning your budget, be sure to also account for underlayment, adhesive or nails, and any tools you might need. Exploring different hardwood flooring collections can give you a clear idea of how these features impact the overall cost.
Environmental and Health Factors
The materials you bring into your home affect not only its appearance but also its environmental footprint and indoor air quality. Many homeowners are now looking for flooring options that are both beautiful and responsibly made. Engineered hardwood can be a great choice in this regard, as its construction often makes it a more sustainable option than solid hardwood. Furthermore, reputable manufacturers are committed to producing floors that are safe for your family, ensuring they meet strict standards for chemical emissions.
Sustainable Sourcing and Indoor Air Quality
Engineered hardwood can be an eco-friendly choice because it uses less slow-growth hardwood per plank compared to solid flooring. The core is typically made from faster-growing, more sustainable wood species. Many manufacturers also prioritize responsible forestry and sustainable sourcing for their materials. For your family's health, look for products that are certified for low volatile organic compounds (VOCs). These certifications ensure the flooring meets strict indoor air quality standards, meaning it won't release harmful chemicals into your home, letting everyone breathe a little easier.
Everything You Need for Your Flooring Project
Before you lay the first plank, let's get organized. A little prep work now saves a lot of headaches later. Think of this as your project's command center—having every tool and material ready to go means you can focus on the installation without any frantic trips to the hardware store. A smooth project starts with a well-stocked workspace, so let's run through exactly what you'll need to have on hand. This preparation ensures your new engineered wood floors will be stable, beautiful, and built to last for years to come.
Your Must-Have Tool Checklist
Having the right tools makes all the difference between a frustrating job and a satisfying one. You don’t need a professional workshop, but a few key items are non-negotiable for getting clean cuts and a tight fit.
Here’s what I recommend having within arm’s reach:
- Measuring Tape & Pencil: For accurate measurements and marking your cuts.
- Saw: A miter saw gives you the cleanest, most precise cuts, but a circular saw or jigsaw will also work.
- Spacers: These small but mighty tools ensure you leave a proper expansion gap along the walls.
- Tapping Block & Pull Bar: These protect the tongue and groove of the planks as you gently tap them into place.
- Safety Gear: Please don’t skip this! Safety glasses protect your eyes from sawdust, and knee pads will save your joints.
Your Flooring Project Supply List
With your tools gathered, it’s time to check your materials list. Running out of something mid-project is a momentum killer, so do a quick inventory before you start.
You’ll need:
- Engineered Hardwood Flooring: This is the star of the show. Make sure you order about 10% to 15% more hardwood flooring than your room's actual square footage. This extra material covers any cutting mistakes and gives you spare planks for future repairs.
- Underlayment: A critical layer for moisture protection and sound control.
- Moisture Meter: An essential gadget for testing both your subfloor and the new planks before you begin.
- Chalk Line: This helps you snap a perfectly straight guideline for your first row of planks.
- Level: Use a long level (four feet or more) to check for any high or low spots in your subfloor.
How to Choose the Right Underlayment
Think of underlayment as the unsung hero of your new floor. It’s a thin layer of material that sits between the wood subfloor and your beautiful engineered hardwood. While you won't see it, you'll definitely feel its benefits. A good underlayment provides a crucial moisture barrier, protecting your wood from any dampness coming from below. It also helps muffle sound, adds a bit of cushioning underfoot for extra comfort, and can even smooth out minor imperfections in the subfloor. Some engineered hardwood planks even come with underlayment already attached, which can be a fantastic time-saver.
How to Prep Your Wood Subfloor
Think of subfloor preparation as the most important step in your flooring project. A little extra effort here ensures your beautiful new engineered hardwood flooring looks professional and lasts for years. A clean, flat, and dry subfloor prevents common issues like squeaks, gaps, and buckling down the road. Taking the time to get this foundation right is a non-negotiable for a successful installation.
How to Ensure Your Subfloor is Level and Stable
First, make sure your wood subfloor is flat and solid. Walk across the entire area, listening for squeaks and feeling for any bouncy spots. If you find any, screw down the loose plywood or OSB panels to the floor joists below to secure them. Next, check for flatness. Grab a long straightedge or a level and lay it across the floor. You’re looking for any dips or bumps greater than 1/8 of an inch over a 10-foot span. You can sand down any high spots and fill low spots with a floor leveling compound to create a perfectly flat surface.
Getting Your Subfloor Clean and Damage-Free
Your subfloor needs to be completely clean before you begin. If you’ve just removed old carpet or other flooring, take the time to pull up any remaining staples, scrape off old adhesive, and sweep or vacuum up all dust and debris. A clean surface ensures your underlayment and flooring lay flat and that no dirt gets trapped underneath, which can cause uneven spots or strange odors later on. This is also the perfect time to inspect for any water damage, rot, or other issues with the subfloor itself. Replace any compromised panels to ensure your foundation is strong and stable.
Testing for Moisture and Acclimating Your Flooring
Even though engineered hardwood is more resistant to moisture than solid wood, it’s not waterproof. Too much moisture in the subfloor can still cause your new floors to warp or swell. Use a moisture meter to test the wood subfloor and ensure it’s within the acceptable range specified by the flooring manufacturer. If the reading is high, you’ll need to find and fix the source of the moisture before proceeding. Once your subfloor is ready, it’s time to acclimate your new flooring. Bring the unopened boxes into the room, open them up, and let the planks sit for at least three days so they can adjust to the room’s temperature and humidity.
Which Installation Method Is Right for You?
Engineered hardwood gives you options when it comes to installation. The right choice depends on your comfort level with DIY projects, the specific area you’re covering, and how much foot traffic the room gets. Below are the three most common methods for installing engineered hardwood over a wood subfloor. Each one has its own set of benefits, so you can pick the approach that works best for you.
Floating Floor: A DIY-Friendly Option
If you’re looking for a straightforward, DIY-friendly option, the floating method is your best bet. With this technique, the planks lock together at the edges and “float” as a single unit over the underlayment and subfloor—no glue or nails required. It’s like putting together a puzzle. To get started, you’ll place small spacers along the walls to leave a slight gap for natural expansion. Then, you simply begin in a corner and click the planks into place, working your way across the room. This method makes installing your new hardwood flooring fast and relatively simple.
Glue-Down: For a Rock-Solid Feel
For a floor that feels incredibly solid and permanent, consider the glue-down method. Here, you’ll spread a specialized adhesive directly onto the subfloor with a trowel before laying each plank. This creates a strong, stable bond that’s perfect for high-traffic areas like hallways and kitchens. Because the planks are fully secured, there’s less sound and a more substantial feel underfoot. You’ll still need to use spacers for an expansion gap, but you’ll work in smaller, more manageable sections, applying enough glue for just a few rows at a time to keep it from drying out.
Nail-Down or Staple-Down: The Traditional Approach
The nail-down or staple-down method is a traditional technique that provides a secure, long-lasting installation. As the name suggests, this involves using a pneumatic floor nailer or stapler to fasten the planks directly to the wood subfloor. It’s a fantastic choice for creating a durable floor that will stand the test of time, especially in large, open spaces. You’ll start the first row by pre-drilling holes and nailing the planks down near the wall. After that, the floor nailer does most of the work. Because it requires specialized tools, this method is often preferred by professionals, and many trade experts rely on it for its reliability.
Planning Your Layout for a Professional Look
A little planning goes a long way. Before you lay the first plank, mapping out your installation will save you headaches and ensure your new floor looks fantastic. This involves getting your measurements right, choosing a plank direction, and planning for the wood's natural movement. Let's walk through how to create a solid game plan for a flawless finish.
How to Measure Your Room and Order Enough Flooring
First, you need to know how much flooring to buy. Grab a tape measure and find the length and width of your room, then multiply them to get the total square footage. It's essential to account for cuts and mistakes by ordering extra. For a standard, straight installation, add 5% to 7% to your total. If you're planning a more intricate pattern like herringbone, you'll need more, so plan on adding about 15% for waste. Having extra on hand is always better than running out mid-project. Once you have your number, you can confidently select the perfect hardwood flooring for your space.
Choosing Your Plank Direction and Starting Point
The direction you lay your planks impacts the room's feel. A good rule of thumb is to run them parallel to the longest wall, which tends to make the space feel larger. Another popular approach is to lay them in the same direction as the main light source, like a large window. Once you've picked a direction, your starting point should be along that longest wall. This gives you a straight, continuous line to build from. When you place that first row, be sure to use 1/2-inch spacers between the planks and the wall to maintain a consistent gap.
Planning for Expansion Gaps and Room Transitions
Wood is a natural material that expands and contracts with changes in temperature and humidity. That's why leaving an "expansion gap" around the perimeter of the room is non-negotiable. This space allows the wood to move without buckling or causing damage. A 1/2-inch gap between the flooring and all walls and vertical obstacles is standard. Don't worry, this gap will be covered by baseboards for a clean finish. Also, think about where your new floor will meet other flooring types. Planning for smooth transitions will give your project a professional, cohesive look.
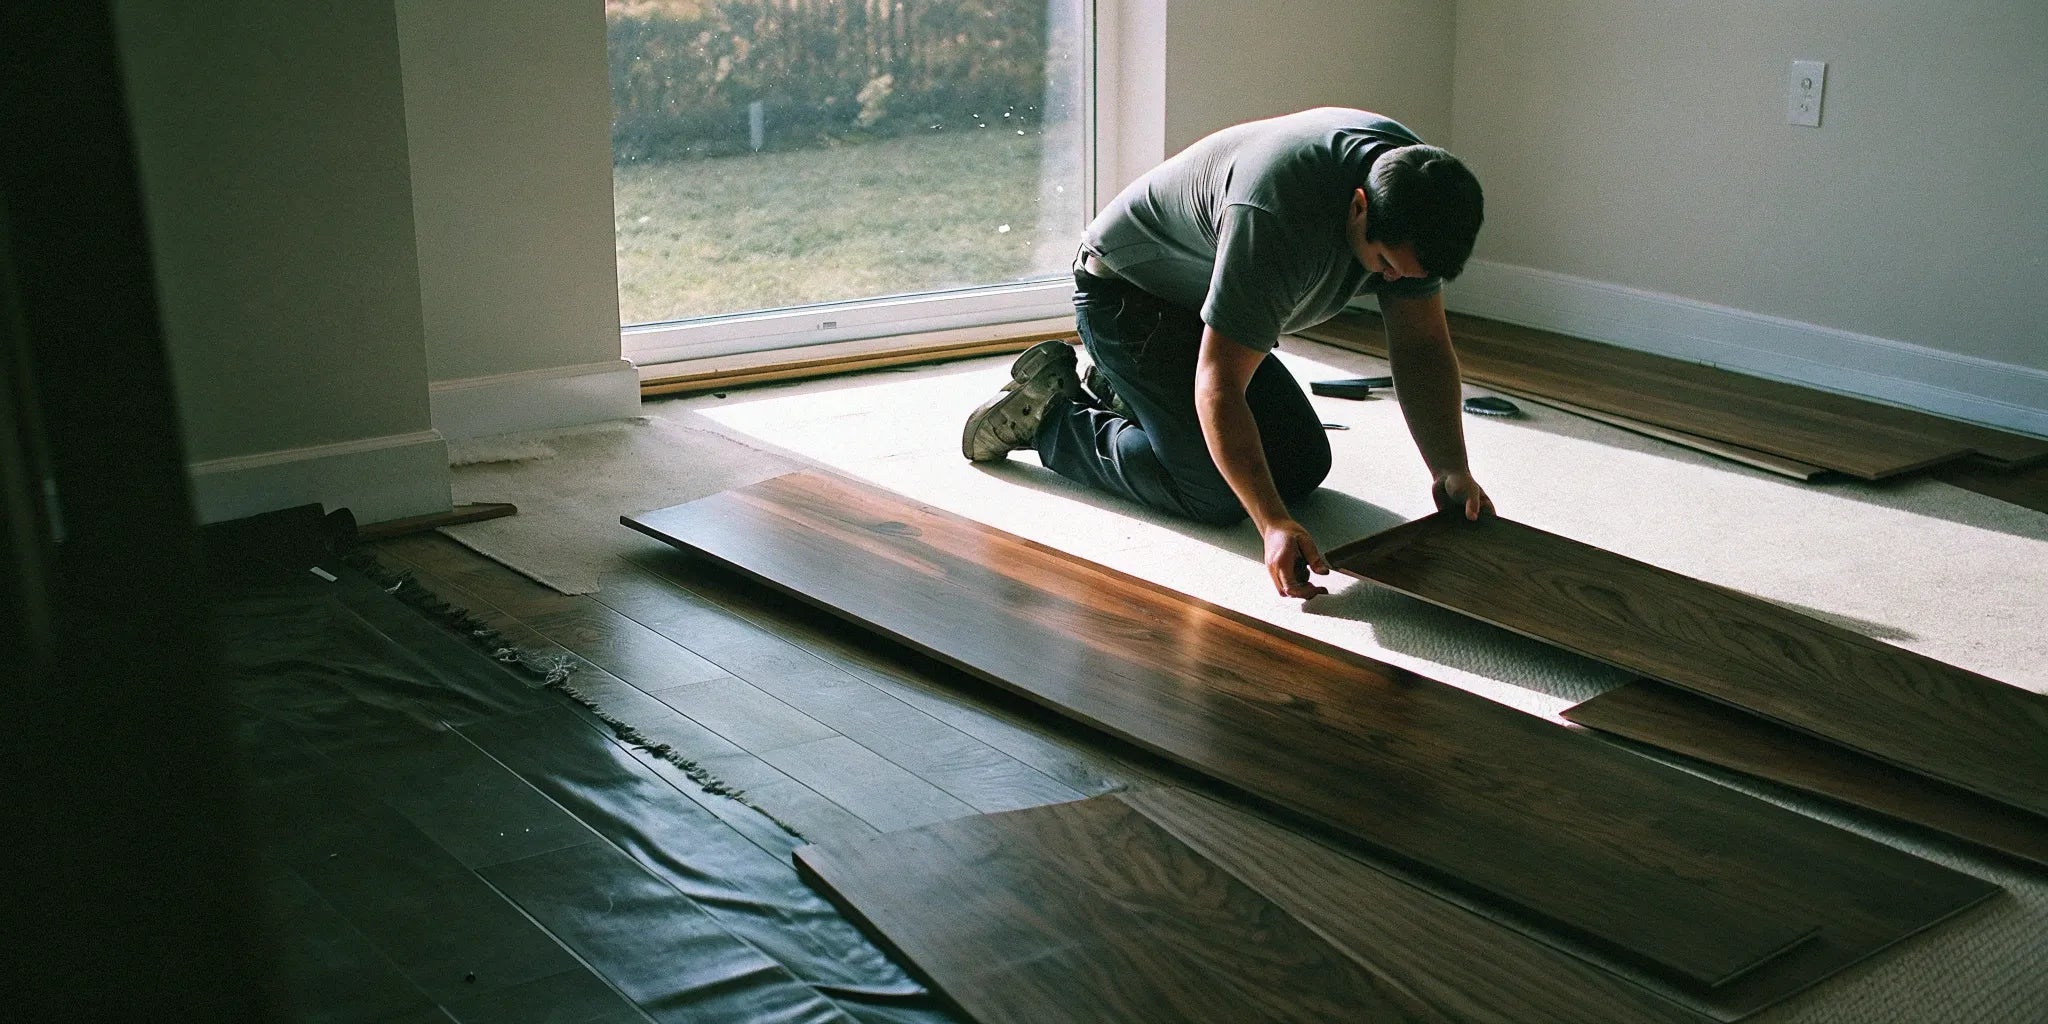
How to Install Engineered Hardwood Flooring: Step by Step
With your subfloor prepped and your layout planned, you’re ready for the most rewarding part: laying the floor. This is where your vision starts to become a reality, and taking a methodical approach will ensure a beautiful, professional-looking result that lasts for years. Whether you’ve chosen a floating, glue-down, or nail-down method, the fundamental process of laying the planks is similar. We'll focus on the popular floating floor installation, as it's the most common DIY-friendly method for engineered hardwood.
Before you begin, do a final check of your materials. Open a few boxes of your engineered hardwood flooring and mix the planks to ensure a natural variation in color and grain throughout the room. This simple step prevents clusters of similar-looking boards and creates a more authentic wood appearance. Also, make sure all your tools are within reach. Having your tape measure, tapping block, mallet, and saw ready will create a smoother workflow. Remember that patience is key. Rushing through the installation can lead to mistakes that are difficult to fix later. Follow these steps carefully to build your new floor, one perfect plank at a time.
Step 1: Roll Out the Underlayment
Before you lay a single plank, it’s time for the underlayment. This thin layer of foam or felt is a non-negotiable step. It acts as a moisture barrier, provides thermal insulation, and even dampens sound, making your room quieter and more comfortable. It also helps smooth out minor imperfections in the subfloor, giving your new flooring a stable base. Start at one end of the room and roll it out, cutting it to length with a utility knife. Lay subsequent rows next to the first, making sure the edges meet but don’t overlap. Follow the manufacturer’s instructions for taping the seams to create a continuous, protective layer across the entire subfloor.
Step 2: Laying the All-Important First Row
Your first row is the foundation for the entire floor, so getting it straight is critical. Start in a corner, typically along the longest exterior wall. Place spacers between the planks and the wall to maintain the expansion gap you planned for—usually about 1/4 to 1/2 inch. Lay the first plank with the tongue side facing the wall. Connect the next plank by locking its end joint into the first. Continue this process across the room. To ensure a tight, secure fit, gently tap the planks together using a rubber mallet and a tapping block. This prevents damage to the edges while closing any gaps. Double-check that this first row is perfectly straight before moving on.
Step 3: Building Out from Your First Row
To create a strong and visually appealing floor, you need to stagger the seams. The end joints of the planks in one row should never line up with the joints in the adjacent rows. A good rule of thumb is to ensure at least a 12-inch offset between them. You can often use the piece you cut from the end of the previous row to start the next one, which is a great way to reduce waste. Connect the long edge of the new plank to the previous row at an angle, then lower it into place. Use your tapping block and mallet to gently tap the long side and ensure a snug fit before moving to the next plank.
Step 4: Making Cuts Around Obstacles and Edges
Inevitably, you’ll run into obstacles like vents, pipes, and doorways. This is where a jigsaw becomes your best friend. Measure carefully and mark your plank before making any cuts. For a really clean look around door frames, use a handsaw to undercut the jamb. This allows you to slide the flooring plank directly underneath the frame instead of cutting around it. For complex shapes, creating a cardboard template first can save you from making a costly mistake. And remember, the rule for expansion gaps applies to everything—leave that 1/4-inch space around pipes, cabinets, and any other fixed object to allow the floor to move naturally with changes in humidity.
Common Installation Mistakes (And How to Avoid Them)
Installing a new floor is exciting, but a few common missteps can turn your dream project into a headache. Even the highest quality hardwood flooring can fail if it’s not installed correctly. The difference between a floor that looks amazing for years and one that starts showing problems early often comes down to avoiding a few key mistakes. Think of this as your checklist for what not to do.
Taking the time to get your subfloor ready, accounting for the natural movement of the wood, and checking for moisture are the three most important things you can do to ensure a professional, long-lasting result. Rushing through these steps might save you a little time upfront, but it can lead to costly repairs down the road. Let’s walk through each one so you can feel confident your new floor will stand the test of time.
Mistake #1: Skipping Subfloor Prep
Your new engineered hardwood floor is only as good as the foundation it rests on. Skipping subfloor prep is one of the biggest mistakes you can make. Before you lay a single plank, the subfloor must be perfectly clean, flat, and stable. This means getting on your hands and knees to pull up any old staples or nails, scraping off any old adhesive, and giving it a thorough sweep and vacuum. Any debris left behind can create annoying creaks or uneven spots later on. A properly prepared subfloor is the first step to a flawless finish.
Mistake #2: Forgetting About Expansion Gaps
Wood is a natural material that expands and contracts with changes in temperature and humidity. Engineered hardwood is no exception. Forgetting to leave a small expansion gap—typically about 1/4 inch—around the perimeter of the room is a recipe for trouble. Without this space, the planks have nowhere to go when they expand, which can cause them to buckle or warp. You can easily maintain this gap by using small spacers between the wall and your first row of planks. It’s a simple step that protects your investment and prevents major issues.
Mistake #3: Ignoring Moisture Problems
While engineered wood handles humidity better than solid hardwood, it’s not waterproof. Excess moisture coming from your wood subfloor can still cause serious damage like swelling, cupping, or even mold growth. Before you begin, it’s essential to test the moisture content of both your subfloor and the new flooring planks with a moisture meter. If the readings are too high, you’ll need to address the source of the moisture and consider laying down a vapor barrier before proceeding. This step ensures your beautiful new floor stays that way for years to come.
How to Handle Tricky Spots
Even the most straightforward room has its quirks. You’ll likely run into floor vents, tricky doorways, or spots where your new floor meets another type of flooring. Don’t worry—these are normal challenges in any flooring project. Handling them correctly is what separates a DIY job from a professional-looking installation. With a little patience and the right techniques, you can get clean cuts and smooth transitions that make your new floor look seamless. Taking your time in these areas ensures the final result is something you can be proud of for years to come.
How to Cut Flooring Around Vents and Doorways
Doorways, vents, and pipes are where a good installation becomes a great one. To get a clean, professional fit, you’ll need to make some custom cuts. A jigsaw is your best friend for this task. For a perfect fit around a tricky shape, try making a template out of cardboard first. Trace it onto your plank and then make your cut. Just remember to maintain that crucial expansion gap around all fixed objects, including door jambs and vent openings. This ensures the floor has room to breathe and prevents buckling down the road. Taking your time here really pays off in the final look.
How to Create Seamless Transitions Between Rooms
When your new engineered hardwood meets another type of flooring, like tile or carpet, you need a way to bridge the gap cleanly. That’s where transition strips come in. These pieces are designed to create a seamless and safe connection between different floor heights and materials. You can find various types, like T-molding for same-height floors or reducers for slight height differences. They cover the expansion gap at doorways and entryways, giving your project a polished, finished look. Choosing a transition strip that complements your hardwood flooring is the final touch that ties the whole room together.
Putting on the Finishing Touches
You’re on the home stretch! Your new engineered hardwood floor is in place, but the job isn’t quite done. These final steps are what separate a good DIY job from a great one. Taking the time to install trim, clean up properly, and learn the basics of floor care will ensure your new floor looks fantastic and lasts for years. This is where all your hard work comes together to create a polished, professional-looking space. Let’s walk through these last few details to get your room ready for its debut.
Installing Your Baseboards and Trim
With the flooring laid, it’s time to cover those expansion gaps you carefully left along the walls. Start by removing the spacers. Now, you can install your baseboards or reinstall the old ones if they’re in good shape. A critical tip here is to nail the baseboards directly to the wall, never into the floor. This allows the hardwood flooring to expand and contract naturally without buckling. For an extra-clean look, add quarter-round or shoe molding at the base. Once everything is nailed in place, fill any nail holes with wood putty for a seamless finish.
The Final Clean-Up and Inspection
Before moving furniture back in, give your new floor a thorough cleaning. Sweep or vacuum up all the sawdust and debris, making sure to get into the corners. Once the dust is gone, give the floor a final inspection. Walk the entire room, looking for any planks that might be loose, uneven, or have visible gaps. Now is the best time to fix minor issues. After installation, avoid heavy foot traffic and wait at least 24 hours before placing furniture on the floor. This gives any adhesive time to cure and allows a floating floor to settle properly.
How to Care for Your New Engineered Hardwood Floor
Starting a good care routine from day one is the best way to protect your investment. The most important rule is to clean up spills as soon as they happen to prevent moisture damage. For daily cleaning, a simple sweep or vacuum (using a hard floor attachment) is all you need. When it’s time for a deeper clean, use a slightly damp mop with a cleaning solution specifically formulated for engineered wood floors. Avoid using water and vinegar, soap-based detergents, or steam cleaners, as they can damage the finish. Finally, place felt pads under the legs of all your furniture to prevent scratches.