


The Essential Guide to 3D Wood Wall Panels
Let's be honest: when you hear “wood paneling,” you probably picture a dated basement from decades ago. It’s time to erase that image entirely. Today’s options are a world away—they are sophisticated, architectural, and incredibly versatile. Modern 3D wood wall panels are all about adding clean lines, rich texture, and organic warmth to a space. They can serve as a subtle backdrop or a dramatic focal point, fitting seamlessly into any contemporary design. I'll show you how these panels have been reinvented and how you can use them to create a fresh, stylish look that feels both current and timeless.
Key Takeaways
- Choose Panels for Your Lifestyle, Not Just Your Style: Select materials based on your room’s specific needs, like moisture-resistant WPC for bathrooms or acoustic panels for home theaters, to ensure your choice is both beautiful and practical.
- Proper Prep Guarantees a Professional Finish: Before you install anything, clean your walls thoroughly and let the wood panels acclimate to the room for at least 48 hours. This crucial step prevents warping and ensures a secure, long-lasting fit.
- Use Lighting and Gentle Care to Make Your Wall Stand Out: Enhance the 3D effect by aiming directional lighting at the panels to create shadows and depth. For maintenance, simple dusting is all you need—avoid harsh chemicals to protect the finish.
What Are 3D Wood Wall Panels, Really?
If you're looking for a way to bring character and dimension to a room, 3D wood wall panels are a fantastic alternative to flat paint or traditional wallpaper. These panels are designed to add texture, depth, and a unique architectural element to any interior space. They can turn a plain wall into a stunning feature, whether you're aiming for a rustic, modern, or sophisticated look.
Unlike flat surfaces, 3D panels play with light and shadow, creating a dynamic effect that changes throughout the day. They offer a tactile quality that invites touch and adds warmth to your home or commercial project. From intricate geometric patterns to simple, elegant lines, there’s a style to fit any vision. Let’s break down what makes these panels special, the materials they come in, and what you should know before getting started.
What Gives a Wall Panel Its 3D Effect?
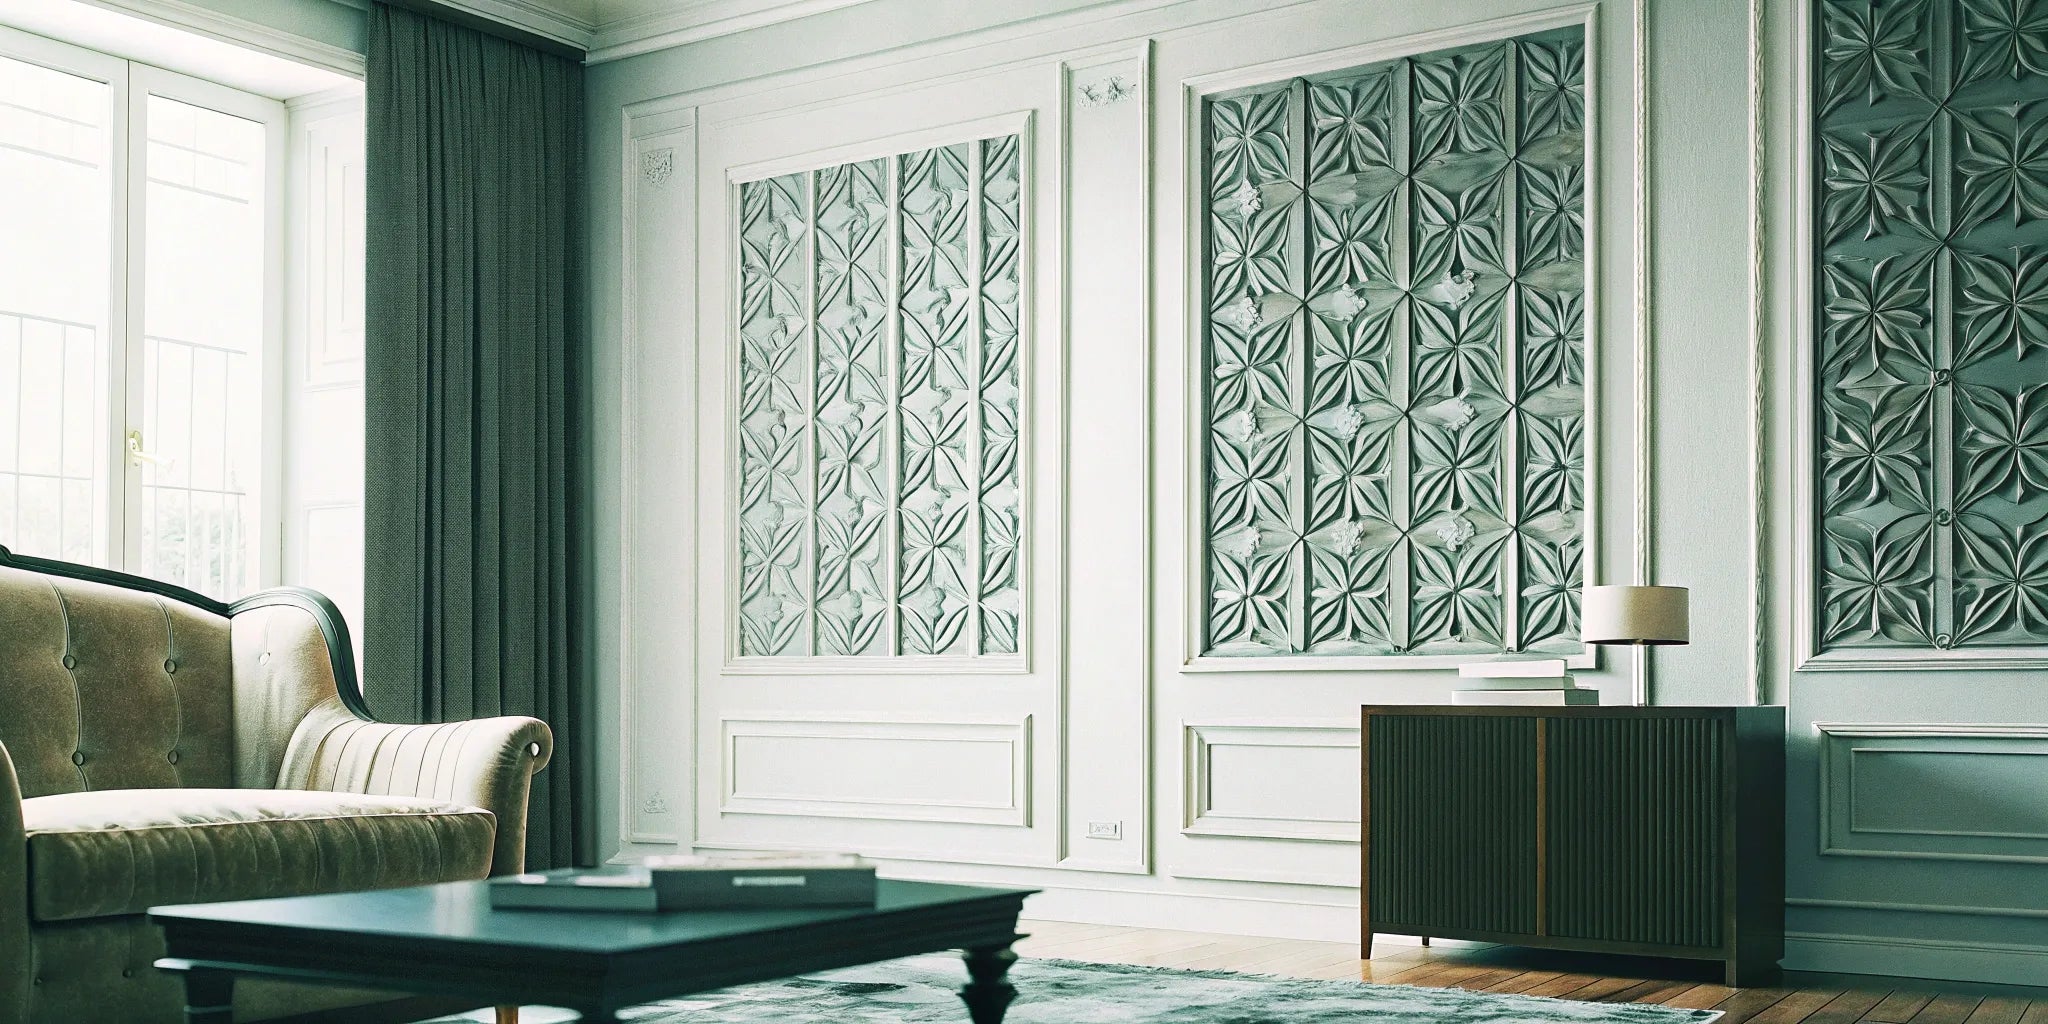
The "3D" in 3D wood wall panels refers to their physical depth. Instead of being a flat sheet, these panels have raised and recessed surfaces that literally stand out from the wall. This dimensional quality is what sets them apart from other wall coverings. The designs often feature geometric shapes, flowing lines, or staggered blocks that create an engaging, textured surface.
This added dimension does more than just look interesting; it interacts with the room's lighting to cast subtle shadows and create highlights. This interplay of light gives the wall a sense of movement and life. By transforming a simple, two-dimensional surface into a three-dimensional work of art, these wall panels can serve as the focal point of your entire design scheme.
Breaking Down Panel Types and Materials
Wood panels come in a beautiful variety of materials, each offering a distinct look and feel. You can find everything from rich, dark woods to light, airy options. For a truly custom look, Unfinished Wood Wall Panels allow you to apply your own stain or paint to perfectly match your decor. Natural Veneer panels provide the authentic grain and warmth of real wood, making each panel one-of-a-kind.
If you're looking for durability and a modern aesthetic, Interior WPC (Wood Plastic Composite) Fluted Slat Panels are an excellent choice. They blend natural wood fibers with recycled materials for a consistent, low-maintenance finish. The material you choose will define the room's atmosphere, whether you want the timeless elegance of walnut or the clean lines of painted slats.
Common Wood Varieties: Walnut, Teak, Oak, and Ash
When you're choosing real wood, the type of species makes all the difference. Walnut is a popular choice for its deep, rich color and elegant grain, instantly adding a luxurious and modern feel to any room. Oak is a timeless classic, known for its durability and prominent grain pattern that works well in both traditional and contemporary settings. Teak brings a warm, golden hue and is naturally resistant to moisture, making it a surprisingly good option for well-ventilated bathrooms or kitchens. For a lighter, more minimalist aesthetic, Ash provides a clean, bright look with a straight grain that complements Scandinavian-inspired designs. Each species offers a unique character, and exploring natural veneer wall panels can help you find the perfect match for your project's personality.
Exploring Other Panel Materials: Gypsum, Plant Fiber, and Polymers
While natural wood is beautiful, it’s not the only material available for creating a stunning 3D wall. Many modern panels are made from high-quality polymers, which are lightweight, durable, and often come ready to be painted any color you choose. This gives you complete creative control to match your wall to your exact color scheme. You can also find eco-friendly options made from sustainable sources like bamboo or other plant fibers. For areas with higher humidity, like basements or bathrooms, WPC panels (Wood Plastic Composite) are an excellent choice. They blend wood fibers with recycled polymers to create a finish that is highly resistant to moisture and wear, giving you the look of wood without the worry.
Common 3D Wood Panel Myths, Busted
One common concern people have about 3D wood panels is that they are a permanent decision that will damage walls upon removal. While it's true that they are installed to be secure and long-lasting, they aren't impossible to take down. The reality is that removing the panels will likely require some minor wall repair, such as patching holes and sanding down adhesive residue. This is a pretty standard touch-up for removing any securely fixed wall treatment, from tile backsplashes to built-in shelving.
Another myth is that wood panels are difficult to maintain. In fact, they are quite simple to care for. Most panels only require occasional dusting with a soft cloth or the brush attachment on your vacuum to keep them looking fresh and clean.
Weighing the Pros and Cons
Like any design choice, 3D wood panels have their own set of pros and cons. On the plus side, their visual impact is undeniable. They instantly create a high-end, custom feel and can act as a stunning centerpiece in any room. They are also incredibly durable and can hide minor wall imperfections. Many types even offer sound-dampening qualities, which is a great bonus for creating a quieter, more peaceful environment. For targeted sound control, you can also explore dedicated Acoustic Wall Panels.
On the other hand, the initial cost is typically higher than a can of paint or a roll of wallpaper. Installation also requires more precision and time, though it's a manageable DIY project for many. Finally, because they are a more significant installation, they aren't as easy to change on a whim if you love to frequently update your decor.
Potential Downside: Vulnerability to Damage
While 3D wood wall panels add a ton of character, it's important to remember they aren't indestructible. The material you choose plays a big role in how well it holds up over time, especially in busy households. Softer materials can be more susceptible to scratches or dents, which is something to consider if you're planning an installation in a high-traffic area like a hallway, mudroom, or a kid's playroom. For spaces that see a lot of action, you might want to explore more resilient options like WPC or other durable composites that are specifically designed to withstand daily wear and tear while still looking fantastic.
Potential Downside: Trendy Designs May Become Dated
It’s a fair concern—will a design that looks cutting-edge today feel old-fashioned in a few years? Some of the more intricate or bold geometric patterns can be very trend-driven. Unlike paint, which is easy to change, removing wall panels is a more involved project. The best way to address this is by choosing a timeless design. Classic styles, such as simple fluted slats or the organic grain of natural wood panels, have a lasting appeal that won't fall out of fashion. By focusing on texture and clean lines rather than a fleeting pattern, you can create a feature wall that feels both modern and enduring.
How to Choose the Right 3D Wood Panels
Picking the perfect 3D wood panels is about more than just looks—it’s about finding the right fit for your space, lifestyle, and budget. With so many options out there, it’s easy to feel a little overwhelmed. But don’t worry, I’m here to walk you through it. The key is to think about a few core factors: the material’s durability, the style you’re aiming for, the size and lighting of your room, and of course, the cost.
By breaking down the decision into these smaller pieces, you can confidently select panels that will not only look incredible but will also stand the test of time. Whether you’re a homeowner planning a weekend DIY or a contractor sourcing materials for a client, these considerations will help you make a smart investment. Let’s get into the details so you can find the ideal wall panels for your project.
Why You Should Order Samples First
I can't stress this enough: always order samples before you commit. It might seem like a small, skippable step, but it can save you from a major design headache. The color you see on your computer or phone screen can be completely different from how the panel looks in real life. Lighting is the biggest variable; the warm afternoon sun in your living room will make a wood panel look entirely different than cool overhead lighting. Getting a sample lets you move it around the room, see it in the morning and at night, and hold it against your furniture and paint colors to ensure it’s the perfect match.
Beyond just color, a sample lets you experience the panel's texture and quality firsthand. You can feel the grain of the wood, check the finish, and get a true sense of its weight and durability. This is especially important if you're planning a custom finish. For instance, if you're considering Unfinished Wood Wall Panels, a sample is your test canvas. You can experiment with different stains and paints to see exactly how the wood takes the color before applying it to an entire wall. It’s the best way to confirm that the final result will live up to your vision.
Which Material Is Durable Enough for Your Space?
The material you choose directly impacts how long your panels will last and how much maintenance they’ll need. For example, PVC panels are a practical choice for high-moisture areas like bathrooms or basements, as they resist water and mold and can last between 20 to 30 years. On the other hand, MDF panels are better suited for dry, indoor spaces and typically have a lifespan of 10 to 15 years. For a blend of style and resilience, consider Interior WPC Fluted Slat Wall Panels, which offer the look of wood with added durability. Thinking about longevity from the start helps ensure your walls look great for years to come.
Understanding the General Lifespan of Wall Panels
Generally, you can expect 3D wall panels to last anywhere from 10 to 30 years. This wide range comes down to a few key factors: the material you choose, the environment where you install them, and how well you care for them over time. High-quality products made from durable materials will naturally have a longer life, often reaching that 20 to 30-year mark or even more with the right maintenance. The overall lifespan is a testament to their value as a long-term design investment. By selecting a material that suits your room's conditions and committing to simple upkeep, you ensure your feature wall remains a beautiful and lasting part of your home's decor.
How to Find a Style You'll Love
This is the fun part—finding a design that brings your room to life. 3D panels add incredible depth and warmth, and the style possibilities are endless. You can find everything from sleek, geometric patterns to organic, wave-like textures. Think about the overall vibe you want to create. Are you going for a modern, minimalist look? Or something more rustic and cozy? Materials like our Natural Veneer Wall Panels offer an authentic wood grain, while other options can be painted to match your exact color scheme. Take some time to browse different styles until you find one that perfectly aligns with your vision.
Current Design Trends: Natural Finishes and Fluted Panels
Right now, the biggest trend is all about bringing the outdoors in. This idea, known as biophilic design, focuses on connecting our homes with nature to create a calmer, more welcoming atmosphere. That’s why panels with natural, authentic finishes are so popular. Think real wood grains and textures that feel organic and warm. Styles like fluted or slatted panels are also having a major moment because they add so much dimension. The way light hits their unique textures creates subtle shadows and a sense of luxury, making a wall look more interesting and sophisticated without being overwhelming. It’s a move toward sustainable, timeless materials that feel both modern and comforting.
Outdated Styles to Avoid
Let's clear the air on what to leave in the past. The wood paneling that gives the style a bad name is the overly glossy, fake-looking finish from the '70s. Modern design has moved away from artificial materials and ornate, old-fashioned paneling in favor of authenticity. Today, the preference is for real, natural materials and clean, architectural lines. The goal is to add texture and warmth, not to cover a wall in something that looks like plastic. By choosing panels with a matte or natural finish and a simple, elegant design, you can be confident you're investing in a look that will feel fresh and relevant for years to come.
How Light and Space Affect Your Panel Choice
Before you commit, consider how 3D panels will interact with your room’s existing dimensions and lighting. Because these panels have depth, they can sometimes make a very small room feel a bit more enclosed. They tend to work best in larger spaces where they can serve as a stunning feature without overwhelming the area. Lighting is also a huge factor. The way light hits the panels can dramatically enhance their texture and create beautiful shadow play. Think about installing some well-placed accent lighting to really make the 3D effect pop and add a layer of ambiance to the room.
What's the Real Cost of Wood Wall Panels?
Budgeting is a crucial step in any renovation project. The cost of 3D wall panels can vary quite a bit, typically ranging from $1 to $40 per square foot depending on the material and design complexity. For a standard 12-by-12-foot room, the average installation cost falls between $3,000 and $4,500. It’s a good idea to measure your space and calculate your material needs to get a clear picture of the total expense. If you’re a contractor or designer, remember that many suppliers offer trade discounts. You can see if you qualify by filling out a trade application, which can help manage project costs.
Example Pricing for 3D Wall Panels
Let's talk numbers to give you a clearer idea of the budget. The cost for 3D wall panels can vary widely, from as low as $1 per square foot for basic options to over $40 for premium, intricate designs. To put that into perspective, outfitting a standard 12-by-12-foot room, including both materials and professional installation, typically lands somewhere between $3,000 and $4,500. The panel material itself is the biggest variable—for example, high-quality options like Natural Veneer or WPC often fall in the $15 to $20 per square foot range. While this is a bigger upfront investment than paint, the durability and dramatic visual impact make it a worthwhile choice for creating a truly custom look.
How to Install Your 3D Wood Panels
Now for the fun part: bringing your vision to life. Installing 3D wood wall panels is a straightforward project that can completely transform a room in a single weekend. Whether you’re a seasoned DIYer or new to home improvement, a little preparation goes a long way. With the right tools and a clear plan, you can achieve a professional-looking finish that you’ll be proud of. This guide will walk you through every step, from prepping your walls to making the final decision on whether to tackle it yourself or call in a pro.
Getting Your Walls Ready for Installation
Before you even think about opening the adhesive, take some time to prepare your wall surface. A great installation starts with a clean slate. First, clear the area of any furniture and remove any existing wall decor, nails, or outlet covers. Next, give the wall a thorough cleaning with a simple soap and water solution or a degreaser to get rid of any dust, grease, or grime. A clean surface is essential for proper adhesion. Finally, measure your wall space carefully. Double-checking your measurements now will save you from cutting errors and material shortages later.
Prepping Painted or Wallpapered Walls
If your walls are currently covered in wallpaper, it’s best to remove it before you begin. While it might seem like an extra step, installing panels directly over wallpaper can compromise the adhesive's bond, potentially causing the panels to loosen over time. You want to ensure they are sticking directly to the wall for a secure, long-lasting fit. For painted surfaces, the prep is a bit simpler. You can install panels over paint as long as it's in good condition—clean, dry, and not greasy. Take a moment to inspect for any flaking or peeling areas. A quick scuff with sandpaper over any loose spots will rough up the surface just enough to ensure a strong grip for the adhesive, giving your new Acoustic Wall Panels the solid foundation they need.
Your Tool and Material Checklist
Having everything you need on hand before you start makes the installation process much smoother. You don’t need a massive workshop, just a few key items. Here’s a basic checklist:
- A tape measure
- A pencil
- A level
- A saw for any necessary cuts (a miter saw or hand saw works well)
- Construction adhesive (like Loctite Power Grab or Liquid Nails)
- A caulk gun
- Brad nails and a nail gun (optional, for extra security)
For the adhesive, make sure you choose one that’s right for your panels. If your panels have a felt backing, a strong construction adhesive is your best bet. Always check the panel manufacturer’s recommendations to ensure you’re using the right products for the job.
Follow These Steps for a Flawless Installation
Ready to get started? First, let your wood panels acclimate to the room’s environment by leaving them in the space for 48 to 72 hours. This helps them adjust to the temperature and humidity, preventing any warping after installation.
Once they’re ready, lay the panels out on the floor to plan your design. This lets you visualize the pattern and make any adjustments before they’re permanently on the wall. When you’re ready to install, start with the first row and use a level to ensure it’s perfectly straight—this is the foundation for your entire wall. Apply a generous amount of construction adhesive to the back of your first panel, press it firmly onto the wall, and for added security, you can secure it with a few brad nails.
Should You DIY or Hire a Pro?
One of the biggest questions is whether to install the panels yourself or hire a professional. If you have some woodworking experience and the right tools, you can definitely install styles like shiplap or flat panels on your own. It’s a rewarding project that can save you money on labor costs.
However, for more complex designs that require precise measurements and intricate cuts, like board and batten or custom patterns, hiring a professional carpenter is a smart move. A pro will ensure a flawless, polished finish. If you’re a contractor or designer, you can join our trade program to get access to bulk discounts and specialized support for your projects.
The Technical Side: Specs and Safety
Once you’ve settled on a style, it’s time to look at the technical details. This part of the process might seem less exciting than picking out finishes, but it’s what separates a good-looking project from a great, long-lasting one. Paying close attention to the fine print ensures your installation is not only beautiful but also safe, durable, and compliant with local standards. These specifications aren’t just numbers on a product page; they directly influence your project’s success.
From the weight of each panel to its fire rating, these details will guide your installation process and help you make the most of your investment. For example, understanding the panel’s weight will determine the type of adhesive you need and whether you can handle the installation yourself. Likewise, checking for moisture resistance is essential for projects in bathrooms or kitchens, preventing issues like warping or mold down the road. For contractors and business owners, confirming that materials meet local building codes is a critical step that protects your business and your clients. Finally, some panels offer added functional benefits, like sound absorption, that can transform the feel of a space. Let’s walk through the key technical aspects you should review before making a final decision.
Getting the Measurements Right: Dimensions and Weight
Before you add anything to your cart, always check the product specifications for dimensions and weight. Knowing the exact size of each panel helps you calculate precisely how many you’ll need, minimizing waste and saving money. For example, a panel might be listed as 26.4 inches by 12 inches. The weight is just as important—a lightweight panel, say around 2 pounds, will be much easier for a DIY installation and may not require heavy-duty adhesives. Heavier panels might need more structural support. You can find these details on the product page for our wall panels, helping you plan your project with confidence from the very beginning.
Typical Panel Dimensions and Weight
Panel dimensions vary widely, which is great for design flexibility. You can find a whole range of options, from smaller, easy-to-handle squares around 12x12 inches that weigh less than two pounds each, to larger formats that are over two feet long. Some designs even come in unique shapes, like long, narrow planks that measure 31.5 by 7 inches, creating a completely different visual rhythm. This variety allows you to choose a size that fits your aesthetic and suits your installation comfort level. The most important step is to carefully read the product specifications before you buy. This will tell you the exact dimensions and weight, so you can accurately calculate your material needs and plan for the installation process without any surprises.
Do You Need to Worry About Building Codes?
This step is especially critical for contractors and anyone working on a commercial project. Building codes vary by city and state, and they often have specific requirements for wall coverings, especially in public spaces or multi-family residences. When choosing your panels, consider the room's function—how much traffic it gets, the moisture levels, and its overall size. For large-scale projects, it’s always a good idea to consult with a local building inspector or a professional contractor. If you’re a trade professional, our team can help you find materials that meet your project’s specific needs when you sign up for our trade program.
How Resistant Are Panels to Fire and Moisture?
Not all wall panels are created equal, especially when it comes to handling moisture and meeting fire safety standards. For rooms like bathrooms, kitchens, or basements, you’ll want a material with excellent moisture resistance, like WPC (Wood Plastic Composite) or PVC, which can prevent mold and warping. Some materials can last for decades because they are so resilient against water and pests. Similarly, commercial buildings often require materials with a specific fire rating for safety compliance. Always check the product’s technical data sheet for this information. Choosing the right material for the environment ensures your walls will look great for years to come without compromising on safety.
Understanding Fire Safety Ratings and Heat Resistance
When you're choosing materials, especially for a commercial space or near a heat source like a fireplace, fire safety is a non-negotiable. Fire ratings tell you how a material reacts to fire and how quickly it will spread flames. These are typically classified as Class A, B, or C, with Class A offering the most protection. You can usually find this information on the product’s technical data sheet. For example, materials like our fiber cement boards are known for their excellent fire resistance. Always check local building codes, as they often dictate the minimum fire rating required for specific applications, ensuring your project is not only stylish but also safe and compliant.
How to Improve Fire Safety with Retardant Paint
What if you fall in love with a wood panel that doesn't have the highest fire rating? You still have options. You can significantly improve a panel's fire resistance by applying a special fire-retardant paint or coating. These coatings are designed to swell up when exposed to heat, creating an insulating layer of char that slows the spread of flames and protects the wood underneath. This is a fantastic solution for our Paint and Stain Grade Panels, allowing you to achieve a custom look without compromising on safety. It’s a straightforward way to add an extra layer of protection and peace of mind to your project.
Can Wood Panels Improve Your Room's Acoustics?
Beyond their visual appeal, 3D wall panels can significantly improve a room's acoustics. The varied textures and depths of the panels help break up and absorb sound waves, reducing echo and creating a quieter, more comfortable environment. This makes them a fantastic choice for home theaters, offices, recording studios, or even just a living room where you want to soften the noise. Our Acoustic Wall Panels, which often feature a felt backing, are specifically designed for sound absorption. This functional benefit adds another layer of value, turning a simple design choice into a practical upgrade for your space.
Acoustic Performance: How Panels Reduce Echo
Think about how sound behaves in an empty room with bare walls—it bounces around, creating a harsh echo. 3D wood panels tackle this problem in two ways: diffusion and absorption. The varied, three-dimensional surface of the panels acts as a diffuser, scattering sound waves in multiple directions instead of letting them bounce back as a single, strong echo. This breaks up the sound, making it feel much softer. The real magic, however, happens with absorption. Dedicated Acoustic Wall Panels are often designed with a soft, felt-like backing that traps sound waves, converting their energy and stopping them from reflecting back into the room. This combination of scattering and absorbing sound is what dramatically reduces reverberation, leading to clearer conversations, better movie audio, and an overall more peaceful atmosphere.
Styling 3D Wood Panels in Your Home
Once you’ve chosen your 3D wood panels, the real fun begins: making them a seamless part of your home’s design. Think of these panels not just as a wall covering, but as a foundational piece of art that sets the tone for the entire room. Integrating them thoughtfully is key to creating a space that feels cohesive and intentional. The goal is to make the panels look like they’ve always belonged there, adding depth, texture, and a touch of personality that flat paint or wallpaper simply can’t match.
Whether you’re aiming for a dramatic statement or a subtle textural backdrop, the right approach can make all the difference. It’s about balancing the bold pattern of the panels with the other elements in your space, from furniture and lighting to flooring and decor. By considering how these components work together, you can create a harmonious environment that feels both stylish and welcoming. Let’s walk through a few simple strategies to help you weave these beautiful wall panels into your design plan.
Using Panels to Create a Focal Point
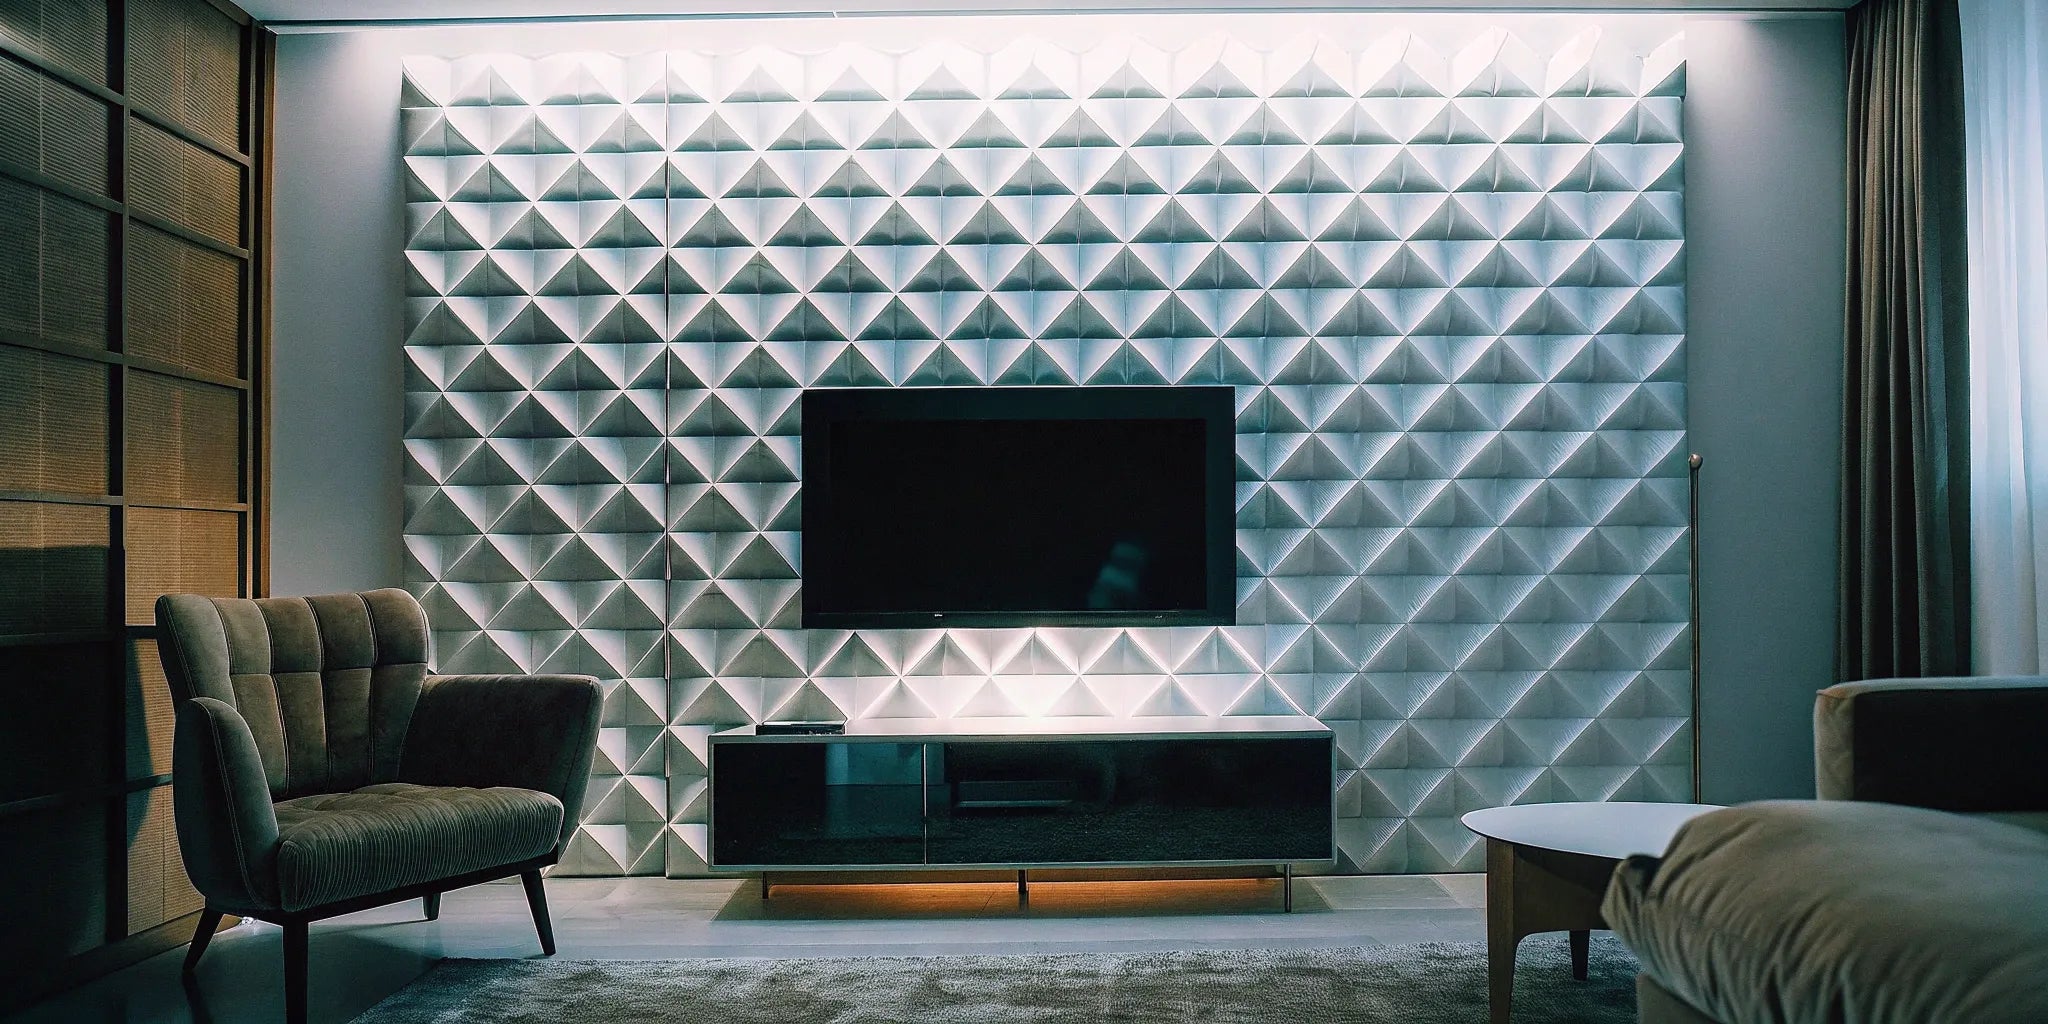
One of the most effective ways to use 3D wood panels is to create a focal point that immediately draws the eye. Instead of covering every wall, choose one to serve as a feature wall. This works beautifully behind a headboard in a bedroom, as a backdrop for the TV in your living room, or to make a statement in an entryway or dining area. The texture and dimension of the panels provide a powerful visual anchor, giving the room a clear center of interest. By concentrating the design on a single wall, you create a high-impact look without overwhelming the space. This approach allows the unique pattern of the panels to truly shine.
How to Coordinate Colors and Patterns
To ensure your new feature wall feels connected to the rest of the room, think about your color palette. You can either match the panel’s finish to your existing decor for a subtle, monochromatic look or choose a contrasting color to make it stand out. For ultimate creative control, our Unfinished Wood Wall Panels can be painted or stained to perfectly match your vision. If you prefer a ready-to-install option, consider how a rich walnut or a light oak will pair with your furniture, flooring, and textiles. The key is to create a sense of balance, allowing the panel’s texture to add interest without clashing with other patterns in the room.
Use Lighting to Bring Out the Texture
Lighting is your secret weapon for making 3D panels look their best. The way light hits the surface can completely transform the wall, highlighting its depth and creating dynamic shadows that shift throughout the day. To maximize this effect, consider installing directional lighting like wall sconces, track lighting, or recessed ceiling lights angled toward the wall. This technique, known as "wall grazing," casts shadows across the panel’s contours, emphasizing its three-dimensional quality. Even placing a floor lamp nearby can bring out the texture and add a warm, inviting ambiance to the room. Don’t underestimate how the right light can turn a beautiful wall into a breathtaking one.
Pairing Your Panels with the Right Decor
With your stunning new wall as the centerpiece, it’s time to style the rest of the room. To avoid a cluttered look, let the panels be the star and choose complementary decor that supports, rather than competes with, them. Opt for furniture with clean lines and textiles in solid colors or simple patterns. This allows the rich texture of the wall to stand out. You can also tie the room together by echoing the panel’s material elsewhere. For example, if you have wood panels, consider adding other natural elements like a wood coffee table or pairing them with sleek, modern finishes like our steel doors to create a sophisticated, layered look.
How to Keep Your Panels Looking New
Your 3D wood wall panels are a significant investment in your home’s style, and keeping them looking their best is easier than you might think. With a bit of routine care and attention, you can ensure your accent wall remains a stunning feature for years to come. The key is to use gentle cleaning methods, perform regular checks, and protect the panels from environmental damage.
Your Guide to Simple Cleaning and Care
For day-to-day upkeep, a simple dusting with a soft, dry cloth or a feather duster is all you need to keep your panels free of dust and debris. If you notice smudges or grime, you can handle them with a gentle approach. Use a soft cloth or sponge dampened with warm water. For more stubborn spots, add a small amount of mild soap to the water. It’s important to avoid harsh chemical cleaners or abrasive scrubbers, as these can easily scratch the wood or strip its finish. Always wring out your cloth so it’s damp, not soaking wet, to prevent excess moisture from seeping into the wood. This simple routine will maintain the beauty of your wall panels without causing any harm.
Material-Specific Maintenance Needs
While a quick dusting works for most panels, the specific material you choose will determine any deeper cleaning routine. For natural wood options, like our Natural Veneer Wall Panels, you’ll need to be careful with moisture. Always use a barely damp cloth and dry the surface immediately to prevent water spots or warping. In contrast, more resilient materials like Interior WPC Fluted Slat Panels are built to handle a bit more, making them a great low-maintenance choice. For specialty options, such as Acoustic Panels with a felt backing, you should skip the damp cloth altogether. Instead, use a vacuum with a soft brush attachment to gently lift dust without damaging the fabric. Understanding your material’s specific needs is the best way to keep it in perfect condition.
Easy Tips for Preventive Maintenance
The best way to handle repairs is to catch them before they become big problems. Make it a habit to inspect your panels every few months. Look closely for any small nicks, scratches, or signs of wear and tear. Check the seams to ensure no panels are coming loose from the wall. Addressing these minor issues early on is much simpler than dealing with a larger repair down the road. This quick visual check helps your panels last longer and keeps them looking flawless. If you have Unfinished Wood Wall Panels, you can also check if the finish needs a touch-up. A proactive approach is the secret to long-term durability and beauty.
How to Prevent Scratches, Dents, and Fading
Where you install your panels plays a big role in their longevity. To prevent warping, discoloration, or other damage, avoid installing wood panels in areas with high moisture, such as bathrooms that have a shower or tub. Constant humidity can cause the wood to swell and change shape over time. Similarly, keep them away from high-heat sources. Installing panels directly next to a fireplace, stove, or other heat-emitting appliance can dry out the wood, leading to cracks or damage to the finish. Also, be mindful of prolonged, direct sunlight, which can cause the wood’s natural color to fade. Choosing the right location is the first step in protecting your investment.
Can You Refinish Your Wood Panels?
Over time, you might find that your natural wood panels could use a refresh. Depending on the material, refinishing is a great option to restore their original luster. Solid wood and natural veneer panels can often be lightly sanded and re-stained or resealed to look brand new. This isn’t something you’ll need to do often, but it’s a fantastic way to extend the life of your panels after years of enjoyment. Before you begin, always check the manufacturer’s guidelines for your specific product. Some finishes and materials, like WPC, are not designed to be refinished. For panels that can be, a fresh coat of stain or sealant can erase minor imperfections and revive the wood’s rich color and grain.
How to Plan Your Project from Start to Finish
A little planning goes a long way in making sure your wall panel project is a success. Before you even add panels to your cart, taking the time to think through the details will save you from headaches later on. From measuring your walls to understanding return policies, a solid plan is your best tool for a smooth installation and a result you’ll love for years. This process ensures you have the right materials, a realistic timeline, and the support you need to bring your vision to life without any last-minute surprises. Let's walk through the key steps to get your project organized from the very beginning.
Start by Assessing Your Space
First things first, take a good look at the room you’re transforming. 3D wall panels are a fantastic way to add texture and personality, offering a dynamic alternative to flat paint or wallpaper. Start by measuring the height and width of the wall to calculate the total square footage you need to cover. Don’t forget to account for windows, doors, outlets, and light switches—these will require precise cuts. Think about the room’s function, too. A high-traffic hallway might need more durable wall panels than a quiet bedroom accent wall. Taking photos and sketching a quick layout can help you visualize the final look and identify any potential challenges early on.
Creating a Realistic Project Timeline
One of the best things about modern wall panels is how quickly they can transform a space. Many designs are DIY-friendly, with some installations taking less than a day. To create a realistic timeline, start by blocking out dedicated time for the project. Factor in a day for prep work, like cleaning the walls and gathering your tools. Then, estimate the installation time based on the panel type and the size of your wall. It’s always smart to add a little buffer for unexpected issues. If you’re working with a contractor, confirm their schedule and lead times for materials to ensure everything aligns with your target completion date.
When Should You Call a Professional?
While many panel installations are straightforward enough for a weekend DIY, some situations call for a professional. If your project involves complex patterns, custom cuts around architectural features, or materials that require specialized tools, hiring an expert is a wise investment. For styles that demand very precise measuring and cutting, a professional carpenter ensures a flawless finish. If you’re a contractor or designer managing multiple projects, our trade program offers resources and bulk pricing to support your business needs. A consultation can provide peace of mind and guarantee the job is done right the first time.
What Does Your Panel Warranty Cover?
Before finalizing your purchase, take a moment to read the warranty and return policy. Understanding these details upfront can save you from unexpected costs later. For example, know that if you return an item simply because you changed your mind, you will likely have to pay for the return shipping. Some policies also include a restocking fee, especially if the original order included free shipping. Beyond returns, check the manufacturer’s warranty for coverage against defects. This information protects your investment and clarifies what to do if you encounter any issues with the product’s quality after it arrives. It’s a simple step that helps you shop with confidence.
Understanding Shipping and Return Policies
Before you click “buy,” take a minute to get familiar with the company’s shipping and return policies. This is one of those details that can make a huge difference in your project experience. Look for key information like the return window—many suppliers accept returns within 30 days, but often only if the product is unopened and in its original packaging. Also, be aware of potential costs. Some companies charge a restocking fee, which can be a percentage of your order total, and you may be responsible for return shipping costs. Knowing these terms upfront helps you budget accurately and avoid any surprises, ensuring your purchase is a confident one from start to finish.
What to Expect from Customer Reviews
Customer reviews are your best source for real-world feedback. When you’re browsing, look beyond the star rating and read what people are actually saying about their experience. Pay attention to comments about the product’s quality, how easy it was to install, and whether it matched the online photos. Reviews can also give you a great sense of the company’s customer service, including how they handle shipping and any issues that might arise. Seeing consistently positive feedback about product quality and service can give you the confidence you need to move forward. You can check out our customer reviews to see what others have said about their projects.
Finding Sustainable and Eco-Friendly Panels
Choosing the right design elements for your home or project is about more than just looks—it’s also about making choices you can feel good about. The great news is that you don’t have to sacrifice style for sustainability. Many modern wall panels are designed with the environment in mind, giving you a way to create a beautiful space while being conscious of your impact. From the source of the wood to the materials used in manufacturing, there are several factors to consider when you want to make an eco-friendly choice.
Thinking about sustainability early in your planning process helps you narrow down your options and ask the right questions. Whether you’re a homeowner focused on creating a healthy living environment or a contractor meeting the demands of a green-certified project, understanding what makes a panel sustainable is key. It’s about looking at the full lifecycle of the product, from where it comes from to how it performs in your space. Let’s walk through what to look for so you can confidently select panels that align with your vision and your values.
What's the Environmental Impact?
When you’re shopping for wood panels, a great first step is to ask where the materials come from. Many manufacturers prioritize using responsibly sourced wood, which means it’s harvested in a way that protects forests and ecosystems for the future. Beyond the wood itself, consider the other components. Look for panels made with non-toxic glues and finishes. This not only reduces harmful chemicals in the environment but also contributes to better indoor air quality in your home or building. Choosing materials with low volatile organic compounds (VOCs) is a simple way to ensure you're creating a healthier space for everyone inside.
How to Find Panels Made from Recycled Materials
Another fantastic way to go green is by choosing panels made from recycled or composite materials. Some options incorporate reclaimed wood, giving old materials a beautiful new life and preventing them from ending up in a landfill. You can also find innovative products like Interior WPC Fluted Slat Wall Panels, which blend wood fibers with recycled polymers. These composite materials are often highly durable and moisture-resistant, all while reducing the demand for new raw materials. It’s a smart approach that combines modern engineering with environmental responsibility.
Can Wood Panels Improve Energy Efficiency?
Did you know your wall panels can do more than just look good? They can also contribute to your home's energy efficiency. Wood is a natural insulator, so adding a layer of wood paneling to your walls can help maintain a more consistent indoor temperature. This extra thermal resistance keeps your space warmer in the winter and cooler in the summer, which can lead to lower heating and cooling bills. Many panels, especially Acoustic Wall Panels, also offer excellent soundproofing qualities, making your room quieter and more comfortable.
What Green Certifications Should You Look For?
If you want extra assurance that your panels are eco-friendly, look for green certifications. Labels from organizations like the Forest Stewardship Council (FSC) indicate that the wood was sourced from forests managed in a responsible and sustainable way. While not every sustainable product will have a certification, it’s a reliable indicator that a third party has verified the manufacturer’s claims. Don’t hesitate to ask suppliers about any certifications their products hold. It’s a simple way to get peace of mind and support companies committed to sustainable practices.
Related Articles
- 3D Wall Panels for Sale in Michigan: A Buyer's Guide
- 3D Wall Panel Guide: Everything You Need to Know
- Modern 3D Wall Panels Exterior: A Complete Guide
- 3D Wall Panel 101: Your Ultimate 2025 Guide
Frequently Asked Questions
Can I install 3D wood panels in a bathroom or kitchen? This is a great question, and the answer really depends on the material you choose. I would advise against using natural wood or MDF panels in areas with high moisture, like a full bathroom with a shower, as they can warp over time. However, if you love the look, you can absolutely achieve it by opting for a moisture-resistant material like WPC (Wood Plastic Composite) or PVC. These are designed to handle humidity beautifully, making them a perfect fit for kitchens or powder rooms.
Will these panels make my small room feel even smaller? It's a valid concern, as adding physical depth to a wall can impact the sense of space. If you're working with a smaller room, the key is to be strategic. Instead of covering all four walls, create a single feature wall, perhaps behind your bed or sofa. This draws the eye and adds character without closing the room in. Also, consider using panels with sleeker, vertical lines and choosing lighter colors or finishes to help the space feel more open and airy.
Are 3D wood panels a timeless look or just a passing trend? While certain bold, geometric patterns might feel very "of the moment," textured walls are a classic design element that has been used for centuries. Wood itself is a timeless material that adds warmth and character to any space. To ensure your design lasts, consider simpler patterns like fluted slats or shiplap. These styles have a classic appeal that integrates well with many different aesthetics, from modern to traditional, ensuring your investment looks great for years to come.
What's the most difficult part of installing these panels myself? For most DIYers, the trickiest part is getting the foundation right. Your first row of panels must be perfectly level, as every other piece will build off of it. Taking your time on this initial step is crucial for a professional-looking result. The other challenge can be making precise cuts around outlets, light switches, or windows. A good saw and careful measurements are your best friends here. If you're not confident in your cutting skills, that's when calling a professional is a smart move.
Besides looking great, do these panels have any other benefits? They absolutely do. One of the biggest functional advantages is their acoustic properties. The textured surfaces are great at absorbing sound, which can reduce echo and make a room feel quieter and more serene. This is a huge plus for home offices, bedrooms, or media rooms. Additionally, wood is a natural insulator, so the panels can add a small thermal barrier to your walls, helping to keep your room a more consistent and comfortable temperature.