


DIY Wood Slat Wall: A Step-by-Step Project Guide
Tired of staring at that blank wall? I get it. Sometimes another coat of paint just doesn’t cut it. A wood slat wall is the perfect answer. It’s a stunning design feature that adds instant warmth, texture, and a modern architectural element to any space. Beyond its visual appeal, it also improves room acoustics by reducing echo. If you're ready to tackle a wood slat wall DIY project that delivers a huge transformation without a huge headache, you're in the right place. I’ll walk you through all the details you need for a successful build.
Key Takeaways
- A Solid Plan Prevents Common Headaches: Before you start, measure your space, decide on a vertical or horizontal layout, and calculate your material needs to ensure a smooth process from start to finish.
- Use a Spacer Block for Flawless Gaps: The secret to a professional-looking slat wall is perfectly consistent spacing. Use a simple scrap wood spacer for every slat and secure them with both construction adhesive and a nail gun for a durable installation.
- Customize for Style and Function: Personalize your wall with a unique paint or stain, add drama with integrated LED lighting, or choose specialized panels like acoustic or water-resistant WPC for rooms that need extra performance.
What Is a Wood Slat Wall?
A wood slat wall is a design feature made of evenly spaced wood strips, arranged either vertically or horizontally. It’s a simple concept with a huge impact, adding texture, warmth, and a clean, modern feel to any room. Whether you're aiming for a Scandinavian, mid-century modern, or contemporary look, a slat wall is a versatile choice that can serve as a subtle background or a dramatic focal point. It’s also a fantastic DIY project that delivers a professional-looking finish.
Understanding Pre-Made Slat Wall Panels
If the idea of measuring, cutting, and spacing dozens of individual wood slats feels a bit overwhelming, pre-made panels are your new best friend. These panels offer a streamlined solution, providing that sought-after modern aesthetic while also improving room acoustics. At USA Builders Depot, our wall panels are designed with DIYers in mind, featuring real wood strips mounted on a special felt backing. This design not only simplifies installation but also ensures a high-end, professional result. You get the full visual impact of a custom slat wall in a fraction of the time, making it an accessible project for any skill level.
The Felt Backing Advantage
The felt backing on these panels does more than just hold the slats together; it’s a key functional component. This dense, fibrous material is excellent at absorbing sound waves, which helps to reduce echo and dampen ambient noise in a room. This makes our Acoustic Wall Panels an ideal choice for spaces where sound quality matters, like home offices, media rooms, or open-concept living areas. By installing these panels, you’re not only adding a stunning design element but also making a tangible improvement to the comfort and tranquility of your space.
Achieving a Seamless Look
One of the biggest benefits of pre-made slat wall panels is their ability to create a flawless, continuous appearance. The panels are engineered to fit together perfectly, which eliminates visible seams and gives your wall a clean, polished look. They are also incredibly versatile and can be easily cut to fit around outlets, light switches, or windows for a custom-tailored installation. This flexibility allows you to achieve a professional-grade finish without the typical challenges of a from-scratch build, ensuring your new accent wall looks like it was installed by a pro.
What Makes Slat Walls So Popular?
A slat wall is one of the easiest ways to add character and architectural interest to a plain room. This unique feature brings in the natural warmth and texture of wood, making a space feel more inviting. Unlike a simple coat of paint, a slat wall creates depth and shadow, changing its appearance as the light shifts throughout the day. It’s a high-impact design choice that feels custom and sophisticated. With ready-to-install wall panels, you can achieve this polished look over a weekend, instantly transforming your space without a complete renovation.
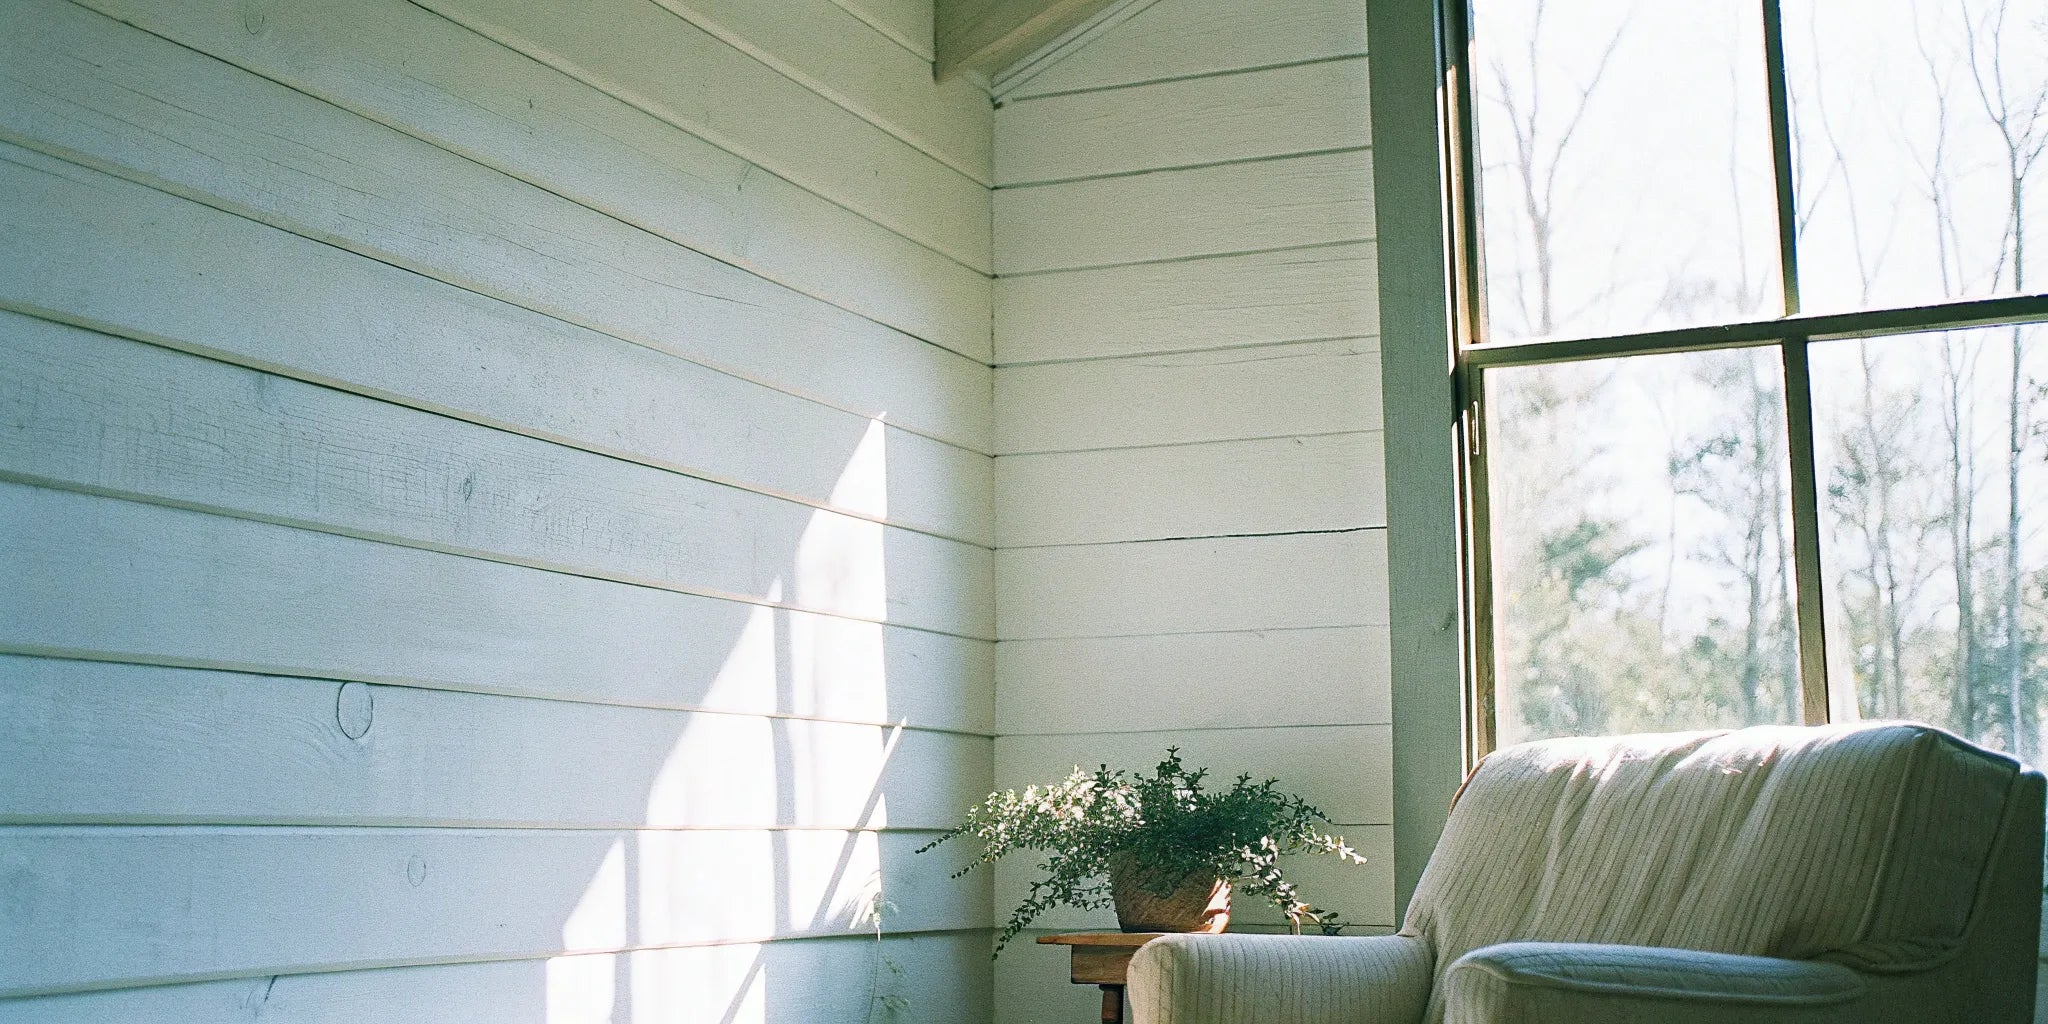
Best Places for a Wood Slat Wall
The beauty of a slat wall is its versatility—it works almost anywhere. You can create a stunning accent wall in your living room behind the sofa or TV, or install one in the bedroom to serve as a dramatic headboard. Slat walls are perfect for adding character to entryways, hallways, and home offices. In an open-concept space, a slat wall can help define a specific area, like a dining nook or a reading corner, without closing it off entirely. From floor-to-ceiling installations to smaller applications, you can adapt the design to fit the scale and style of any room.
Slat Walls in Commercial Spaces
Slat walls aren't just for homes; they are a game-changer for commercial spaces like offices, restaurants, and retail stores. They instantly add a high-end, modern feel that can make a business stand out. More importantly, they offer a practical solution for noise control. In a busy café or an open-concept office, the felt backing on acoustic slat panels works wonders to absorb sound, reducing echo and creating a more comfortable environment for customers and employees. For contractors and business owners, the ease of installation is a huge plus. Using pre-made panels means a quick transformation with minimal disruption, which is essential when time is money. It’s a smart investment that pays off in both style and function.
Thinking Vertically: Slat Wall Ceilings
Why limit a great design feature to just the walls? Taking slat panels to the ceiling is a bold move that creates incredible visual impact. A slatted ceiling can draw the eye upward, making a room feel more spacious and adding a layer of architectural detail that feels completely custom. This application is especially effective in defining a specific zone within a larger area, like a reception desk or a conference room. Just like on walls, ceiling panels provide excellent acoustic benefits by absorbing sound that would otherwise bounce off a flat, hard surface. For maximum sound control, you can install the panels with wood battens and insulation behind them, achieving a professional-grade acoustic rating while creating a stunning design statement.
The Surprising Acoustic Benefits
Beyond visual appeal, wood slat walls offer a surprising functional benefit: improved acoustics. The gaps between the slats help break up and absorb sound waves, reducing echo in a room. This makes them a smart choice for home theaters, offices where you take video calls, or any large space that feels a bit too loud. By choosing dedicated Acoustic Wall Panels with sound-dampening felt backing, you can significantly enhance a room's sound quality while adding a beautiful design element. It’s a perfect example of how great design can be both beautiful and practical.
How to Achieve Class-A Sound Absorption
While the felt backing on acoustic panels provides significant sound-dampening benefits on its own, you can achieve professional-grade results with a specific installation technique. This is how you reach Class-A sound absorption—the highest rating for acoustic performance. The key is to create an air gap behind the panels. First, you’ll install thin wood strips, called battens, directly onto your wall. Then, fill the space between the battens with a dense insulation material, such as mineral wool. Finally, secure the acoustic wall panels to the battens. This layered system is incredibly effective at trapping and deadening sound waves, making it a perfect solution for home theaters, recording spaces, or any room where noise control is essential.
Your Slat Wall Project: Tools & Materials
Alright, let's get everything in order before we start building. A little prep work now saves a ton of headaches later. There’s nothing worse than getting into a good workflow only to realize you’re missing a critical tool or you’ve run out of nails. Taking an hour to gather your materials is the best way to prevent those frustrating mid-project runs to the hardware store. Having all your materials and tools laid out and ready to go makes the entire process feel smoother and more enjoyable. Think of it as setting up your creative workspace, like a chef preparing their ingredients before they start cooking. It puts you in control and helps you focus on the fun part: the actual building. We’ll walk through choosing the right wood for your vision, the essential tools you’ll need to get the job done right, the supplies that will bring it all together, and how to think about your budget so there are no surprises. This way, you can start your project with confidence, knowing you have everything you need right at your fingertips.
How to Choose the Right Wood
The wood you choose is the star of the show, so it’s worth taking a moment to pick the right one. Your decision will come down to two things: durability and aesthetic appeal. You want wood that not only looks great but can also stand the test of time. Pine is a popular and budget-friendly choice that’s easy to work with, while hardwoods like oak or walnut can offer a more premium, dramatic look with beautiful grain patterns. Consider the existing tones in your room and what kind of vibe you’re going for—light and airy, or dark and moody? If you want to simplify the process, you can also start with pre-made Unfinished Wood Wall Panels that are ready for your custom stain or paint, saving you a ton of cutting time.
Exploring Different Panel Types and Finishes
Once you've landed on the type of wood, the next step is to think about the finish. This is where you can really make the project your own. You’re not just stuck with a standard wood grain; you can customize the color and texture to perfectly match your room's style. Plus, modern wall panels offer more than just good looks. There are specialty options designed to solve common household problems, like noise control or durability in tricky spaces. Let's look at how you can personalize your slat wall with different finishes and explore panels built for specific needs.
Beyond Standard Wood Tones: Color and Finish Options
Your slat wall doesn't have to be a traditional wood tone unless you want it to be. The finish is your opportunity to get creative. You can choose a rich, dark stain to create a moody, sophisticated vibe or a light, natural finish for a bright and airy feel. If you love color, you can even paint the slats to match an accent color in your room. For a high-end look, consider panels with different wood species. While walnut and white oak offer classic, iconic textures, you can also find beautiful Natural Veneer Wall Panels in other woods like ash or maple. These options give you the flexibility to achieve a custom look that perfectly complements your existing decor.
Specialty Panels: Fire-Rated, Flexible, and Exterior Options
Sometimes, a wall needs to do more than just look pretty. If you're installing a slat wall in a home theater, office, or a room with high ceilings, noise can be an issue. This is where Acoustic Wall Panels come in handy. They are designed with a felt backing that absorbs sound, reducing echo and creating a more comfortable environment. For spaces that might see a bit more wear and tear or moisture, like a bathroom or even an outdoor patio, there are durable options available. Materials like WPC (Wood Plastic Composite) or specially treated exterior panels can withstand the elements, giving you that beautiful slat wall look without worrying about damage.
The Essential Tool Checklist
You don’t need a professional workshop to build a beautiful slat wall, but a few key tools will make the job much easier and give you cleaner results. Most of these are great investments for future DIY projects, too, so don't be afraid to add them to your collection.
Here’s what you’ll want to have on hand:
- Miter Saw or Chop Saw: Essential for making clean, precise, and perfectly angled cuts.
- Nail Gun: This will be your best friend for attaching the slats to the wall quickly and securely.
- Palm Sander or Sanding Block: For smoothing out any rough edges on your wood slats before finishing.
- Tape Measure & Level: The golden rule of DIY—measure twice, cut once, and use the level to keep everything perfectly straight!
- Pencil: For marking your cuts and layout on the wall.
Adhesives, Fasteners, and Other Supplies
With your tools ready, it’s time to gather the materials that will actually form your wall. The exact quantity will depend on your wall size, which we’ll cover in the planning stage. It's always a good idea to buy a little extra just in case of mistakes.
Here’s a general shopping list:
- Wood Slats: 1x2 boards are a common and affordable choice.
- Spacer Block: A scrap piece of wood cut to your desired spacing width. This is your secret weapon for perfectly even gaps between slats.
- Sandpaper: A medium grit (around 120-220) works well for finishing the slats.
- Finishing Nails: Make sure they are the right size for your nail gun and wood thickness.
- Wood Stain or Paint: To get the exact color you want.
- Clear Top Coat: A polycrylic finish will protect the wood and give it a polished look.
- Rags, Foam Roller, or Brush: For applying the stain and top coat smoothly.
How Much Does a DIY Slat Wall Cost?
A slat wall can be a surprisingly affordable project, but your final cost will depend on your choices. Some DIYers have completed a wall for as little as $25 by using inexpensive pine and supplies they already owned. If you’re buying everything new and opting for a higher-end wood like oak or walnut, your budget will naturally be higher. I always recommend buying the best materials you can afford, as quality wood and finishes make a noticeable difference in the final look. For contractors or those tackling larger projects, applying for a trade program can offer bulk discounts that help keep costs down without compromising on quality. Plan ahead and price out your materials to avoid any surprises.
How to Design Your Wood Slat Wall
A great-looking slat wall starts long before you pick up a saw. The planning phase is where you make all the key decisions that will transform your vision into a stunning feature. Taking the time to map everything out ensures a smooth installation and a professional finish you’ll be proud of. This is your chance to get creative and figure out exactly how you want your wall to look and function. From the orientation of the slats to the spacing between them, every detail matters. Let’s walk through how to design a slat wall that perfectly fits your space and style.
Measure Twice: Planning Your Layout
First things first: grab your tape measure. You need to know the exact height and width of the area you plan to cover. Once you have your dimensions, use a pencil and a level to lightly mark the wall where the top and bottom of your slats will go. This gives you a clear visual guide. If you’re using individual slats, this is also the time to decide on their length. For a floor-to-ceiling look, you’ll cut them to match the wall’s height. Using pre-made Unfinished Wood Wall Panels can make this step much simpler, as they come in standard sizes that you can trim to fit perfectly.
Ordering Samples to Find Your Perfect Match
Before you commit to an entire wall's worth of material, ordering samples is a non-negotiable step. Photos online can be a great starting point, but the way a wood finish looks on a screen can be completely different from how it appears in your home. The lighting in your room, the color of your floors, and even the furniture nearby can all influence the final look. Getting a few samples allows you to hold the material in your hand, feel the texture, and see how the color and grain interact with your space throughout the day. This simple step helps you choose your materials with confidence, ensuring the final result is exactly what you envisioned without any expensive surprises.
Using Online Tools to Visualize Your Design
To take the guesswork out of your design, take advantage of online visualization tools or mobile apps. Many of these allow you to upload a photo of your room and digitally overlay different slat wall styles to see how they’ll look. This is a fantastic way to experiment with different wood tones, finishes, and even the orientation of the slats—vertical versus horizontal—before you make a single cut. It helps you confirm that your design choice complements the room's scale and existing decor. Playing around with a visualizer can give you the confidence you need to move forward with your plan, knowing that you’ve already previewed the stunning transformation that’s about to happen.
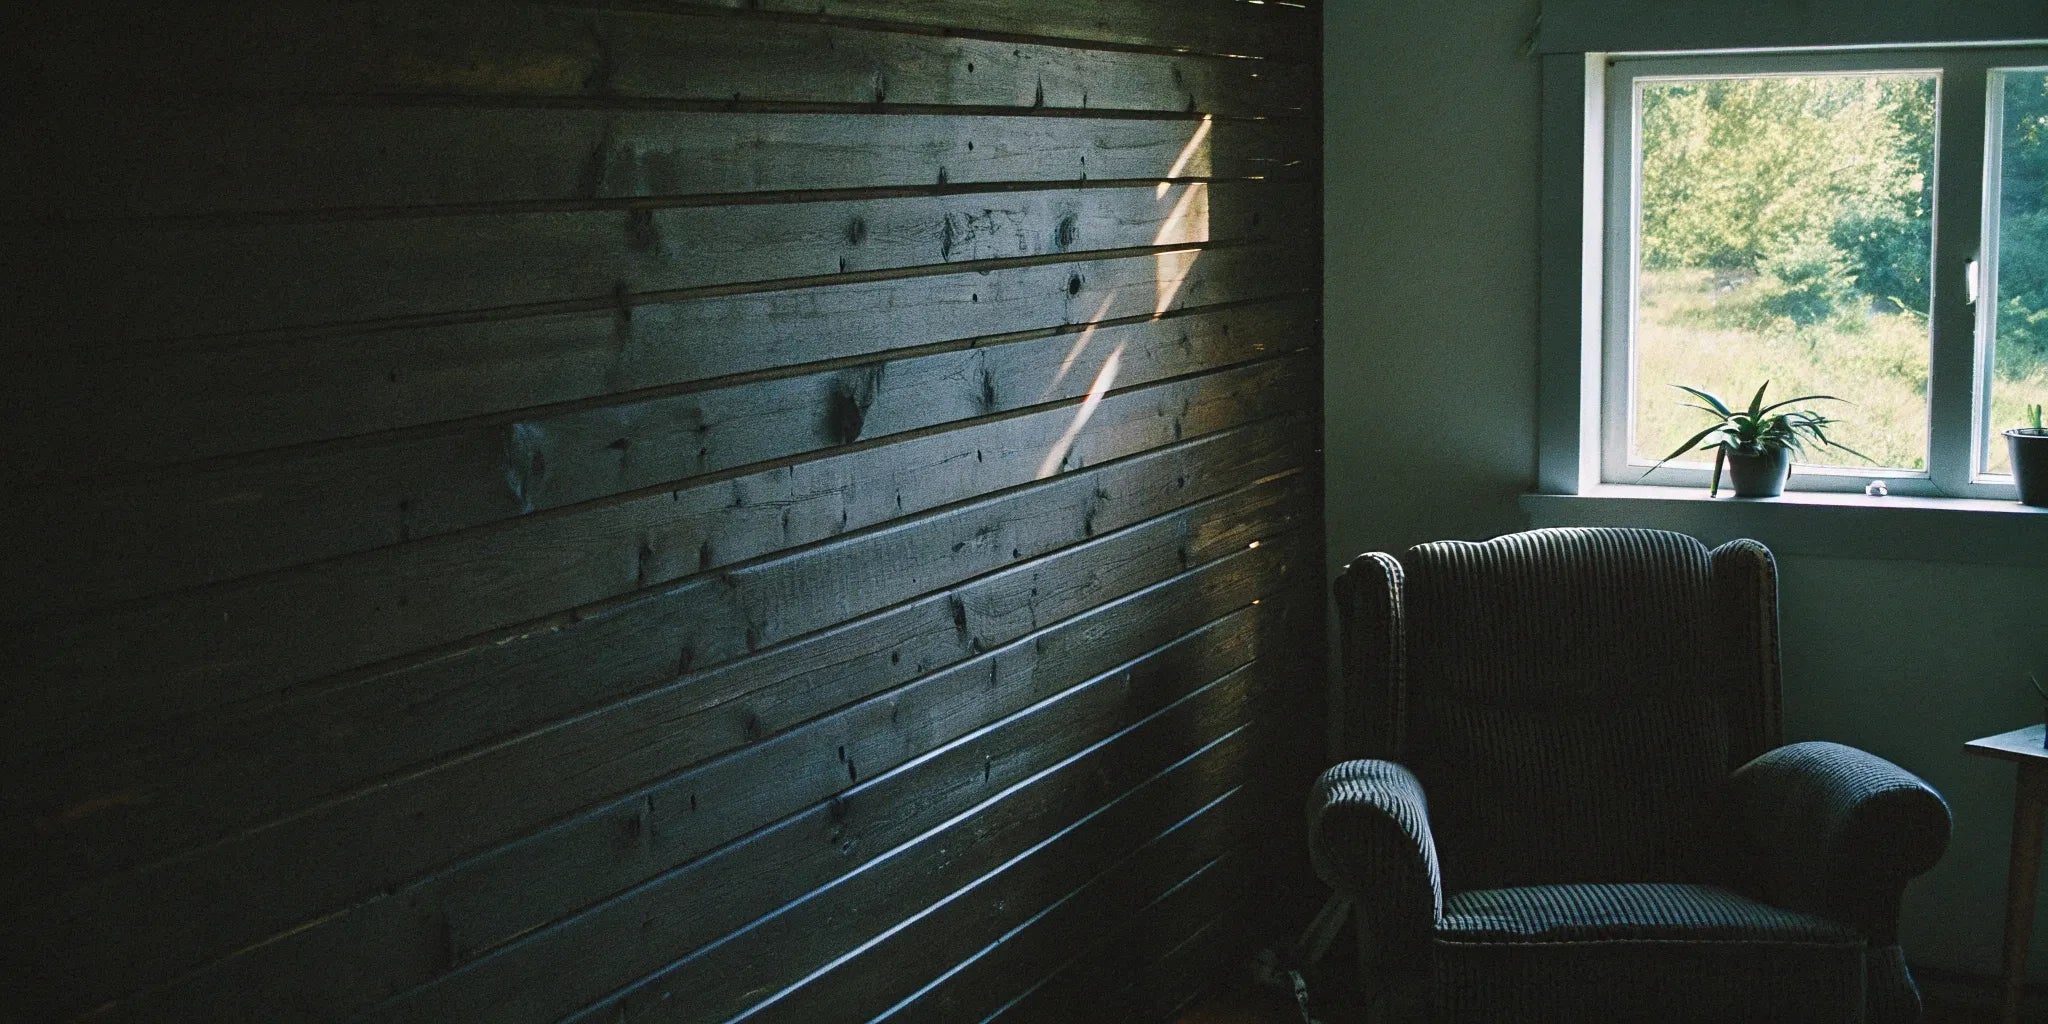
Vertical vs. Horizontal: Which Look Is for You?
The direction you run your slats has a huge impact on the room's feel. Vertical slats are a popular choice because they draw the eye upward, creating an illusion of height. This works wonders in rooms with standard or low ceilings, making the space feel more open and grand. On the other hand, horizontal slats can make a room feel wider and more expansive, which is a great trick for narrow spaces or long hallways. Think about the room you’re working with and what you want to achieve. A vertical accent wall behind a bed can add drama, while a horizontal installation in an entryway can feel modern and welcoming.
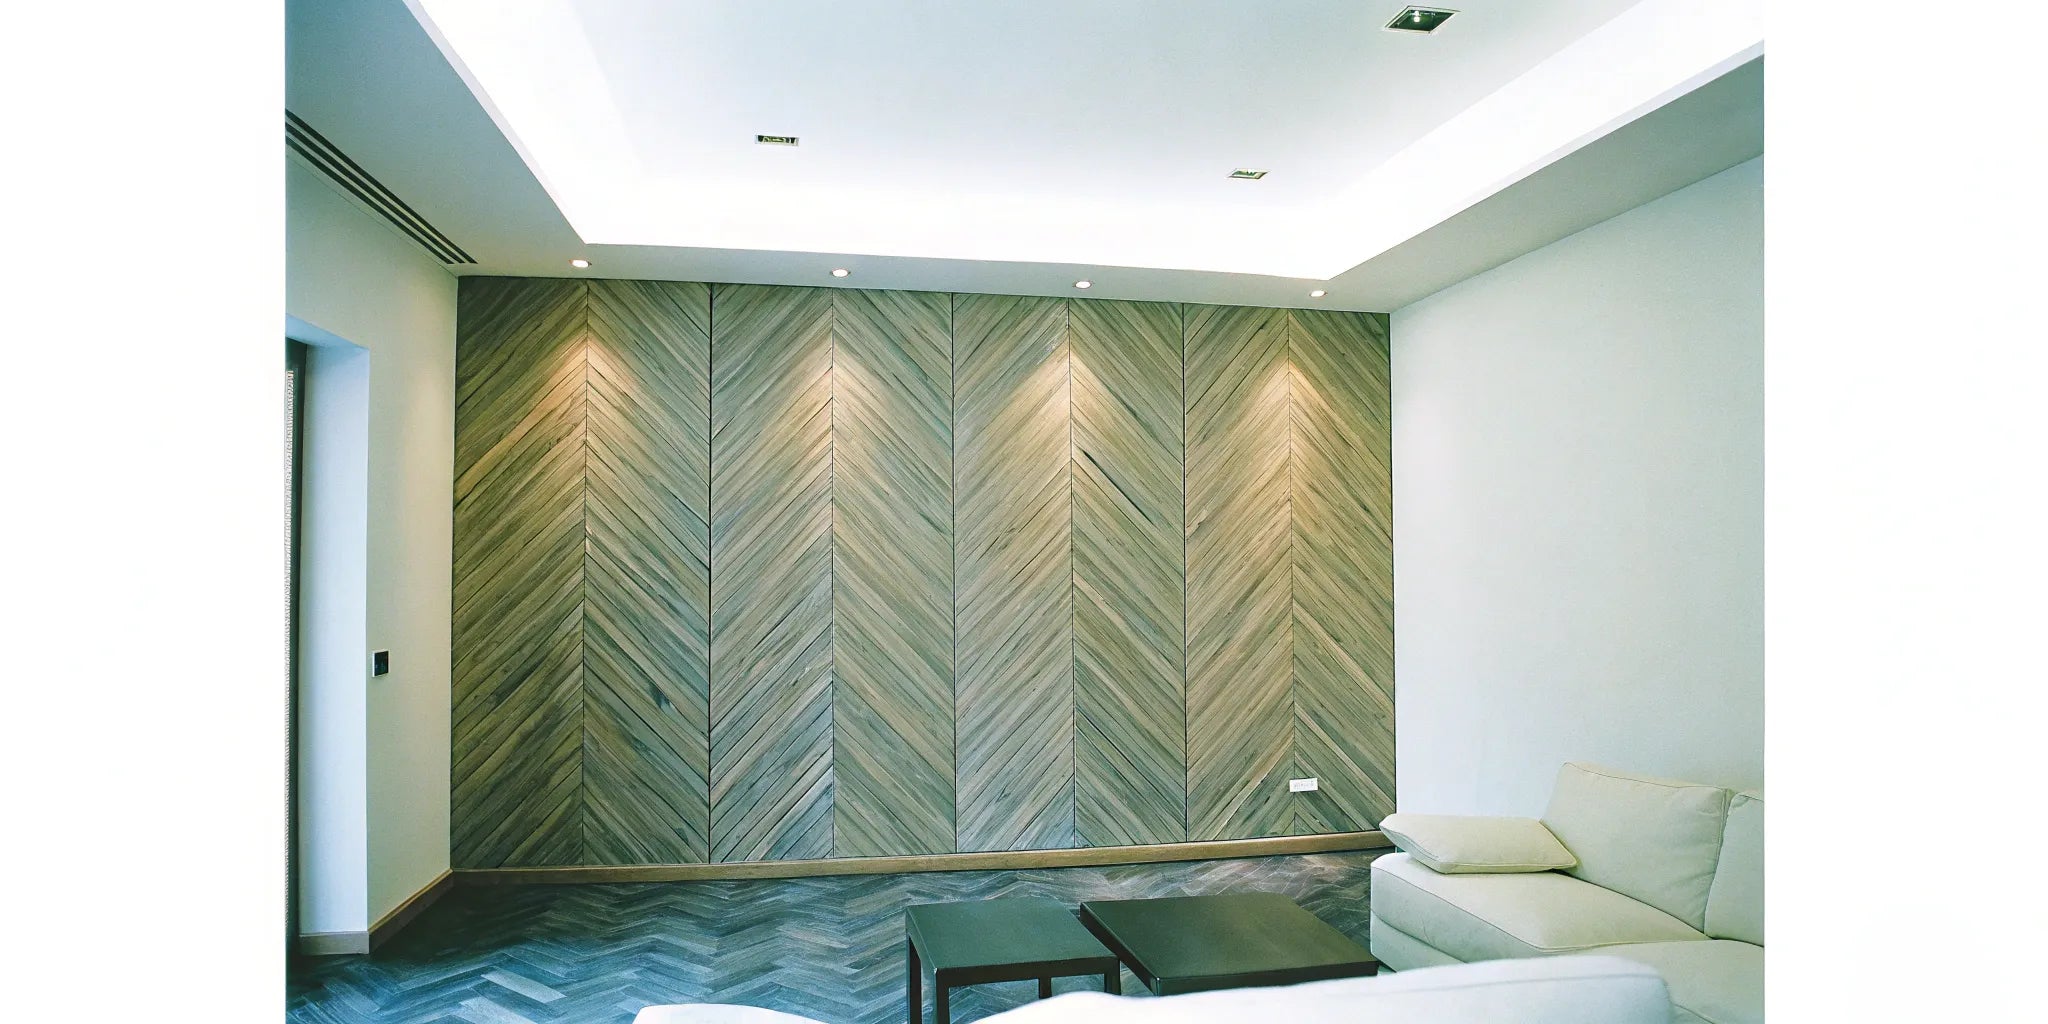
Choosing Your Slat Spacing and Pattern
Consistency is everything when it comes to spacing. The gap between your slats defines the rhythm and pattern of the wall, and even slight imperfections will be noticeable. A common technique is to use a spare piece of wood cut to your desired gap width as a spacer. As you install each slat, you place the spacer next to it to ensure the next one is perfectly positioned. Most people opt for a gap that is the same width as the slat itself, but you can play with this. A wider gap creates a more open feel, while a narrower one gives a denser, more textured look.
How to Calculate Your Wood Requirements
To avoid a last-minute trip to the store, you’ll want to calculate your material needs upfront. Start by measuring the total width of your wall. Then, decide on the width of your slats and the gap between them. Add those two numbers together (slat width + gap width). Now, divide the total wall width by that number. This will tell you how many slats you need to cover the entire space. It’s always a smart idea to add about 10% extra to your final count to account for any mis-cuts or mistakes. This simple calculation will save you time and a potential headache later on.
Working Around Outlets and Light Switches
Chances are, the wall you’ve chosen has an outlet, light switch, or thermostat on it. Don’t worry—working around these is totally manageable with a bit of planning. When you get to a slat that needs to go over an obstacle, hold it in place and carefully trace the outline of the electrical box onto the wood. You can then use a jigsaw or a multi-tool to cut out the marked section. For a clean look, you can buy outlet box extenders that bring your outlet flush with the new slat wall surface, creating a seamless, integrated finish.
How to Build a Wood Slat Wall: Step-by-Step
Alright, this is where the fun begins! With your design planned and materials in hand, you’re ready to bring your vision to life. Building a slat wall is a totally manageable project, even for a beginner. The key is to work methodically and pay attention to the details. We’ll walk through it step-by-step, from prepping your surface to adding the final coat of stain. If you want to simplify the process, you can always start with pre-made wall panels, which handle much of the cutting and spacing for you. These are a fantastic shortcut to a professional look without the detailed labor of a from-scratch build. But if you’re ready to dive into a custom project, let’s get to it.
Step 1: Prepare Your Wall Surface
Before you attach a single slat, make sure your wall is ready. A clean, smooth, and dry surface is your best friend here. Start by wiping down the wall to remove any dust or grime. If you have any significant holes or cracks, fill them with spackle and sand them smooth once dry. A quick coat of paint that matches your backing or slat color can help create a seamless look, especially if your gaps are wide. Finally, use a stud finder to locate and mark the studs. This will give you secure anchor points for your slats, ensuring your beautiful new wall is built to last.
Step 2: Cut and Sand Your Wood Slats
Now it’s time to prepare your wood slats. Measure your wall height carefully and cut each slat to the required length using a miter saw or jigsaw for clean, precise cuts. Once all your pieces are cut, give the front and sides of each slat a light sanding to smooth out any rough edges. This step makes a huge difference in the final look and feel. If you plan to stain or seal your wood, doing it now—before the slats are on the wall—will save you a lot of time and tedious brushwork later. Trust me, it's much easier to finish them on a workbench than on the wall.
How to Cut Pre-Made Panels
Choosing pre-made panels means you get to skip the most time-consuming steps, and thankfully, cutting them to fit your space is straightforward. The trick is to work from the back of the panel. First, grab a sharp utility knife and carefully slice through the felt backing along your cut line. This little bit of prep work is key because it prevents the felt from snagging or fraying when you bring in the saw. After scoring the felt, use a circular saw or a miter saw with a fine-toothed blade for a super clean cut through the wood slats. This two-part technique is my go-to for achieving a perfect, splinter-free edge. It works especially well on materials like our Acoustic Wall Panels. If you need to work around an outlet, the same logic applies: trace the outlet box on the back and use a jigsaw to cut out the opening.
Step 3: Attach the Slats to the Wall
This is the most satisfying part of the process. Start by finding the center of your wall or your chosen starting point. Your first slat is the most important one, so use a level to ensure it’s perfectly straight before you attach it. Apply a bead of construction adhesive to the back of the slat, press it firmly against the wall, and secure it with a few brad nails into the studs you marked earlier. Use a spacer block (a scrap piece of wood cut to your desired gap width) to position the next slat, and repeat the process. Consistency is key here!
Installation Method 1: Gluing Directly to the Wall
This is the quickest and cleanest method, perfect for achieving a seamless, modern look without any visible fasteners. It works best with lightweight, pre-made panels, like our Acoustic Wall Panels, which are designed for easy handling. Simply apply a generous amount of strong construction adhesive to the back of the panel, press it firmly onto your prepared wall, and hold it for a moment to ensure it bonds. This approach is ideal for smooth, flat walls and creates a floating appearance that looks incredibly professional. It’s a fantastic option for a weekend DIY project because it minimizes the need for extra tools and leaves you with a flawless finish.
Installation Method 2: Screwing Directly to the Wall
If you want an extra layer of security, especially in a high-traffic area like a hallway or entryway, screwing the panels directly to the wall is a great choice. This method provides a more robust attachment and can help pull the panels tight against a wall that might not be perfectly flat. For pre-made panels with a felt backing, you can drive black screws directly through the felt between the slats. The dark color of the screws blends right in, making them nearly invisible. This technique gives you the peace of mind that your wall is securely fastened while still maintaining a clean, polished look.
Installation Method 3: Installing on Wood Battens
For walls that are uneven or for projects where you want to maximize acoustic performance, installing the panels on wood battens is the way to go. This traditional method involves first attaching horizontal wooden strips (battens) to the wall studs. Then, you screw your slat wall panels directly onto the battens. This creates a perfectly level and stable framework for your slats and adds an air gap behind the panels, which can further enhance their sound-dampening properties. While it requires a bit more prep work, this technique is the gold standard for achieving a perfectly aligned, professional-grade installation on any surface.
Step 4: Apply the Finishing Touches
With all your slats mounted, it’s time for the final details. If you didn't pre-finish your wood, now is the time to apply your chosen stain or paint. Using a clean, dry cloth can make applying stain much easier and more even. Once your finish is dry, apply a sealant like polyurethane to protect the wood from scuffs and moisture. Fill any visible nail holes with wood putty that matches your stain color, then lightly sand it smooth once it’s dry. These small touches are what will give your slat wall a truly professional and polished appearance.
A Quick Word on Safety
Whenever you’re working with power tools, safety should always be your top priority. Make sure you’re wearing safety glasses to protect your eyes from sawdust and debris. When using a table saw or miter saw, always use push sticks or blocks to keep your hands a safe distance from the blade. Read the manuals for your tools and make sure you understand how to use them properly before you begin. A safe project is a successful project, so don't rush through these important precautions.
Make It Your Own: Slat Wall Ideas
Once your slat wall is up, the real fun begins. This is your chance to turn a simple architectural feature into a personalized work of art that truly reflects your style. Think of the slats as your canvas. You can go for a minimalist, natural wood look or make a bold statement with color and light. The beauty of a slat wall is its versatility; it can be adapted to fit a cozy bedroom, a modern living room, or a professional office space.
Customization isn't just about aesthetics, either. With the right approach, your slat wall can also improve your room's acoustics and create a specific mood with integrated lighting. Whether you're aiming for subtle elegance or a dramatic focal point, there are endless ways to make your design unique. We'll walk through some of the best ways to add those finishing touches, from simple paint jobs to more complex integrations that will make your wall stand out.
Paint vs. Stain: Choosing the Right Finish
The finish you choose can completely change the character of your slat wall. If you love the natural texture of the wood, a clear sealant or a light stain can enhance the grain and add warmth to your space. For a more dramatic effect, consider a dark stain to create a sophisticated, moody accent. If you're working with unfinished wood wall panels, you have total freedom. You can paint the slats to match your existing wall color for a subtle, textured look or choose a bold, contrasting color to make it the room's centerpiece. Don't forget you can also paint the wall behind the slats for a pop of color that peeks through the gaps.
Thinking Beyond Wood: Mixing Materials
Who says you have to stick to just wood? Combining materials is a fantastic way to add depth and a custom feel to your project. Imagine pairing warm oak slats with cool, metallic accents for an industrial-chic vibe. You could also alternate between different types of wood or stains to create a unique pattern. For a truly high-end look, consider framing your wood slat section with sleek porcelain slabs or another textured material. This approach breaks up the visual and allows you to tie in other elements from your room's decor, creating a cohesive and professionally designed look.
Adding Integrated Lighting for a Modern Look
Lighting can take your slat wall from a simple feature to a stunning focal point. Integrating LED strips behind the slats or within the gaps is a popular way to create a warm, ambient glow. This technique, often called backlighting, highlights the texture and vertical lines of the wall, adding a layer of sophistication. It’s perfect for creating a cozy atmosphere in a living room or bedroom. You can also install small, directional lighting fixtures above or below the wall to cast interesting shadows. The right lighting not only enhances the wall itself but also contributes to the overall mood of the room.
Functional and Stylish: Slat Wall Accessories
Your slat wall is more than just a beautiful backdrop; it can also be a highly functional part of your room. The clean, strong lines of the slats are perfect for mounting custom accessories. Think about adding a few minimalist floating shelves to display photos or small plants, or installing sleek hooks in an entryway for coats and bags. The gaps between the slats provide a natural grid, making it easy to create a customized storage system that looks intentional and integrated. You can also think of the panel itself as a functional accessory. Opting for specialized Acoustic Wall Panels, for example, adds sound-dampening qualities to your design, making your space quieter and more comfortable without sacrificing style.
Using Your Wall to Improve Sound
A wood slat wall does more than just look good—it can also make a room sound better. The uneven surface and the gaps between the slats help to break up and absorb sound waves, reducing echo and reverberation. This is especially useful in rooms with high ceilings or hard surfaces like hardwood floors. For even greater sound-dampening benefits, you can install acoustic wall panels that come with a felt backing designed specifically for sound absorption. This makes them a smart choice for home offices, entertainment rooms, or any open-concept space where noise tends to travel.
Styling Your New Feature Wall
Your new slat wall is a durable feature, but a little care will keep it looking its best for years. Regular dusting with a microfiber cloth or a vacuum brush attachment is usually all it takes to keep it clean. For natural wood, it’s important to manage humidity levels in the room to prevent warping. If you’ve painted or stained your slats, follow the manufacturer’s care instructions. Proper installation is the first step to longevity, so ensuring every slat is secure will prevent issues down the road. With just a bit of simple maintenance, your wall will remain a beautiful and timeless part of your home.
Tips for a Professional-Looking Finish
You’re so close to the finish line! Getting the details right in the final stages is what separates a good DIY project from a great one. These tips will help you troubleshoot common issues and ensure your new slat wall looks like it was installed by a pro. With the right techniques, you can create a stunning feature that lasts for years. For a head start, you can explore pre-made wall panels that simplify the installation process.
Common DIY Mistakes (and How to Avoid Them)
The number one giveaway of a DIY slat wall is inconsistent spacing. Even a tiny imperfection in your gaps will be noticeable once the entire wall is complete. The best way to prevent this is by using spacer blocks. Cut a few small, identical blocks from scrap wood to place between each slat as you install it. This ensures every gap is perfectly uniform from top to bottom. Don’t try to eyeball it—relying on a tape measure for every single slat can introduce small errors that add up over time.
How to Get Perfectly Straight Lines
Before you attach your first slat, check if your walls are straight and plumb. Most walls aren't perfectly flat, and if you press a slat against a wonky surface, it will follow that curve. Use a long level or straightedge to find any bows or dips. If your wall isn't straight, you may need to trim the back of the boards to fit snugly. For corners that aren’t perfectly 90 degrees, scribing your first slat to match the wall’s angle will create a seamless starting point for the rest of your installation.
Can You Install a Slat Wall in a Bathroom or Kitchen?
Want to add a slat wall to a room with high humidity? Material choice is everything. Natural wood can be sensitive to moisture, which can lead to warping or fading over time. For bathrooms, laundry rooms, or kitchen backsplashes, you’ll want a material that can handle the environment. Interior WPC fluted slat wall panels are an excellent alternative. They offer the beautiful look of wood but are made from a water-resistant composite material, making them durable and easy to clean in moisture-prone areas.
Protecting Wood Slats in High-Moisture Areas
If your heart is set on the authentic look of natural wood in a bathroom or kitchen, you can make it work with the right precautions. The key is to create a strong barrier between the wood and the moisture. Before installation, apply several coats of a high-quality waterproof sealant, like a marine varnish or an exterior-grade polyurethane. It's crucial to seal every single surface of the wood slats—front, back, and all the edges—to prevent moisture from seeping in. Also, think carefully about placement. Avoid areas that get direct splashes of water, like a shower wall or a kitchen backsplash right behind the sink. Proper ventilation is also your best friend; a good exhaust fan will help manage humidity and keep your beautiful new wall looking great for years to come.
Secrets to a Flawless Installation
For the most secure installation, use a combination of construction adhesive and a finish nailer. Apply a bead of adhesive to the back of each slat, then press it firmly onto the wall. The finish nails act as a clamp, holding the slat securely in place while the adhesive cures. This dual method prevents any shifting or sagging over time. For an even stronger hold, drive your nails in at a slight angle, alternating the direction with each nail. This creates a locking effect that makes the slats incredibly sturdy.
How to Clean and Maintain Your Slat Wall
If you’re staining your own slats, be prepared for a strong smell that can linger for a few days. To manage this, stain your wood in a well-ventilated area like a garage or patio and let the slats dry completely before bringing them inside for installation. Opening windows or using an odor absorber can also help the scent dissipate faster. Once your wall is up, maintenance is simple. A quick dusting with a microfiber cloth or the brush attachment on your vacuum is all it takes to keep it looking brand new.
The Right Way to Clean Your Panels
Keeping your new slat wall looking fresh is surprisingly simple. For regular upkeep, a quick pass with a microfiber cloth or the brush attachment on your vacuum is all you need to handle dust. If you notice any smudges or grime, you can use a slightly damp cloth with a drop of mild soap. Just be sure to test the soap on a small, hidden area first to make sure it doesn't affect the finish. When cleaning, always wring out the cloth well to avoid oversaturating the wood, which is especially important for natural wood finishes. For more durable options like our Interior WPC Fluted Slat Wall Panels, cleaning is even easier, but the gentle approach is always the best way to preserve the look of your wall for years to come.
Related Articles
- Wood Slat Accent Wall: Your Ultimate Guide
- Exterior Fluted Slat Wall Panel, Brown Walnut | USA Builders Depot
Frequently Asked Questions
Is building a slat wall a good project for a beginner? Absolutely. If you're comfortable using a saw and a level, you can definitely tackle this. The key to success isn't advanced skill, but patience and careful planning. Take your time with the measurements and make sure your first slat is perfectly straight—it will guide the rest of your wall. The process is repetitive but very rewarding.
How long should I set aside for this project? For a typical accent wall, a weekend is a realistic timeframe. You can spend the first day gathering your supplies, prepping the wall, and cutting and finishing your wood slats. The second day can be dedicated to the actual installation and adding those final touches. Spreading the work out like this keeps it from feeling overwhelming.
What's the difference between using individual slats versus pre-made panels? Building from scratch with individual slats gives you complete control over the wood type, stain, and spacing, which is great if you have a very specific vision. However, if you want to achieve a flawless look with less effort, pre-made wall panels are a fantastic option. The slats are already perfectly aligned and attached to a backing, which dramatically cuts down on installation time and ensures professional-looking, even gaps.
Can I install a slat wall on a surface that isn't drywall, like brick or plaster? Yes, you can, but the installation method is a bit different. For uneven or hard surfaces like brick, concrete, or old plaster, it's best to first attach vertical wood strips, called furring strips, to the wall. These strips create a flat and stable framework that you can then easily nail your slats onto, ensuring a secure and level finish.
Is it possible to hang a TV or heavy shelves on the slat wall once it's finished? Of course. The trick is to anchor heavy items to the wall studs, not just to the wood slats. When you're ready to mount something, use longer screws that can go through the slat and deep into the stud behind it. This ensures your TV or shelving is completely secure. For lightweight pictures or decor, attaching them directly to a slat is perfectly fine.