


How to Choose & Install a Wood Wall Panel
You know the feeling. Staring at a wall of pre-finished materials, trying to convince yourself that "close enough" is good enough. But you don't have to settle. An unfinished wood wall panel is your blank canvas, giving you complete creative control to become the designer of your space. It’s your opportunity to perfectly match existing trim, create a bold statement with a custom paint color, or apply a unique stain that highlights the wood’s natural character. This guide is for anyone who wants a truly bespoke look without the custom price tag.
Key Takeaways
- Embrace Total Creative Freedom: Unfinished panels are your blank canvas. You can stain them to match existing wood trim, paint them a specific color for a bold statement, or apply a clear coat to highlight their natural beauty, ensuring a truly custom result.
- Prioritize Prep for a Professional Finish: For a smooth, long-lasting installation, two steps are non-negotiable. First, let the wood panels acclimate to the room for at least 48 hours to prevent warping. Second, ensure your wall is clean, dry, and smooth before you begin.
- Use Panels as a Versatile Design Tool: Think beyond just covering a wall. Unfinished wood panels are perfect for creating high-impact features like a built-in headboard, adding texture to a ceiling, or constructing a stylish room divider in an open-concept space.
What Are Unfinished Wood Wall Panels?
So, what exactly are unfinished wood wall panels? Think of them as a blank canvas for your walls, giving you complete creative freedom. These panels are made from real wood and arrive in their natural, untreated state, ready for you to bring your design vision to life. This is their biggest superpower: total customization. You get to choose the exact paint color, stain, or protective oil that perfectly matches your room’s aesthetic, whether you’re aiming for a warm, rustic vibe or a sleek, minimalist look.
Unlike pre-finished options that lock you into a factory-applied color, Unfinished Wood Wall Panels put you in the driver's seat. This flexibility makes them a fantastic choice for designers, contractors, and homeowners who want a truly unique space. They come in various forms, from modern fluted slats to classic shiplap, allowing you to add texture and dimension to any room. By starting with an unfinished product, you ensure that the final result is a perfect reflection of your personal style, not just an off-the-shelf solution. It’s your chance to create a feature wall, headboard, or ceiling detail that is truly one-of-a-kind.
Unfinished vs. Finished: What's the Difference?
The main difference is simple: one is a blank slate, and the other is ready to go right out of the box. Unfinished panels give you the freedom to customize. You can stain them to bring out the natural wood grain, paint them a bold color to make a statement, or apply a clear sealant to maintain their raw beauty. This is perfect if you need to match existing wood trim or want a very specific shade. Finished panels, on the other hand, arrive with their color and protective coat already applied. While convenient, your creative options are limited to what the manufacturer offers.
Common Pre-Finished Colors and Styles
When you browse pre-finished panels, you’ll typically find a lineup of popular, go-to options designed to appeal to a broad audience. Colors often stick to the classics: crisp whites, modern blacks, and a range of neutral grays and browns. Wood finishes usually replicate the look of common species like warm oak, light pine, or rich walnut. The same goes for the design itself; you'll see a lot of popular styles like rustic shiplap, traditional beadboard, or simple V-groove planks. While these choices are beautiful and convenient, they represent a curated selection. If your project requires a very specific shade of sage green or you want to match an existing, less common wood grain, you might find the pre-finished world a bit restrictive.
Why You'll Love Unfinished Wood Panels
Beyond their custom-ready surface, unfinished wood panels have several great features. They are typically crafted from real wood veneers on a stable core, like high-density fiberboard, which makes them durable yet relatively lightweight and easy to handle during installation. This construction also helps prevent warping. The biggest benefit is the ability to completely transform a room and enhance its aesthetic appeal. Adding the natural texture and warmth of wood can make a space feel more inviting and sophisticated. This kind of high-impact architectural detail not only looks great but can also add tangible value to your home, making it a smart and stylish investment.
Why Choose Unfinished Wood Panels for Your Project?
Opting for unfinished wood panels opens up a world of possibilities that pre-finished options just can't match. While the idea of finishing them yourself might seem like extra work, the benefits in customization, cost, and performance are well worth it. Whether you're a homeowner aiming for a specific look or a contractor needing to meet precise client demands, unfinished panels provide a versatile foundation for incredible design. They put you in the driver's seat, allowing you to create a space that is truly your own, from the exact shade of paint to the subtle sheen of the final protective coat. Let's explore the key advantages that make unfinished wood a smart and stylish choice for any renovation or building project.
Enjoy Complete Creative Freedom
The number one reason to choose unfinished wood panels is the complete creative freedom they offer. Unlike pre-finished products that lock you into a specific color or stain, an unfinished surface is a blank canvas. You can paint, stain, or seal it to perfectly match your room's existing trim, furniture, or overall color palette. This gives you the power to create a truly custom look, whether you’re aiming for a bold, painted accent wall or want to apply a unique stain that highlights the wood's natural grain. For designers and contractors, this flexibility is invaluable for bringing a client's vision to life without compromise. You can test different finishes on a sample piece before committing, ensuring the final result is exactly what you envisioned.
Get High-End Style on a Budget
Choosing unfinished wood wall panels is often a savvy move for your budget. Because these panels skip the factory finishing process, they typically come with a lower price tag than their finished counterparts. This initial savings can be significant, especially on larger projects, freeing up funds for other elements like lighting or flooring. By handling the finishing yourself, you control the cost of materials, whether you opt for a simple clear coat or a high-end designer paint. This approach allows you to achieve a high-end, custom look without the premium price, making it an excellent choice for anyone wanting to maximize their project's value. For trade professionals, these savings can translate into more competitive bids and happier clients.
Create a Quieter, Cozier Space
Beyond their visual appeal, wood panels offer a fantastic functional benefit: they can significantly improve a room's acoustics. Wood is a natural sound-absorbing material, and panels—especially slatted or fluted designs—are excellent at breaking up and dampening sound waves. This helps reduce echo and reverberation, creating a quieter, more comfortable, and less distracting environment. This makes them ideal for spaces like home offices where focus is key, media rooms that need balanced sound, or large, open-concept living areas that can feel cavernous and loud. By installing acoustic wall panels, you’re not just making a design statement; you’re making your space more serene and functional.
Improve Acoustics and Insulation
Wood panels do more than just look good; they fundamentally change how a room feels by offering practical perks in both sound and temperature control. As a natural sound-absorbing material, wood is fantastic for quieting a noisy space. Textured designs, like Acoustic Wall Panels with slats or flutes, are particularly effective at breaking up sound waves and reducing echo in rooms with high ceilings or hard floors, creating a more comfortable and less distracting environment. At the same time, wood adds a layer of natural insulation to your walls. This helps maintain a more stable temperature, making your space feel cozier in the winter and a bit cooler in the summer—a simple upgrade for year-round comfort.
Make an Eco-Friendly Design Choice
When sourced responsibly, wood is one of the most sustainable building materials available. It's a renewable resource that adds natural warmth and character to any space. By choosing unfinished panels, you can extend this eco-friendly approach by selecting low-VOC or zero-VOC paints, stains, and sealers. This minimizes the introduction of harmful chemicals into your home, contributing to better indoor air quality. Many manufacturers source their lumber from forests certified by organizations like the Forest Stewardship Council (FSC), ensuring that the wood comes from responsibly managed forests that support environmental and social well-being. This makes unfinished wood panels a choice you can feel good about, both for your home and for the planet.
Consider Material Safety and Fire Resistance
While you’re planning the perfect stain or paint color, it’s also smart to think about safety. Unfinished wood, in its natural state, is combustible, but that doesn't mean you have to compromise on your design. There are straightforward ways to make it a safer choice for your home or commercial project. For instance, many wood panels can be treated to significantly enhance their fire-resistance rating, making them much less of a risk. You can also explore using materials like fire-resistant plywood, which is engineered to perform better under heat exposure. Another effective approach is applying a clear fire-retardant coating after installation. By incorporating one of these safety measures, you can confidently enjoy the warmth and beauty of wood while ensuring your space has an added layer of protection.
Finding Your Perfect Unfinished Wood Panel
Once you’ve decided to go with unfinished panels, the fun part begins: choosing the right type for your space. This isn’t just about picking a color; it’s about selecting the raw material that will define the room’s character. The type of wood, the style of the panel, and its dimensions all play a huge role in the final outcome. For example, the clean, vertical lines of slat panels create a modern and sophisticated feel, while the overlapping edges of shiplap can give a room a cozy, rustic charm.
Think about the overall vibe you're aiming for. Are you designing a sleek, minimalist office or a warm, inviting living room? The wood species you choose will determine the natural grain and base color, which is especially important if you plan to stain it. The style—be it slat, shiplap, or simple plank—sets the pattern and texture of the wall. Finally, getting the sizing right ensures a smooth installation and a professional finish. Let’s walk through these key choices so you can find the perfect unfinished wood wall panels for your project.
Which Wood Species Is Right for You?
The type of wood you select is the foundation of your design. Each species has a unique grain pattern and natural tone that will influence the final look, especially if you’re using a stain. Oak, for instance, has a prominent, traditional grain, while maple is much finer and more subtle. Since you’re working with unfinished panels, you have the freedom to “paint, stain, or treat it yourself to match your style.” This means you can enhance the wood’s natural beauty with a clear coat, deepen its color with a rich stain, or completely transform it with a coat of paint. Consider how the base wood will interact with your chosen finish to create the exact look you envision.
Exploring Popular Wood Types: Oak, Walnut, Pine, and More
Let's look at a few popular choices you'll often find for unfinished panels. Oak is a classic for a reason. It’s known for its strength and a beautiful, prominent grain that brings a traditional, regal feel to a room. When you stain oak, that distinct pattern really stands out, creating a rich, textured look perfect for adding character. If you're aiming for something more luxurious and modern, walnut is a fantastic option. It has a finer, straighter grain and a naturally rich, dark color that feels sophisticated, making it a stunning choice for a feature wall in a dining room or office.
For a more budget-friendly and versatile choice, pine is a go-to. As one of the most accessible types of wood, it’s perfect for larger projects. Pine is lighter in color with a rustic, knotty character and takes paint exceptionally well, so it's a great canvas if you're planning a colorful accent wall. The best part about using unfinished panels is that you can take any of these woods and apply a finish that makes them completely your own, whether you want to highlight the natural grain or create a smooth, painted surface.
Pick Your Style: Slat, Shiplap, or Plank
Beyond the wood itself, the panel style defines the wall's texture and pattern. The three most common options each offer a distinct aesthetic. Slat panels feature narrow strips of wood, creating a contemporary, linear effect that adds depth and visual interest. They are perfect for modern accent walls or media centers. Shiplap panels have overlapping joints that create subtle horizontal lines, lending a classic, farmhouse, or coastal feel to a room. Plank styles offer a more traditional, seamless look that can be arranged in various patterns. Thinking about which style best complements your home’s architecture and your personal taste is a key step in the design process.
Discovering Other Panel Styles
While slat, shiplap, and plank are fantastic go-to options, the world of wall panels is full of other creative styles. If you're looking to make a truly unique statement, exploring different textures and materials can open up a new level of design. From panels that play with light and shadow to flexible options that wrap around curves, these alternatives can help you craft a space that feels anything but standard. Thinking outside the box can lead to a design that is not only beautiful but also highly functional. Let’s look at a few other styles that can add personality and function to your project.
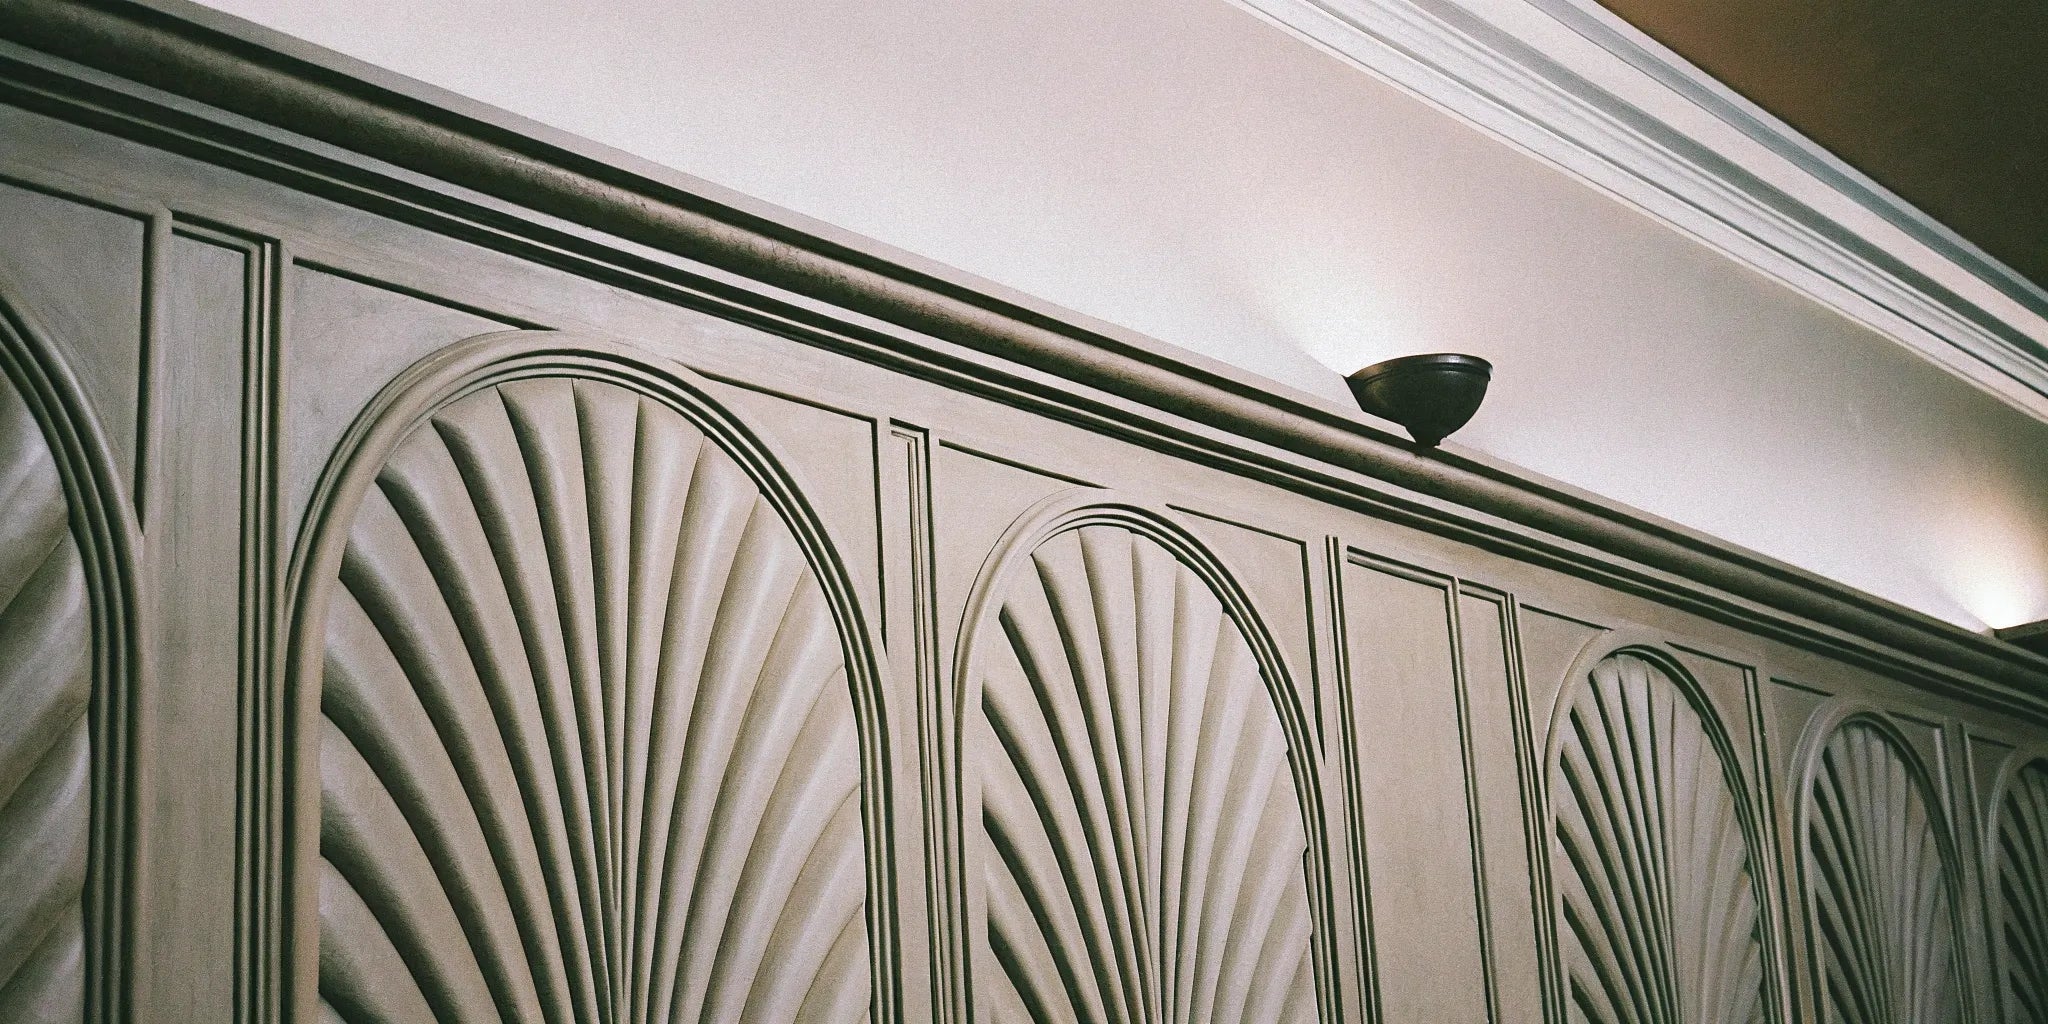
3D and Geometric Panels
If you want to turn a flat wall into a dynamic work of art, 3D and geometric panels are your answer. These panels feature raised patterns that create incredible texture, playing with light and shadow to add depth and movement to a room. They are perfect for creating a dramatic focal point behind a sofa, in an entryway, or as a headboard. Available in a wide range of designs, from subtle waves to bold geometric shapes, they allow you to express your creative side and give your space a modern, artistic feel. They are a fantastic way to add architectural interest without a major structural overhaul.
Flexible Tambour Panels
Have a curved wall, a rounded kitchen island, or a custom furniture piece you want to wrap in wood? Flexible tambour panels are designed for exactly that. Featuring a flexible backing with thin, ribbed wood slats, these panels can conform to concave or convex surfaces where rigid panels can't go. This versatility makes them a favorite among designers for creative installations. Tambour adds a sophisticated, linear texture that works well in both contemporary and mid-century modern designs, offering a seamless and high-end finish for challenging architectural features.
Rustic Barnwood and Mosaic Panels
To bring warmth, history, and character into a space, consider rustic barnwood or mosaic panels. Rustic panels, often made to look like reclaimed barnwood, introduce a cozy, vintage charm that’s perfect for creating a feature wall in a living room or dining area. Wood mosaic panels take this a step further by arranging small pieces of wood into unique patterns, creating a stunning, textured effect that adds visual interest and depth. Both styles are excellent for adding a touch of handcrafted artistry to your home.
Alternative Materials: MDF and Cork
While wood is a classic choice, other materials offer unique benefits. Medium-Density Fiberboard (MDF) panels provide a durable and incredibly smooth surface, making them an ideal alternative if you plan to paint. They come in styles like beaded or v-groove and offer a crisp, clean look without any wood grain. On the other hand, cork panels are an eco-friendly option known for their excellent sound-absorbing qualities. They are a great choice for home offices, music rooms, or anywhere you want to improve acoustics while adding a soft, natural texture to the walls.
How to Choose the Right Panel Size and Thickness
Before you place an order, you need to do some math. Carefully measure the height and width of your wall to calculate the total square footage you need to cover. Pay close attention to the product specifications, as panel dimensions can vary. For example, some panels might be a standard 1/4 inch thick, while coverage can differ—a box of 94-inch panels might cover 12 square feet, while a box of 106-inch panels covers more. Always order about 10% extra material to account for cuts and mistakes. Getting the measurements right from the start saves you from last-minute material runs and ensures you have everything you need for a seamless installation.
How to Finish Your Wood Panels
This is where your creativity really comes into play. Finishing your unfinished wood wall panels is your chance to customize their look completely while adding a crucial layer of protection. Whether you want to showcase the wood’s natural character or match a specific color palette, the right finish makes all the difference. The process is straightforward, and your main choices are staining, painting, or using a clear sealer. Each option offers a distinct aesthetic and level of durability, so you can get the exact result your project needs.
Think of the unfinished panel as a blank canvas. You get to decide if you want a rich, warm stain that highlights every unique grain pattern, a bold coat of paint that makes a statement, or a simple clear coat that lets the wood’s natural beauty speak for itself. Before you decide, consider the room's function and existing decor. A high-traffic hallway might benefit from a durable semi-gloss paint, while a cozy bedroom accent wall could look stunning with a warm, matte stain. This step is not just about looks; it’s also about sealing the wood to protect it from moisture, dust, and daily life, ensuring your new walls stay beautiful for years to come. Let’s walk through how to choose the perfect finish for your project.
Staining to Let the Natural Grain Shine
If you love the unique lines and knots in your wood panels, staining is the way to go. Unlike paint, which covers the surface, a stain soaks into the wood to add color while allowing the natural grain to remain the star of the show. Stains can add incredible depth and richness, making the wood look warmer and more dynamic. You can find stains in a wide range of colors, from light, natural tones to deep, dramatic shades. Before you commit, always test your stain on a scrap piece of paneling or a hidden spot to make sure you love the color. This simple step prevents any surprises and ensures the final result is exactly what you envisioned.
Painting for a Bold, Custom Look
When you need a specific color or want a smooth, uniform finish, painting is your best option. Painting gives you complete creative control, allowing you to match your wall panels to your trim, furniture, or overall design scheme. It’s perfect for creating a clean, modern look, a cozy shiplap-style cottage feel, or a bold accent wall. To get a professional-looking result, start with a quality primer designed for wood. This will prevent the grain from bleeding through and help the paint adhere smoothly for a durable, even coat. Don’t skip the primer—it’s the key to a long-lasting finish that won’t chip or peel over time.
Sealing Your Panels for Lasting Protection
Whether you stain your panels or leave them in their natural state, a protective topcoat is essential. Clear finishes like polyurethane, varnish, or lacquer create a durable barrier on the surface that shields the wood from moisture, scratches, and everyday wear. These sealers don’t just protect; they also enhance the wood’s appearance by adding a subtle sheen. Alternatively, penetrating oils like tung or linseed oil soak into the wood for a more natural, matte finish that you can feel. A good sealer is your best defense against damage and will keep your wood panels looking beautiful for years, so be sure to apply it as the final step in your finishing process.
How to Pick the Perfect Sheen
The final touch for your finish is choosing the sheen, which determines how much light the surface reflects. A satin or matte finish has very little shine, which is great for hiding minor imperfections and creating a soft, contemporary look. A semi-gloss finish offers a noticeable sheen and is more durable and easier to clean, making it a practical choice for high-traffic areas or kitchens. High-gloss finishes are the most reflective and durable, but they also highlight every tiny flaw in the surface. Your choice of sheen is a balance between the aesthetic you want and the durability you need. Think about the room's lighting and use when making your final decision.
How to Install Unfinished Wood Panels
Installing your own wood paneling is a totally achievable project that adds incredible warmth and texture to a room. With the right preparation and a clear plan, you can create a professional-looking feature wall in a weekend. The key is to break it down into manageable steps: prepping your space, gathering your supplies, following a methodical installation process, and knowing how to handle any small hiccups along the way. Let’s walk through exactly how to get it done.
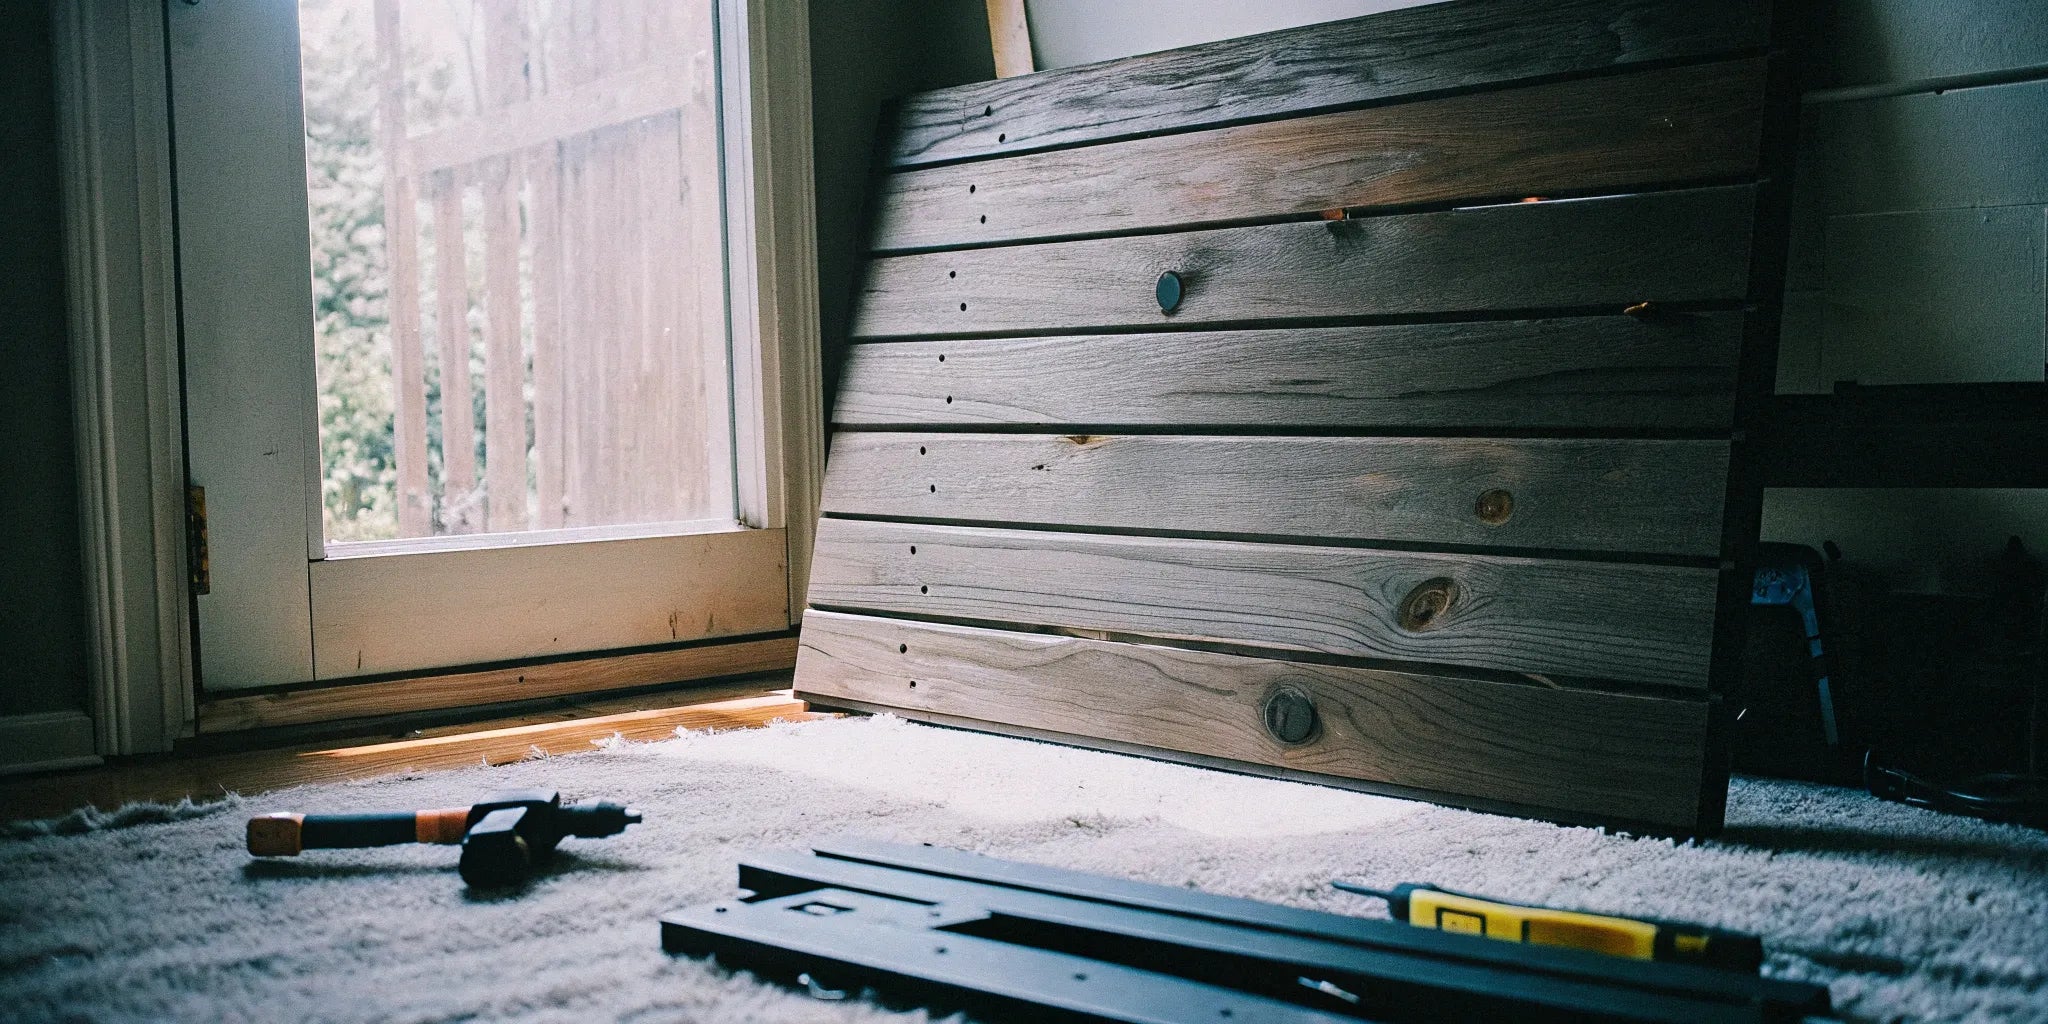
First Things First: Prepping Your Walls and Wood
Before you even think about picking up a nail gun, two prep steps are non-negotiable: acclimating your wood and preparing your walls. Wood is a natural material that expands and contracts with changes in humidity and temperature. To prevent future warping or gapping, you need to let your unfinished wood wall panels acclimate to the room where they’ll be installed for at least 48–72 hours. Just lay them flat and let them breathe.
While your panels are acclimating, get your wall ready. The goal is a clean, smooth, and dry surface so the panels can lie perfectly flat. Fill any holes or cracks with spackle, sand down any bumps, and wipe the wall clean of all dust. Finally, use a stud finder to locate and mark the vertical studs behind your drywall. This is crucial for ensuring your panels are securely attached to the wall’s frame.
Your Tool and Material Checklist
Having everything you need on hand before you start makes the installation process go much more smoothly. You don’t want to be running to the hardware store mid-project. Here’s a quick checklist of what you’ll need:
- Measuring & Marking: Tape measure, level, pencil, and a stud finder.
- Cutting: A miter saw or circular saw for straight cuts and a jigsaw for cutting around outlets or windows.
- Installation: A nail gun with finishing nails (or a hammer and nails), and a caulk gun for the adhesive.
- Materials: Your wood panels, high-quality construction adhesive, wood filler for nail holes, and fine-grit sandpaper.
Gathering these items will set you up for a successful and stress-free installation.
Standard vs. DIY-Friendly Installation Methods
When it comes to installing your panels, you have two main paths: the traditional method or a more modern, DIY-friendly approach. The standard technique, favored by professionals, involves applying a bead of construction adhesive to the back of the panel and then securing it to the wall with a nail gun. This creates an incredibly strong, permanent bond, ensuring your panels stay put for good. According to experts, you can nail paneling sheets directly onto the wall studs for maximum stability. While this method is the most durable, it does require more tools and a bit more confidence. Your choice ultimately depends on how permanent you want the installation to be and your comfort level with the tools involved.
Peel-and-Stick and Self-Adhesive Options
For those looking for a simpler project without the need for a nail gun or messy glue, peel-and-stick panels are a fantastic alternative. These panels come with a pre-applied adhesive backing, so installation is as simple as peeling off the protective film and pressing the panel firmly onto your prepared wall. This method is a game-changer for renters or anyone who wants a high-impact look without a long-term commitment. It’s also a much faster and cleaner process. However, don't mistake "easy" for "no-prep." For the adhesive to work correctly, you still need to follow essential steps like proper surface prep and acclimation to ensure your panels stick securely and look great for years to come.
Installing Your Wood Wall Panels, Step by Step
With your prep work done and tools ready, it’s time for the fun part. Follow these steps for a seamless installation:
- Plan Your Layout: Start from one corner or find the center of the wall for a symmetrical look. Measure the wall and plan where your first and last panels will go.
- Make Your Cuts: Measure and cut your first panel to size. Remember the classic rule: measure twice, cut once.
- Apply Adhesive: Apply construction adhesive to the back of the panel in an “S” shape. This ensures even coverage.
- Place and Secure: Press the panel firmly onto the wall, using your level to make sure it’s perfectly straight. Secure it by driving finishing nails through the panel and into the wall studs you marked earlier.
- Repeat the Process: Continue installing panels, making sure each one fits snugly against the last.
- Finishing Touches: Once all panels are installed, fill the nail holes with a dab of wood filler. After it dries, lightly sand it for a smooth, invisible finish.
Solving Common Installation Problems
Even with careful planning, you might run into a few small challenges. Don’t worry—most are easy to fix. If you notice uneven gaps between boards, your wall may not be perfectly square. Using a level on every single panel is the best way to prevent this. If a panel isn’t sticking firmly, you may need more adhesive or you might have forgotten to nail it into a stud.
The most common issue, warping, is almost always caused by skipping the acclimation step. If you notice slight bowing after installation, it’s likely due to the wood adjusting to the room’s climate. This is why giving your panels a few days to acclimate is so important. You can also leave a tiny expansion gap (about the width of a nickel) around the perimeter of the wall, which will be covered by trim, to give the wood room to move.
Creative Ideas for Your Unfinished Wood Panels
Unfinished wood panels offer a blank canvas for so much more than just a standard wall covering. Their versatility allows you to craft unique architectural features that reflect your personal style and add character to any room. Whether you’re a homeowner looking for a weekend project or a contractor planning a custom build, these panels provide an affordable and high-impact material. From creating a cozy bedroom retreat to adding functional art to a living space, the possibilities are endless. Let’s explore a few creative projects that go beyond the basics and turn simple panels into standout design elements.
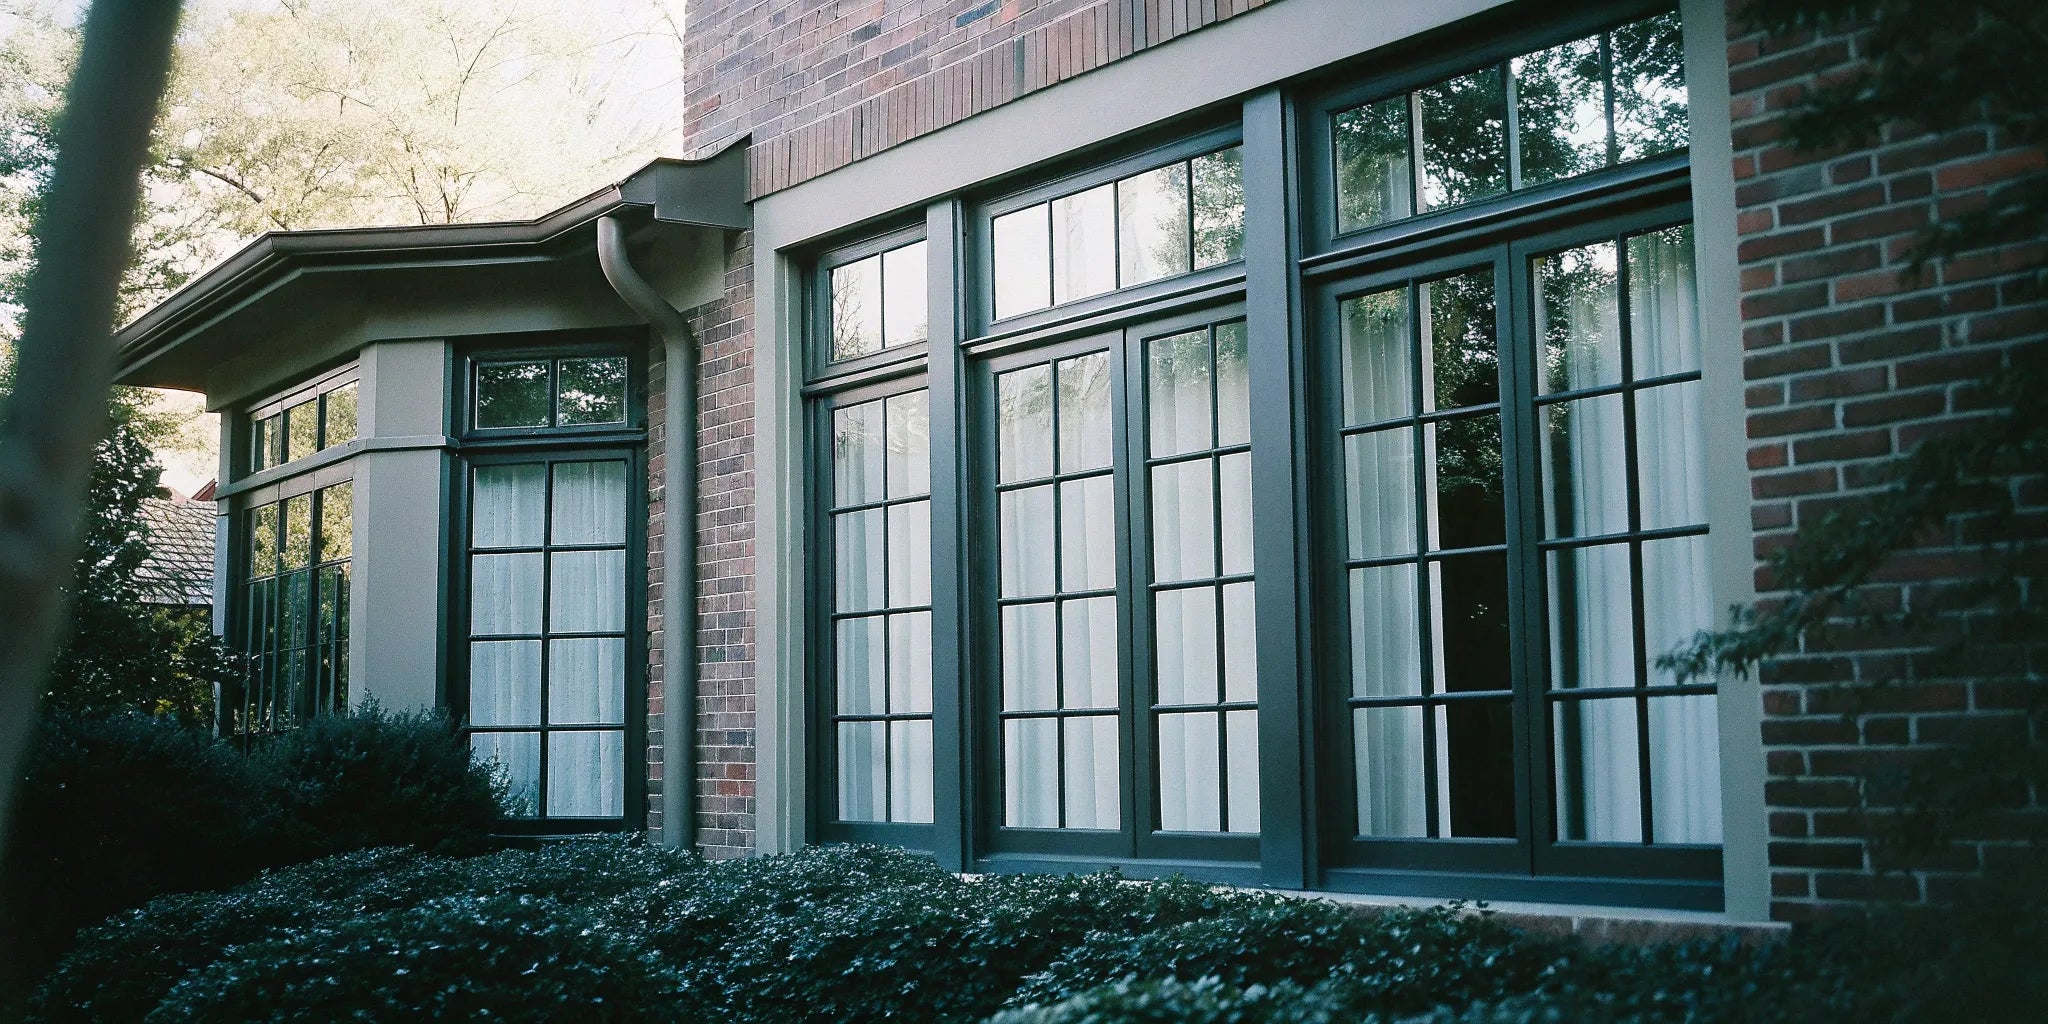
Create a Striking Accent Wall or Headboard
Wood paneling is officially back, and it’s more stylish than ever. Creating an accent wall is one of the most popular ways to use Unfinished Wood Wall Panels, and for good reason. It instantly adds warmth, texture, and a natural focal point to a room without overwhelming the space. You can install panels behind a sofa in the living room or on the main wall in a dining area to define the space. In the bedroom, a floor-to-ceiling wood panel installation behind the bed creates a stunning, built-in headboard effect. This type of interior wood cladding not only looks beautiful but also adds a layer of durability to your walls.
Think Beyond Walls: Ceilings and Room Dividers
In open-concept homes, creating distinct zones can be a challenge. Unfinished wood panels are a perfect solution for building stylish room dividers. Because the panels are lightweight and designed for easy installation, you can construct a partial wall that separates a living area from a home office without blocking light or flow. Vertical slat panels work especially well for this, offering visual separation while maintaining an open feel. Don’t forget to look up! Applying wood panels to a ceiling adds unexpected architectural interest, drawing the eye upward and making a room feel cozier and more thoughtfully designed. It’s a fantastic way to cover up old popcorn ceilings or simply add a touch of drama.
Integrate Functional DIY Shelving
Why settle for generic, store-bought shelves when you can create something truly custom? Unfinished wood panels are an excellent material for building your own integrated shelving. You can design a recessed wall niche lined with wood panels and add floating shelves for a clean, modern look. This approach turns a simple storage solution into a beautiful display feature. For contractors and designers, offering these custom shelving solutions can be a great way to add value for a client. It’s a functional upgrade that feels high-end and can even help increase a home’s resale value by adding unique, built-in character.
More Applications for Home and Business
The versatility of unfinished wood panels extends far beyond a single accent wall. They are a flexible design tool that can be adapted for a wide range of applications in both residential and commercial settings. From adding classic architectural details to creating a specific mood in a business, these panels can solve various design challenges. Their ability to be finished in any style makes them a go-to material for creating cohesive and custom environments. Let’s look at a few more ways you can use them to add character and function to different spaces, whether it's your home, office, or restaurant.
Wainscoting and Kitchen Backsplashes
Give a classic design element a modern update by using wood panels for wainscoting. Installing panels on the lower portion of a wall adds timeless character and protects it from scuffs and marks, making it perfect for hallways and dining rooms. You can also use them in unexpected places, like a kitchen backsplash. The natural warmth of wood creates a stunning contrast against sleek, modern appliances and stone countertops, preventing the space from feeling too cold or clinical. By choosing Paint and Stain Grade Panels, you can seal them to withstand moisture and customize the finish to perfectly complement your cabinetry and color scheme.
Commercial Spaces: Offices, Restaurants, and Hotels
Wood panels are a fantastic tool for shaping the atmosphere in commercial spaces. In an office, they can create a warm and inviting environment that feels less corporate and more comfortable, which can help with employee focus and well-being. For restaurants and cafes, wood panels can establish a specific ambiance, whether it’s a rustic farmhouse vibe or an upscale, sophisticated mood. Hotels can use them in lobbies and guest rooms to add a touch of luxury. Beyond aesthetics, many Acoustic Wall Panels are designed to absorb sound, making them a practical choice for reducing noise in busy environments and creating a more pleasant experience for customers and staff.
Exterior Applications with Treated Panels
You can even take the beauty of wood panels outside, as long as you use the right materials. Certain panels, like Exterior Shiplap Cladding, are specifically designed to handle the elements. When properly treated and sealed, these exterior-grade panels can be used to create a beautiful, modern facade that adds incredible curb appeal. They are also perfect for enhancing outdoor living spaces, such as covered patios, outdoor kitchens, or entryways. Using wood on the exterior helps connect the home to its natural surroundings and can create a seamless design flow from the inside out, making your entire property feel more cohesive and thoughtfully designed.
How to Care for Your New Wood Wall Panels
Your beautiful unfinished wood wall panels are an investment in your home’s style and character. With the right care, they’ll look incredible for years to come. The good news is that maintaining them is straightforward. It all starts with proper preparation before you even install them and continues with simple, consistent cleaning routines. Protecting your panels from the elements—both inside and out—is the final piece of the puzzle. By following a few key steps, you can ensure your wood panels remain a stunning feature in your space, adding warmth and texture that you’ll love seeing every day. A little effort goes a long way in preserving the natural beauty of the wood and keeping it looking its best.
Maintaining Your Finish for Lasting Beauty
A beautiful finish starts with a solid foundation. Before you even think about staining or sealing, it’s essential to ensure your wall surface is smooth and clean. To get your wood panels to lie flat against the wall, the surface needs to be prepared properly to avoid any unevenness. Once your wall is ready, you can turn your attention to the panels themselves. Applying a finish isn’t just about looks; it’s your first line of defense against damage. Clear finishes like varnish or polyurethane are great for preserving the wood's natural color and grain. If you want to add richness and depth, a quality wood stain can completely transform the appearance of the panels.
Easy Cleaning and Maintenance Tips
Once your panels are installed and finished, keeping them clean is simple. The key is consistency. For routine upkeep, regular dusting with a microfiber cloth is usually all you need to prevent buildup. For a slightly deeper clean, you can use a soft cloth dampened with a mild detergent solution to gently wipe down the surface. This will help maintain the appearance of your wood panels without damaging the finish. Always avoid harsh chemical cleaners or abrasive sponges, as these can strip the sealant and scratch the wood. A gentle approach is always best for preserving the integrity and beauty of your panels for the long haul.
Guarding Against Moisture and Wear and Tear
Wood’s biggest enemy is moisture. Fluctuating humidity can cause panels to expand and contract, so ignoring expansion gaps during installation can lead to warping and damage over time. This is especially important in rooms like bathrooms or basements. A quality sealant provides a crucial barrier against moisture. Beyond humidity, be mindful of everyday wear and tear. Arrange furniture to avoid direct contact with the panels, and be careful when moving items that could cause scratches or dents. Proper installation and care ensure your panels look professional and polished. If it's not installed perfectly, it can make the home look unfinished and messy, which is why taking your time with the project is so important.
Pro Tips for Long-Term Durability
The secret to long-lasting wood panels is a high-quality finish. Think of it as armor for your walls. Whether you choose a stain or paint, the final protective topcoat is what will stand up to daily life. Revisit your finish every few years to check for signs of wear, especially in high-traffic areas. If you notice the sheen has dulled or the surface looks dry, it might be time for a light sanding and a fresh coat of sealer. This simple maintenance step can prevent moisture from seeping in and keep your wood panels looking vibrant and new, ensuring they remain a beautiful feature in your home for years to come.
Protecting Panels from Sunlight
Just like our skin, wood can be damaged by prolonged exposure to the sun. Direct sunlight contains UV rays that can cause the color of your wood panels to fade or become uneven over time. To prevent this, consider applying a topcoat with built-in UV protection when you first finish your panels. For walls that get a lot of direct sun, using window treatments like blinds or curtains during the brightest parts of the day can make a huge difference. This simple step helps preserve the rich color of your stain or paint, ensuring your accent wall remains the stunning focal point you designed it to be.
Preventing Scratches and Dents
Your best defense against everyday wear and tear is being mindful of the space around your newly paneled walls. When arranging your room, try to leave a small gap between furniture and the wall to prevent accidental scuffs and dents. For items that might get bumped against the wall, like the back of a dining chair, adding small felt pads can provide a soft buffer. When it comes to cleaning, always use a soft microfiber cloth for dusting. This prevents tiny particles of dirt from causing micro-scratches, keeping your finish smooth and pristine for the long haul.
Where to Buy Unfinished Wood Panels
Once you’ve decided that unfinished wood panels are the right choice for your project, the next step is finding the right place to buy them. Sourcing high-quality materials from a reliable company is just as important as the installation itself. It sets your project up for success from the very beginning and ensures the final result is something you can be proud of for years to come. Let’s walk through what to look for in both the panels and the supplier, so you can feel confident in your purchase.
What to Look for When Buying Wood Panels
The best unfinished wood panels are a perfect blank canvas, but not all are created equal. You’ll want to look for products made from a real wood veneer on a stable core, which gives you an authentic look and a durable base that’s ready for your creative touch. High-quality panels should be expertly crafted, with clean lines and consistent sizing that makes installation straightforward. The surface should be smooth and prepared to accept any paint, stain, or sealer evenly. When you invest in well-made wall panels, you’re not just buying a material; you’re buying the foundation for a beautiful, long-lasting feature in your home or commercial space.
Assessing Craftsmanship and Material Sourcing
Beyond the type of wood, pay attention to the overall craftsmanship. High-quality panels will have clean, precise lines and consistent dimensions, which makes a huge difference during installation. A smooth, well-prepared surface is also key, as it ensures your paint or stain will go on evenly for a professional finish. It’s also smart to consider where the materials come from. Wood is a fantastic renewable resource, but it’s important to choose products from suppliers who prioritize responsible sourcing. Look for companies that are transparent about their materials, as this often points to better quality and a commitment to sustainability. Sourcing from a trusted supplier ensures you get expertly crafted unfinished wood panels that not only look great but are also made to last.
How to Find a Trusted Wood Panel Supplier
A reliable supplier does more than just sell you a product—they make your entire project easier. Look for a company with a strong reputation for quality and customer service, backed by positive reviews. A great supplier offers a wide selection of styles, from fluted slats to shiplap, ensuring you can find the perfect match for your vision. Fast, nationwide shipping is another critical factor, as it keeps your project on schedule without frustrating delays. For contractors and designers, finding a supplier with a dedicated trade program can provide valuable discounts and support for larger projects, making them a true partner in your business.
Understanding Panel Pricing to Get the Best Value
While budget is always a consideration, the cheapest option isn't always the best value. Pricing for wood panels is often calculated per square foot, so be sure to measure your space accurately to get a clear cost estimate. True value comes from a combination of a fair price, high-quality materials, and dependable service. Investing in a durable, well-made panel from the start saves you from the potential costs and headaches of repairs or replacements down the road. Look for suppliers who offer transparent pricing and potential discounts on bulk orders, ensuring you get a premium product that fits your budget without compromising on quality.
Typical Cost Per Square Foot
When you're budgeting for your project, it helps to think in terms of square footage. Generally, you can expect unfinished wood panels to cost between $10 and $20 per square foot. The final price depends on factors like the wood species, the complexity of the design—for example, intricate fluted panels might cost more than simple planks—and the thickness of the material. While this is an investment, remember that you're paying for a high-quality, customizable material that adds significant architectural character. By choosing unfinished panels, you often save money compared to pre-finished options, giving you more room in your budget for the perfect paint or stain to complete your vision.
Understanding How Panels Are Packaged and Sold
Wood wall panels are typically sold in boxes, not as individual pieces. The price per box can range from around $119 to over $400, depending on the style and material. The most important detail to check is how many square feet each box covers. This information is always listed in the product description and is key to ordering the right amount. Before you buy, calculate the total square footage of your wall, then divide that number by the coverage per box to determine how many boxes you need. And don't forget the golden rule of DIY: always order about 10% extra to account for any mis-cuts or mistakes.