
How Much WPC Cladding Do I Need? A Coverage, Waste & Trim Guide

Ordering exterior cladding sounds simple:
Measure the wall. Calculate the square footage. Divide by the panel coverage.
That works as a starting point. It is not always enough for an accurate order.
Exterior WPC cladding projects also involve windows and doors, gables, inside and outside corners, panel orientation, cut waste, end conditions, starter and termination details, matching trims, clips and fasteners, full-box quantities, and future repair material.
A wall with 500 square feet of net surface area can therefore require a different material quantity from another 500-square-foot wall if the layouts are different.
This guide explains how to build a more reliable WPC cladding takeoff before ordering.
The Basic WPC Cladding Formula
Total wall area − major openings = net cladding area
Then:
Net cladding area + project-specific waste allowance = adjusted material area
Finally:
Adjusted material area ÷ usable coverage per panel = estimated panel quantity
Always round the final panel quantity up, not down.
Step 1: Measure Every Wall Separately
Do not begin by estimating the entire house as one number.
Measure each elevation individually.
For every rectangular wall section:
Wall width × wall height = wall area
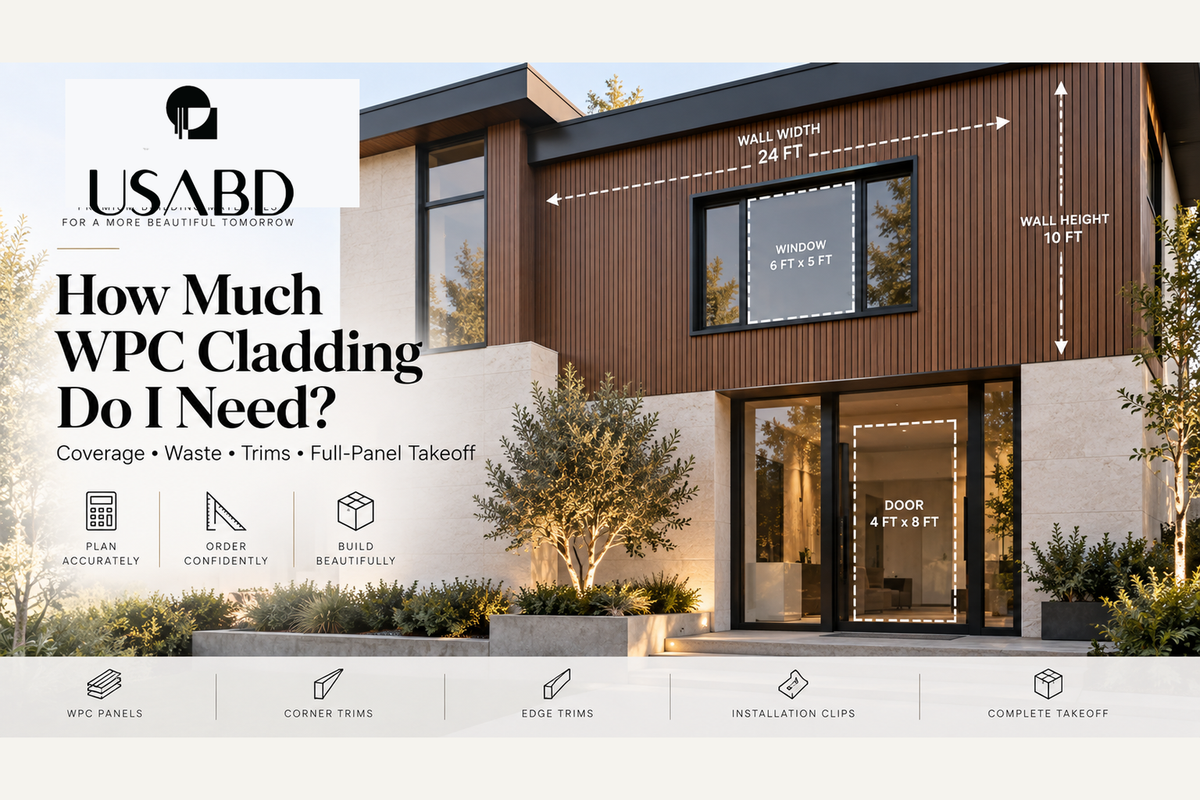
For example, a wall that measures 24 ft wide × 10 ft high has 240 sq ft of gross wall area.
If the project has four elevations, calculate all four separately before adding them together.
Keeping each wall separate helps later when you evaluate vertical versus horizontal panel layout, cuts, corners, openings, board lengths, different finishes, and accent sections.
Step 2: Break Complex Elevations Into Simple Shapes
Many façades are not perfect rectangles.
You may have bump-outs, recessed entries, garage projections, parapets, columns, dormers, gables, or stepped rooflines.
Rather than trying to calculate the entire elevation at once, divide it into rectangles and triangles.
Calculate each shape separately, then add the areas together.
Step 3: Calculate Gable Area Separately
For a triangular gable:
Base × height ÷ 2 = gable area
For example, a gable that is 20 ft wide × 6 ft high has 60 sq ft of area.
Gables often create more offcuts than simple walls, so keep them identified as separate sections in the takeoff.
Step 4: Measure Windows and Doors
Large openings can usually be deducted from the gross wall area.
For each opening:
Width × height = opening area
Example: a 6 ft × 8 ft door equals 48 sq ft. A 4 ft × 5 ft window equals 20 sq ft.
If there are three identical windows, 20 × 3 = 60 sq ft.
The combined area of those openings can then be deducted from the wall.
Openings Reduce Area but Increase Cutting
A wall with multiple windows may have less surface area to cover, but more cuts to make.
That means windows and doors affect the estimate in two opposite ways: they reduce net wall area, but they can increase cutting waste and trim requirements.
The more interrupted the wall becomes, the more carefully the layout should be planned.
Do You Need to Subtract Every Small Opening?
Not necessarily.
Very small vents, electrical penetrations, lights or similar details may create more cutting waste than material savings.
For estimating purposes, project teams sometimes leave small penetrations inside the calculated wall area rather than deducting them individually.
Step 5: Use Usable Coverage, Not Just the Nominal Panel Size
This is one of the most important points in a cladding takeoff.
A product may have a listed physical width. That does not necessarily mean the entire physical width becomes exposed wall coverage.
Some panel systems overlap, interlock, engage into clips, use hidden connection zones, have tongues or grooves, or require spacing between pieces.
The correct calculation should use the usable or installed coverage dimension for the exact selected panel.
USABD Exterior WPC Profiles
USA Builders Depot offers exterior WPC cladding in multiple profiles, including exterior shiplap-style panels, exterior fluted slat panels, matching edge trims, matching corner trims, installation clips, and spacer clips.
The physical panel dimensions differ between profiles.
Physical dimensions should not automatically be treated as usable coverage. Confirm the installed coverage for the exact SKU before calculating the final quantity.
Step 6: Decide Panel Direction Before Finalizing the Order
WPC cladding can create very different layouts depending on whether it is installed vertically or horizontally where the selected product and installation system permit either orientation.
Orientation affects the number of full-length runs, joint locations, offcuts, trim, furring or substructure, and layout around openings.
Vertical WPC Cladding Calculation
For a simple vertical layout, first determine how many panel widths are required across the wall:
Wall width ÷ usable panel coverage width
Round up to the next whole panel.
Then verify whether one panel length reaches the required wall height.
Horizontal WPC Cladding Calculation
For horizontal installation, think in courses.
First calculate:
Wall height ÷ usable installed panel height = number of courses
Then determine how many full-length panels are needed across each course.
Square Footage vs. Piece-by-Piece Layout
For a large, simple wall, a square-footage estimate can get you close.
For walls with many openings, short returns, narrow sections, tall gables, multiple corners, mixed panel directions, or decorative transitions, a piece-by-piece elevation takeoff is usually more reliable.
The best workflow is:
square footage first → panel layout second → final order third
Step 7: Add a Project-Specific Waste Allowance
Every cladding project produces some offcuts, but there is no single waste percentage that is automatically correct for every WPC project.
Waste depends on the layout.
Factors that can increase waste include multiple windows, multiple doors, gables, angled walls, narrow returns, many corners, mixed panel directions, decorative breaks, short wall sections, limited ability to reuse offcuts, and selective color or grain placement.
Worked Example
Imagine an exterior project with these gross wall areas:
Front elevation: 320 sq ft
Rear elevation: 280 sq ft
Left elevation: 240 sq ft
Right elevation: 240 sq ft
Total gross wall area: 1,080 sq ft
Suppose all doors and windows total 180 sq ft.
Net cladding area:
1,080 − 180 = 900 sq ft
The project team then reviews the drawings and determines an appropriate project-specific allowance based on window cuts, corners, panel direction, offcut reuse, and gable conditions.
If, purely as an example, the estimator elects to carry a 10% allowance:
900 × 1.10 = 990 sq ft
That 990 sq ft is still not the final panel count.
The final step is to divide by the usable installed coverage of the exact selected product, then round up to complete panels and complete packages.
The 10% in this example is an illustration of the math, not a universal recommendation.
Step 8: Round Up to Full Panels
WPC panels are not normally purchased as fractions of a board.
If the calculation produces 83.2 panels, you need at least 84 full panels before considering packaging rules.
Step 9: Check Box Quantities
The mathematical panel count may still not equal the order quantity.
Some exterior WPC products are sold only in complete boxes.
Always verify pieces per box, minimum order, and allowed quantity increments on the current product page before checkout.
Step 10: Calculate Trims Separately
Panels are usually estimated in square feet or pieces.
Trims are usually estimated in linear feet or full trim lengths.
Potential WPC cladding accessories may include outside-corner trim, inside-corner trim, edge trim, L-trim, starter profiles, termination profiles, and opening trims.
Outside Corners
Measure the vertical height of every outside corner that needs a finishing profile.
Example: four 10-foot outside corners equal 40 linear ft.
Now compare that requirement with the available trim length.
Inside Corners
Repeat the same process for inside corners where the selected system requires a matching inside-corner detail.
Inside and outside corner profiles may not be interchangeable.
Window and Door Perimeters
Some systems use dedicated trims around openings.
If trim is needed around all four sides of a rectangular opening:
2 × width + 2 × height = perimeter
For example, a 4 ft × 5 ft window has 18 linear ft of perimeter.
Edge Trims
An exposed panel termination may need an edge trim at the end of an accent wall, transition to stucco, transition to stone, edge beside a doorway, or another approved termination point.
Step 11: Calculate Clips and Fasteners From the System Requirements
Clips should not be estimated from panel area alone unless the selected installation documentation provides a coverage rule.
Clip quantity can depend on support spacing, furring layout, panel length, panel orientation, wall height, and start and end conditions.
Step 12: Account for the Substructure
The cladding panel quantity is only one part of the exterior wall system.
Depending on the wall assembly, the project may also need furring, battens, approved fasteners, WRB integration, flashing, insect or ventilation details, starter support, and structural attachment.
Step 13: Do Not Forget Returns
A common estimating mistake is measuring only the primary front-facing surface.
Look for returns around entry recesses, columns, garage openings, bump-outs, window recesses, short side walls, and parapets.
Step 14: Decide How You Will Handle Offcuts
A good takeoff asks: Can this cut piece actually be reused?
Whether an offcut can be reused depends on required length, profile orientation, visible end, tongue/groove or interlocking geometry, joint location, and color consistency.
Long Walls Need Joint Planning
If a wall dimension exceeds the panel length, do not simply divide total wall area by panel area.
You also need to decide how the wall will be segmented.
Color and Lot Planning
Exterior cladding should be reviewed as one coordinated finish.
For a large project, placing the primary order together can help simplify quantity and finish planning.
Should You Keep Spare WPC Panels?
For many projects, keeping usable spare material can be practical for future accidental damage, modifications, added penetrations, landscaping impacts, or repairs.
Fluted WPC vs. Shiplap WPC: Quantity Differences
Two walls with the same square footage can require different piece counts when the selected cladding profiles have different installed coverage widths.
The better question is:
“My wall is 300 sq ft. What is the usable installed coverage of the exact WPC panel I selected, and how does my layout affect full-piece usage?”
Should You Deduct the Entire Area of a Window?
Mathematically, yes, a large window reduces the cladding surface.
From an ordering standpoint, the answer is more nuanced.
If several full panels must still run past the opening and be cut around it, the opening may not reduce the piece count by as much as its square footage suggests.
Example: Two Walls With the Same Area
Wall A: 20 ft × 10 ft = 200 sq ft, no openings.
Wall B: 20 ft × 10 ft = 200 sq ft, but includes three windows, one doorway, and two narrow returns.
Even after subtracting the openings, Wall B may require a higher effective material allowance because it produces more cuts and shorter reusable pieces.
How to Create a Simple WPC Cladding Takeoff Sheet
| Item | Measurement |
|---|---|
| Wall width | ___ ft |
| Wall height | ___ ft |
| Gross wall area | ___ sq ft |
| Door area | ___ sq ft |
| Window area | ___ sq ft |
| Net wall area | ___ sq ft |
| Panel orientation | Vertical / Horizontal |
| Selected WPC profile | ___ |
| Usable panel coverage | ___ |
| Estimated full panels | ___ |
| Outside corners | ___ linear ft |
| Inside corners | ___ linear ft |
| Edge trims | ___ linear ft |
| Opening trims | ___ linear ft |
| Clips / fasteners | Per approved layout |
| Project-specific waste | ___ |
| Full-box order quantity | ___ |
Do Not Mix Different Profiles in One Calculation
If the project uses fluted WPC on the entry, shiplap WPC on the garage, and another finish on the rear elevation, calculate them separately.
Different profiles may have different panel widths, coverage, trim systems, packaging, prices, and clip requirements.
Sample Before Final Quantity Approval
Before ordering a large exterior cladding package, confirm the finish selection.
A sample can help confirm color, texture, profile, and the relationship to stone, stucco, windows, and steel doors.
Common WPC Cladding Estimating Mistakes
- Using gross wall area without subtracting major openings.
- Subtracting every opening but forgetting additional cutting waste.
- Using physical panel width instead of usable installed coverage.
- Ignoring panel direction.
- Forgetting gables.
- Forgetting short returns.
- Forgetting corners and edge trims.
- Estimating trims in square feet instead of linear feet.
- Ordering clips without checking support spacing.
- Rounding panel quantities down.
- Forgetting full-box requirements.
- Assuming all offcuts can be reused.
- Ordering different elevations separately without considering finish matching.
- Forgetting spare material for future repairs.
WPC Cladding Pre-Order Checklist
- Every elevation has been measured.
- Gables are calculated separately.
- Major windows and doors are identified.
- The exact WPC profile is selected.
- The actual usable coverage is confirmed.
- Vertical or horizontal orientation is established.
- Full-panel layout has been reviewed.
- Cut waste has been considered.
- Outside-corner quantities are measured.
- Inside-corner quantities are measured.
- Edge trims are measured.
- Opening details are resolved.
- Clips and fasteners are calculated from the approved system.
- Box quantities are confirmed.
- Minimum-order requirements are checked.
- Finish samples are approved.
- Delivery and jobsite storage are planned.
- Technical installation requirements are reviewed.
Frequently Asked Questions
How many WPC cladding panels do I need for 100 square feet?
It depends on the usable installed coverage of the exact panel. Divide 100 square feet by the confirmed usable coverage per panel, then account for the layout, cuts, waste and full-package quantities.
Can I calculate WPC cladding by square feet?
Yes. Square footage is the correct starting point, but a final order should also account for panel direction, piece length, openings, trims, waste, packaging and installation requirements.
Should I subtract windows and doors?
Large openings should generally be measured and considered in the takeoff. However, they also create cuts and trims, so subtracting their entire area does not automatically mean the material order drops by the same percentage.
Is 10% waste always enough?
No universal percentage works for every façade. Waste should reflect the actual project geometry, cuts, gables, openings, corners, panel direction and ability to reuse offcuts.
Do vertical and horizontal WPC layouts use the same number of panels?
Not necessarily. Even if the total wall area is identical, different orientations can create different cut patterns and piece counts.
Can I use the physical width printed on the product page to calculate coverage?
Only if the product documentation confirms that the physical width is also the installed coverage width.
How do I calculate WPC corner trims?
Measure the total linear footage of the corners that require the specific trim, divide by the available trim length, and round up to complete pieces.
How do I calculate trim around windows?
Measure the required perimeter based on the approved opening detail. A simple rectangular perimeter is 2 × width + 2 × height.
How many WPC clips do I need?
Use the installation requirements for the exact panel system. Clip quantity depends on panel layout and support spacing, not only wall square footage.
Should I buy extra WPC panels for future repairs?
Keeping spare original material can be useful because future availability, finish or production runs may differ.
Can I calculate two different WPC profiles together?
It is better to calculate each profile separately.
Plan the Full WPC Cladding Order, Not Just the Wall Area
A reliable exterior-cladding takeoff should answer more than “How many square feet do I have?”
It should answer: Which panel? Which orientation? How many full pieces? How much cutting? Which corners? Which trims? Which clips? Which package quantity?
That approach helps reduce two expensive project problems: running short halfway through installation and over-ordering material that cannot be used elsewhere.
USA Builders Depot offers exterior WPC fluted and shiplap cladding, matching trims, installation accessories and finish samples for residential and commercial exterior projects.
Before ordering, verify the exact panel dimensions, installed coverage, packaging, accessories and current technical information for the selected product.
For related guidance, see our WPC Exterior Wall Cladding Guide, WPC Exterior Wall Cladding Installation Guide, WPC Cladding Over Stucco, Brick or Concrete, WPC vs. Fiber Cement Siding, and our Exterior WPC Technical Resources.